
The Endeavour TrawlerCat 48 is a tall boat. It’s around 17 feet from the water to the flat top of the skylounge roof, with anything on top of that obviously making it worse. That flat roof is around the same height as the top of the anchor light was on the Meridian, for comparison. With harsh bridge restrictions on the great loop (19’6″ maximum bridge in Chicago, for example), from the moment we considered buying this new boat, we knew we’d have to get creative with how to put stuff on the roof and still fit under things.

The boat came with what I’m pretty sure was the original factory mount and electronics setup — a 2008-era Raymarine radar dome, a Glomex analog TV antenna booster, and a non-LED light. It was, at least, on a folding tower, so you could lower it out of the way of bridges. However, the wiring was pretty questionable — they basically just cut a big hole in the roof next to the mount and then ran the wires into the interior from there, rather than running it through the tower itself. I basically decided to eliminate every aspect of the factory setup and start over from scratch.
From the final internet and instrument setup on the old boat, as well as some new toys I knew I’d end up buying, I knew roughly what I wanted to put on the new boat:
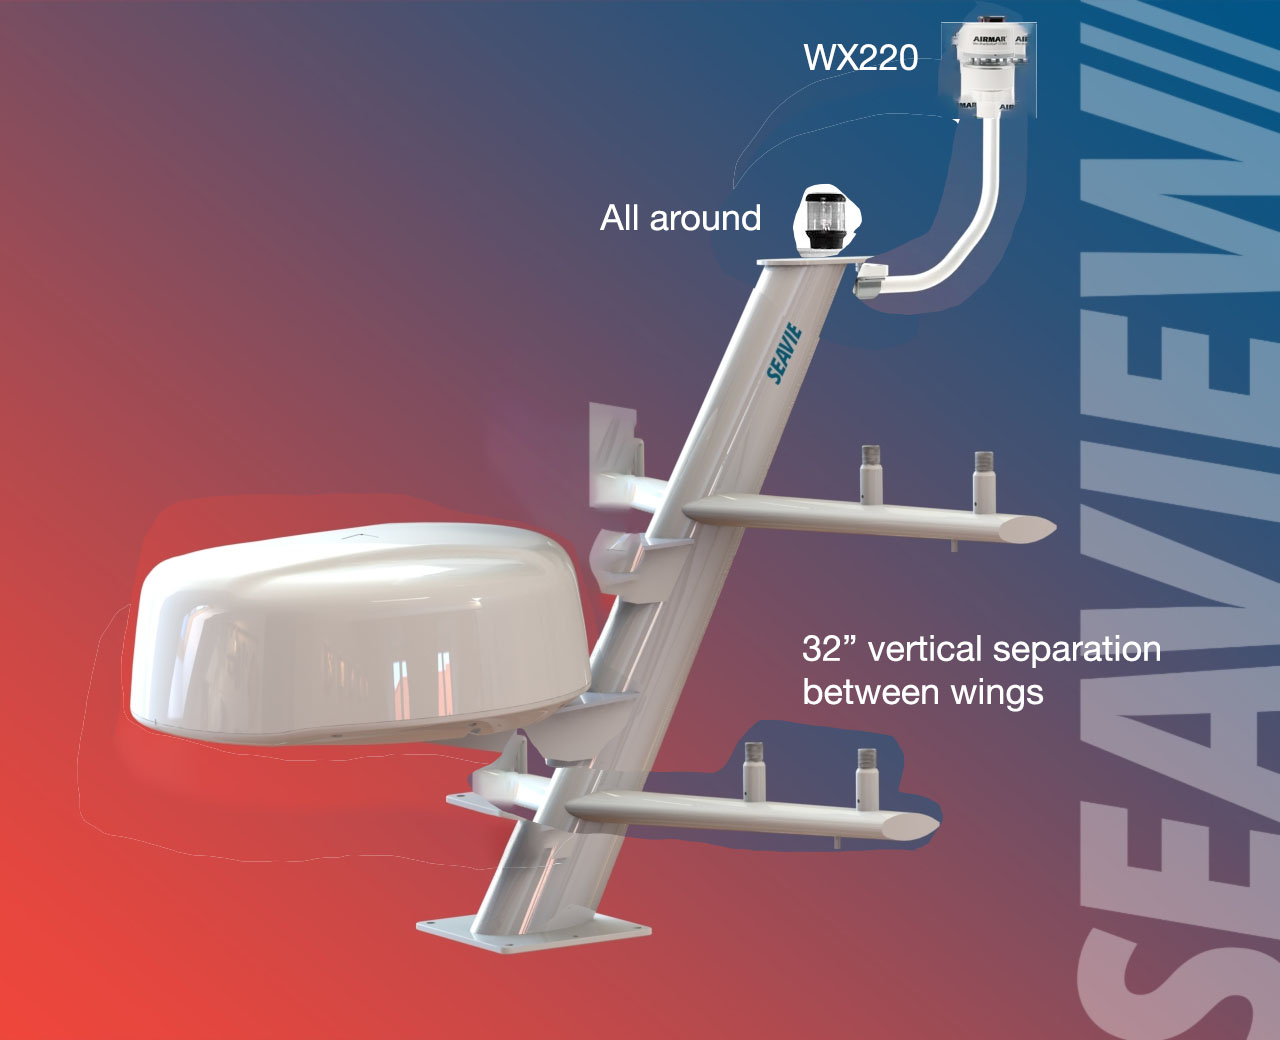
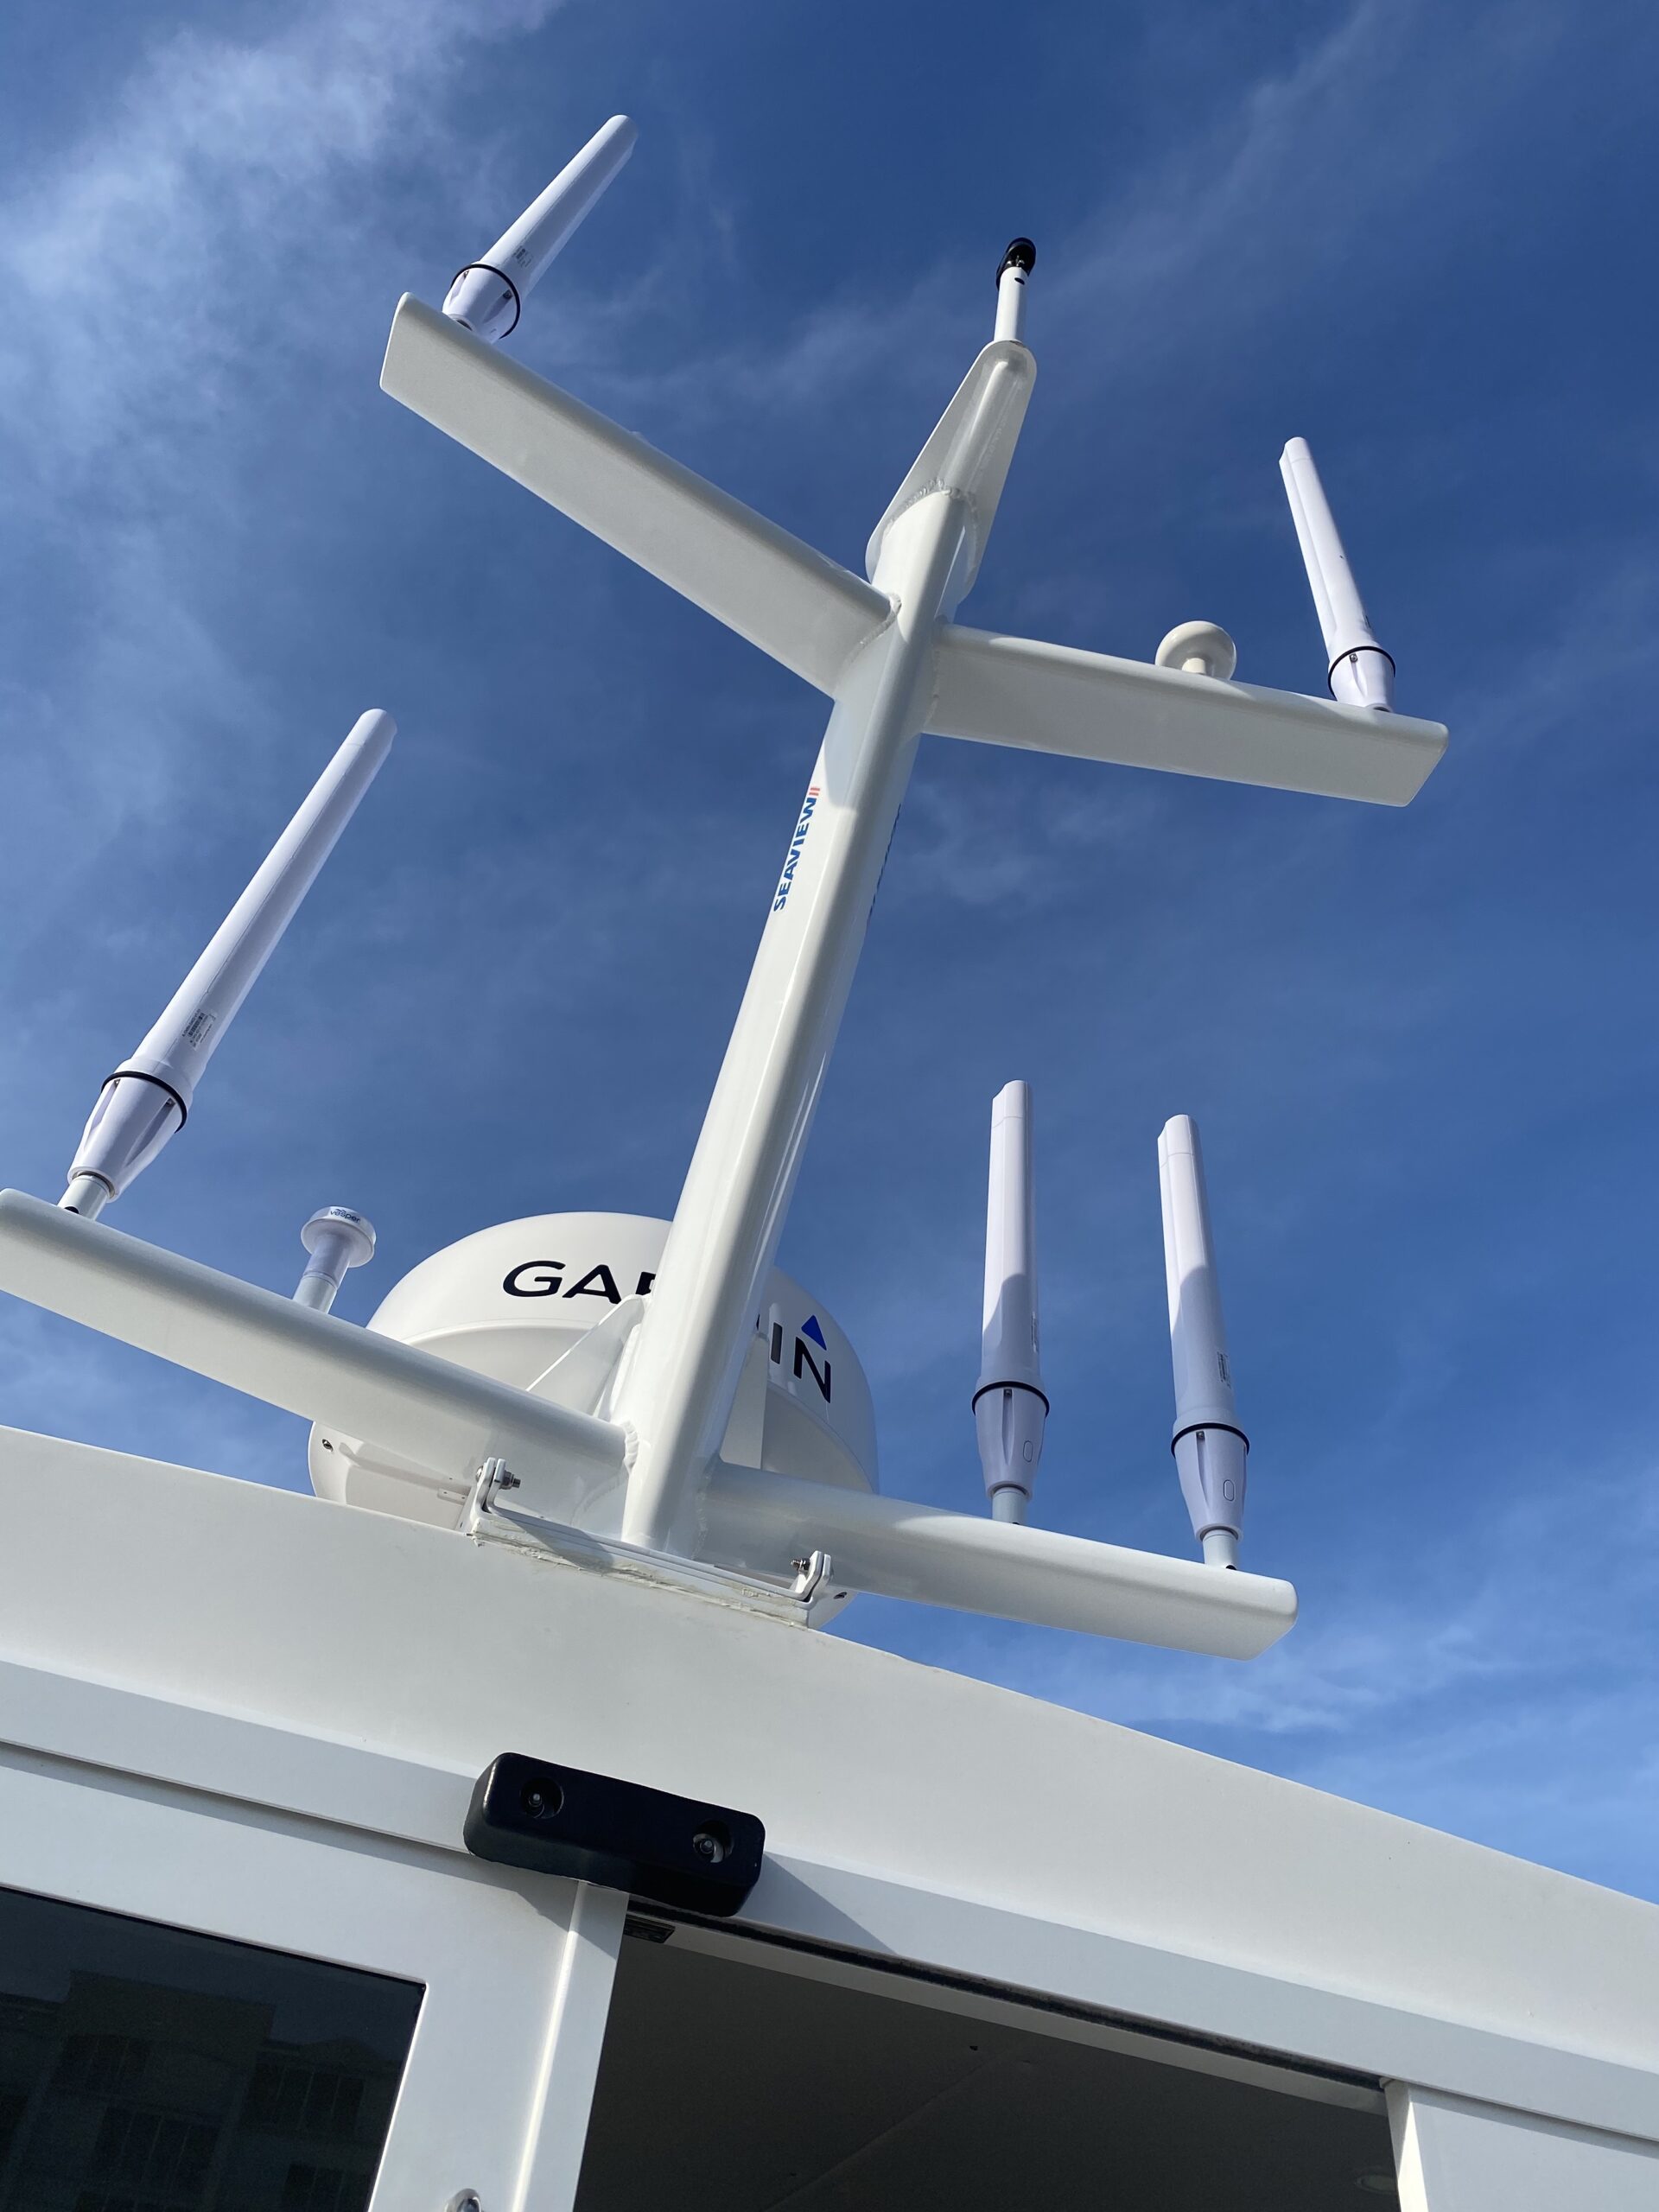
- Three Poynting 402 LTE/3G antennas
- Two Poynting 496 2.4/5Ghz WiFi antennas
- Airmar WX220 ultrasonic weathervane
- Vesper Cortex GPS (dedicated GPS for the AIS system)
- Shakespeare SiriusXM Antenna (could also put it on the roof somewhere else, but I want as much room for Solar as I can manage)
I poked around at a bunch of SeaView options, since they seem to be the only real game in town for larger-scale instrument masts, but really nothing off the shelf fit my bill. However, I noticed a custom build section and said why not give it a shot, figuring it’d be crazy expensive.
Within a day, Jason at SeaView had gotten back to me, and to my surprise, based on my rough description, he actually gave a surprisingly affordable early price estimate that made it worth proceeding. I professionally mocked up a rough idea of what I wanted, based on the other legos they had on their site, and he went to work.
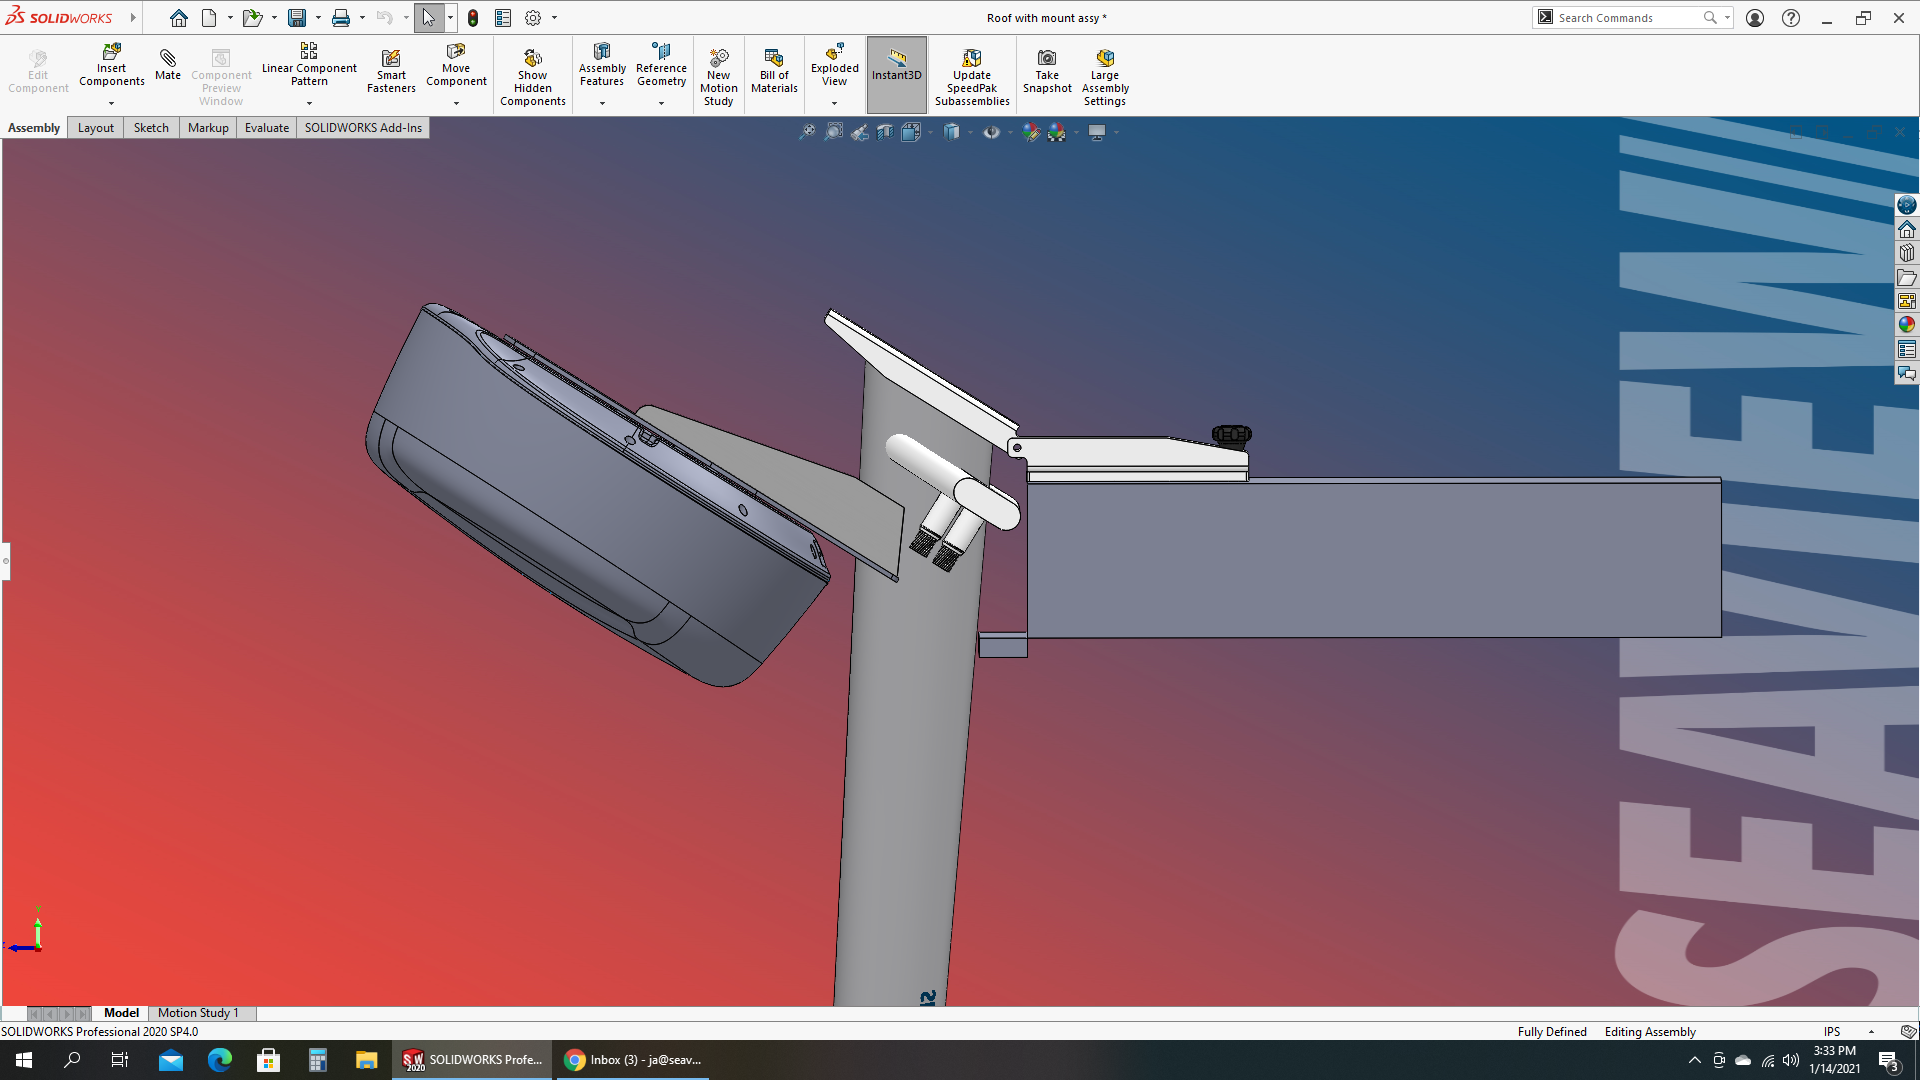
A couple days later, some neat looking CAD mockups showed up:


From there, I took some more careful measurements of the back of the roof, since he said he could easily guesstimate how far things would be able to fold, and if we should adjust the design to compensate.
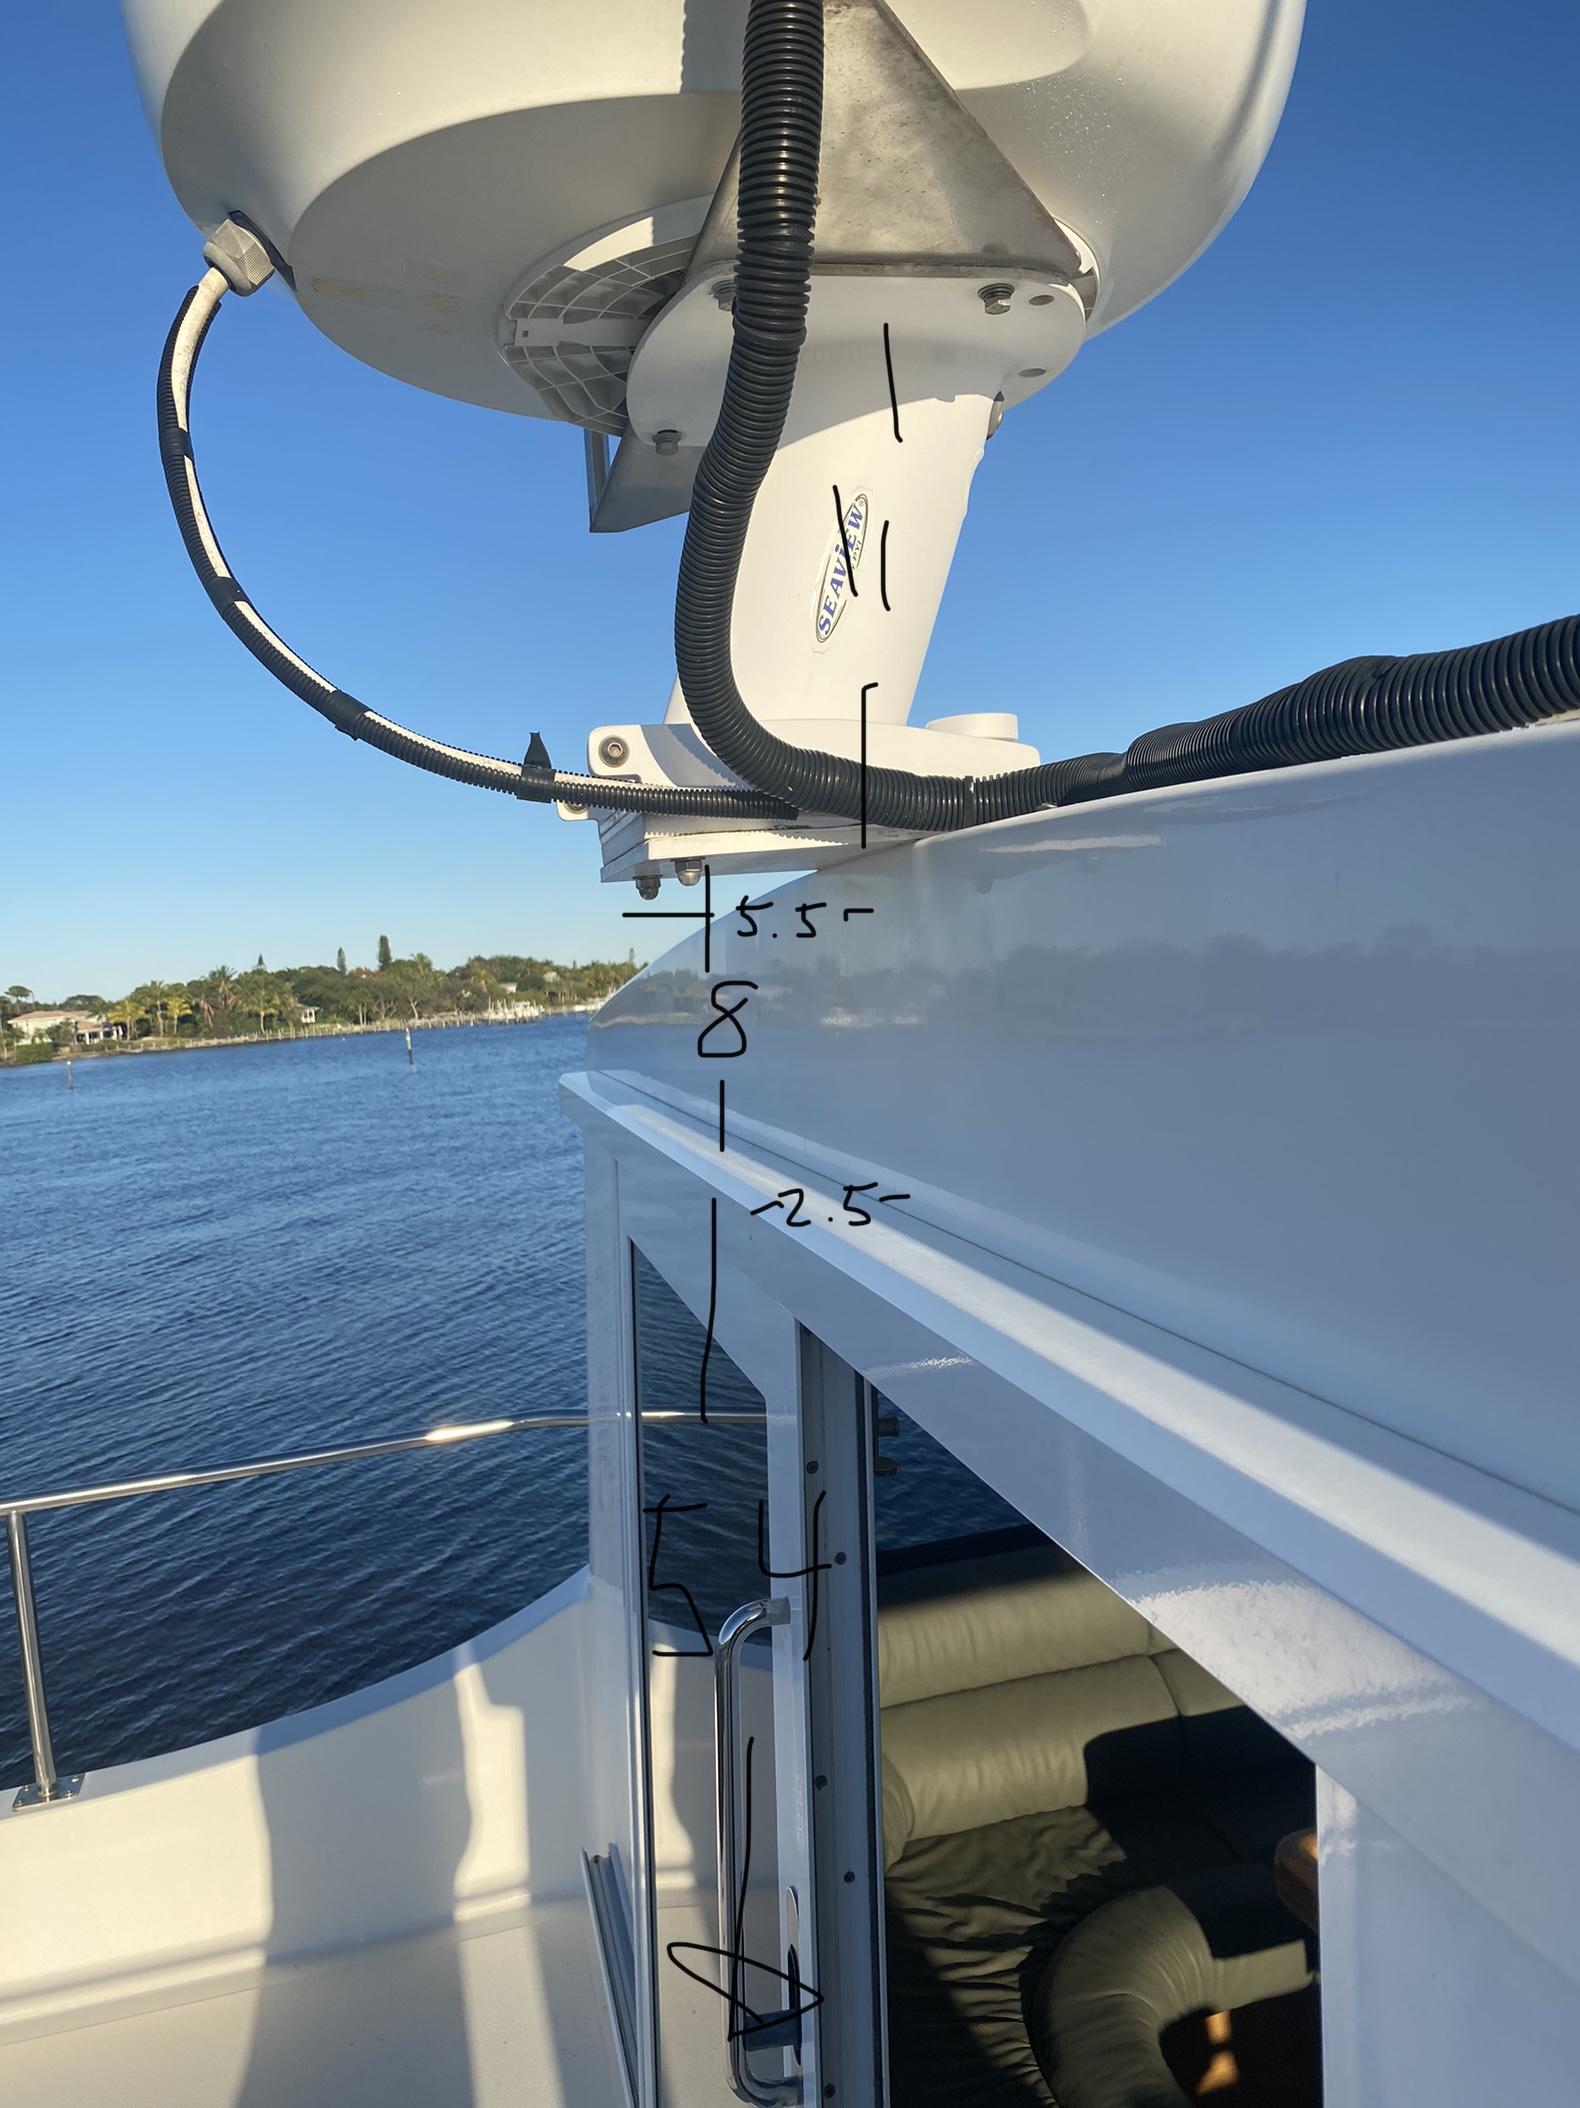
He did some math, determined that it was going to stick up a fair ways, and we iterated a bit more. We lowered the sweep angle of the “wings” such that it’d be able to just clear down to the sill above the door — the best we could possibly do.
At this point, it looked awesome, and we gave the goahead and put down a deposit. 5 weeks of leadtime started then. This was all done from the rental house on Key Largo, well before we moved onto the boat, since we knew it’d have such a long lead time. So we got started ordering all of the various antennas that’d go on top, and went back to sipping margaritas every night.
Fast forward 6 weeks, and about half way through our stay at Cocoa, a pallet shows up (which YRC unceremoniously drops in the street and drives away without calling us):


We unwrapped it and got to work! The first major job was disassembling all of the old stuff and patching any necessary holes from that job. Hannah loves what I did to her yoga space all month. Also, when we went to actually remove the old folding mast, it was on what turned out to be a painted solid fiberglass plate, which must have been 5200’d down to the roof, because it took a pretty good chunk out of the gel coat when it finally pried loose. The sledgehammer was clutch for this and Hannah couldn’t believe how hard I was wailing on the damn thing.


With impending possible rain and the day waning, we decided to not be too ambitious for the day and just go for getting the plate mounted up.
A week prior, I’d ordered a foot square 3/8″ thick aluminum plate to be the backing plate for the new mast, knowing that the roof wasn’t all that thick, was just cored fiberglass, and just had some flimsy wood on the bottom to space off the roof panels for wires to run. So with the mast finally here, I took some rough thickness measurements and brought the top plate over to the hardware store, and ended up buying some 1/2″ diameter countersunk bolts and matching fasteners.
Hannah and I spent a while measuring and cutting the appropriate holes in the aluminum plate, then we roughly lined up where the folding panel would go on the roof, marked the holes, and proceeded to drill half inch holes straight through the roof. After some tweaking, the plate looked like it’d mount up well, so then we took the 2.5″ hole saw and slowly cut a huge hole through the roof right in the center of the plate. Not stressful at all.
At this point, everything looked ready to go, and so we pulled out multiple tubes of 4200 and 5200 and frantically started our work. We coated all of the exposed fiberglass with 5200, filled in all of the wiring and screw holes from all of the things we took off with the old mast, and then lined all of the new area that needed sealing with a tube and a half of 4200. We had no time to take pictures of this part, unfortunately, and we were also covered in 4200. We threw the new plate on top, quickly bolted it down to the aluminum backing plate, just as it was vaguely starting to stiffen up, and stood back to clean up and admire our handywork.


Rain was predicted later in the evening, and we were pretty exhausted, so we called it for the day and went inside to other projects.
The next day, we resumed work. We figured we should do some more final test fits at this point to see where we’d landed. We’d done some really rough “hold the heavy thing up to the wall and see how we feel about it” checks that seemed fine, and, fortunately, they held up under final prototyping.


CAD is neat. Even though I’ve been a software engineer for most of my life, and the process, decomposed, is thoroughly uninteresting at this point, it’s still sometimes amazing when you can give someone some rough napkin calculations over the internet and they can get something calculated and fabricated that lands within millimeters on your handbuilt boat. Everything looked great, so it was time to get down to the dirty work of actually building the mast.


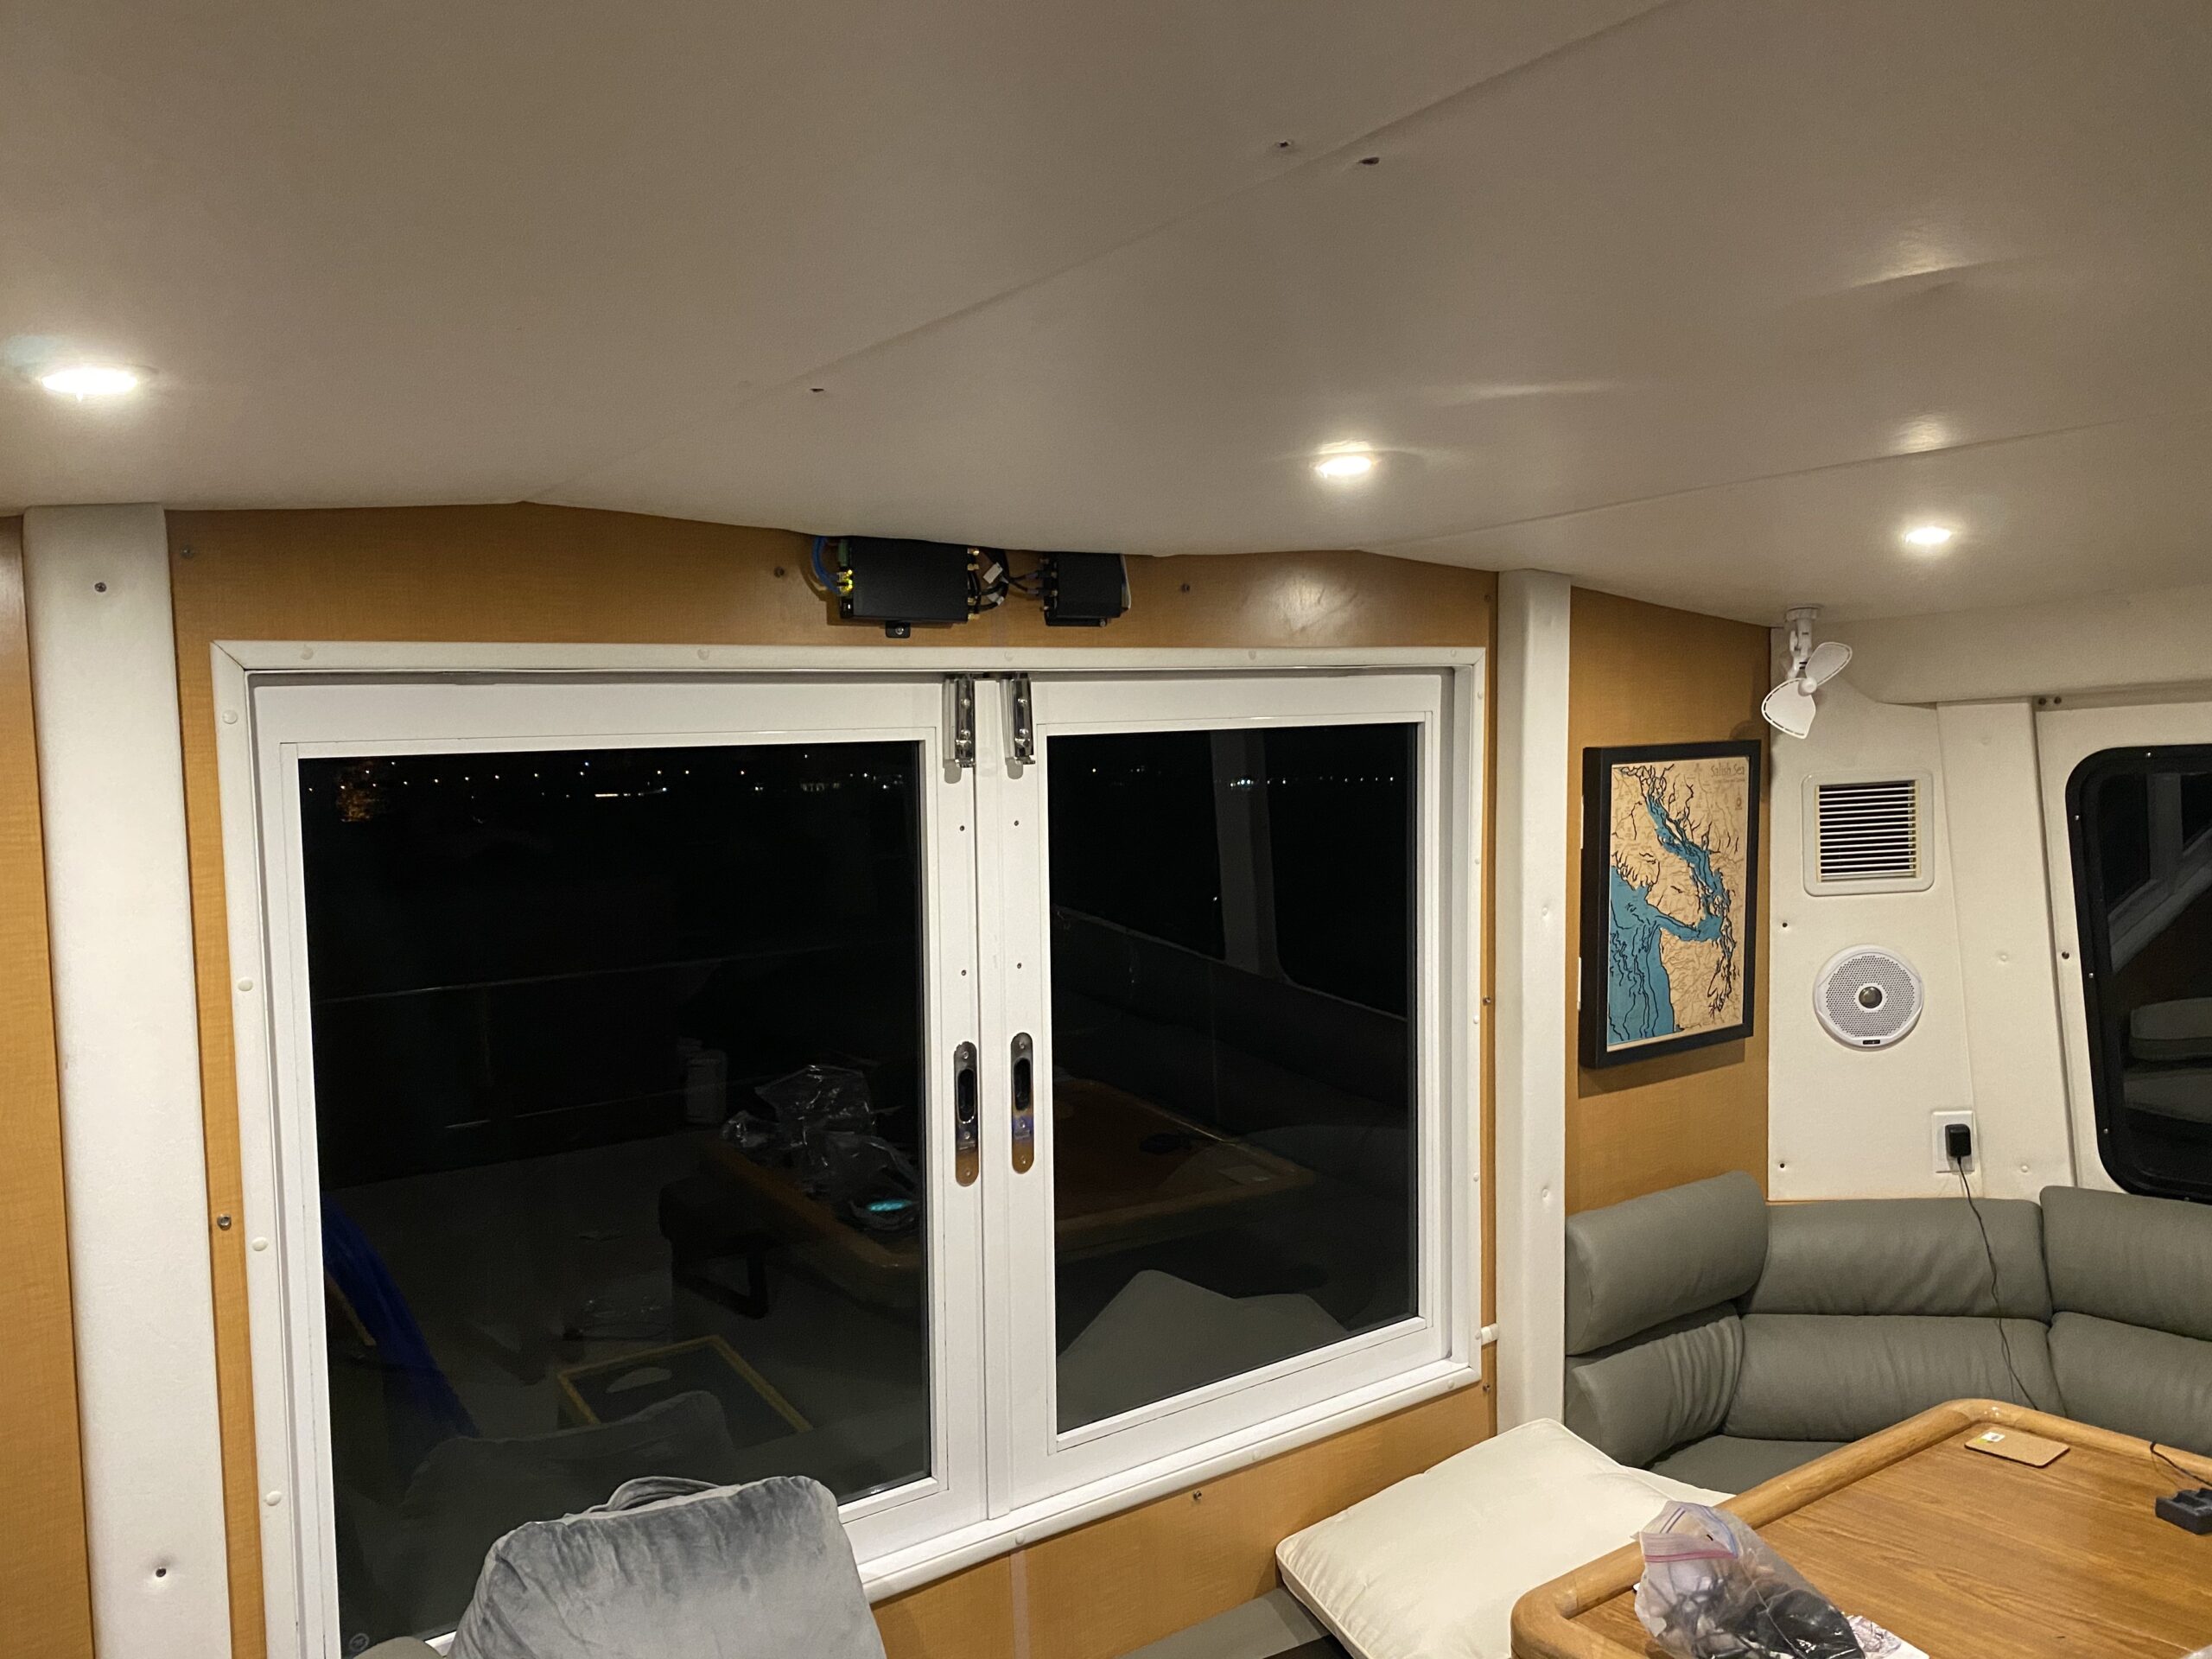
Boy did that turn out to be an unexpected pain in the ass. The outside of the mast looks lovely, but of course the inside has sharp edges and corners and support structure that make running wires through it a chore. It took us nearly two hours, and we both sunburned the crap out of ourselves since we kinda lost track of time in our annoyance, to get everything mounted up and wire-fished through the beast. And when it was all together, we had a nice rats-nest-of-the-gods that we had created for ourselves. However, at this point, it was just an awkward game of muscle-ups to get the assembled mast, now twice the weight, up onto the hinge, and bolt it all up. Of course, we discovered that the antenna arrangement I’d picked meant that, at full droop, the LTE antenna tips JUST touched the ground, so Hannah got to hold it all up while I ran the cables into the roof, since it couldn’t rest there. Measure once, cut twice, or something.

It looked great! Just one problem.

Hannah was now able to go read a book while I spent hours running and cleaning up wiring, and testing the results.


This whole time, I’d been very nervous about the hinging process itself, since the size and location of things meant that the cord moved almost a foot through the tube when the mast went up and down. With no room in the ceiling, it was going to to be a challenge to make it so that we could raise/lower this thing several times a day in Florida and then every so often past that, without eventually snagging a wire on something in the ceiling and making for a very expensive and time-consuming problem. I decided to try out using braided plastic sheathing over the section of wire that would slide in and out of the roof hole, and spaced off the roof panel by a little over an inch, to give a little bit of play for the cables to live in. Some early testing looked promising, so, at the end of the day, we put the roof panel back up and had a drink.
It looks a tiny bit awkward if you’re really looking for it, but it’s pretty hard to notice otherwise. I’ll probably tweak it over time to try to make it a little more flat across the roof, but I’m incredibly pleased with how well it all came out in the end.
We finished off the project by ordering a rubber stop for the mast to touch down against and keep the antennas from hitting the floor while everything is lowered, and it worked out perfectly.
Hannah’s already had to raise and lower it for a bunch of the bridges coming up through Florida, and it’s worked like a charm. So, cross our fingers, maybe this project is basically all done, at least until the next gadget catches my eye…
I am just fascinated and so impressed with every project you two do! I deactivated my FB account, so i love the blog posts you each write and send. Love it! 😁