NOTE: This post has been left for posterity, but there’s an updated internet setup post for 2023. If you’re arriving here from a link, you probably want to skip to the newer stuff.
Warning: Nerdy informational post. Skip if you just want to hear boating stories.
We’ve been using the Cradlepoint, Rogue Wave, and WirEng setup for the last ~2 years on the boat, and while most of the time it’s been functional, we’ve basically constantly been fighting issues. The Cradlepoint requires manual intervention to switch between providers, the Rogue Wave basically never connects to marina wifi, and the WirEng antenna seems to not be very omnidirectional, so it changes signal drastically as we spin in anchorages. We’ve basically had nearly a year on the boat periodically apologizing during work calls for dropping seconds of audio periodically. During COVID, lots of people have bad internet, but at some point this is going to be a problem.
Knowing I wanted more antennas, as well as more solar, while we were in Maine this summer/fall, we had the bimini canvas modified to add velcro patches so we could move the solar panel setup over from the hardtop, freeing up tons of real estate for antennas, while also doubling our wattage. Since then, I’ve been on-and-off researching options for a couple months. I’ve been leaning toward switching over to a Peplink router, and had still been trying to decide how complicated of a setup to get, other antennas to try, etc., when Hannah ran across an article on SeaBits about his 2020 internet setup. He had a ton of details on his Peplink-based setup, and had tried a bunch of antennas. I exchanged a couple messages with him, posted a little on the Peplink forum, and after a bunch of research, hemming, and hawing, I decided to try a “cheap” version of his setup.
In the past, we had Verizon and AT&T SIM cards in the Cradlepoint that we’d switch between. I wanted to, instead, support at least both of those connections simultaneously, as well as possibly adding TMobile on top. Peplink has a whole slew of different routers available, supporting everything from a single CAT6 modem through to a 6500$ unit with four integrated CAT18 modems. I decided to hedge some of my bets and went with the MAX Transit Duo CAT12, which has two integrated CAT12 modems, for 1000$. The router also supports integrated WiFi-as-WAN, so you can pull in marina wifi and treat it just like another internet connection like the cell modems. It also has a single WAN port, allowing me the flexibility to add another single cell modem and use that as yet another connection to share, which I ended up using in the end.
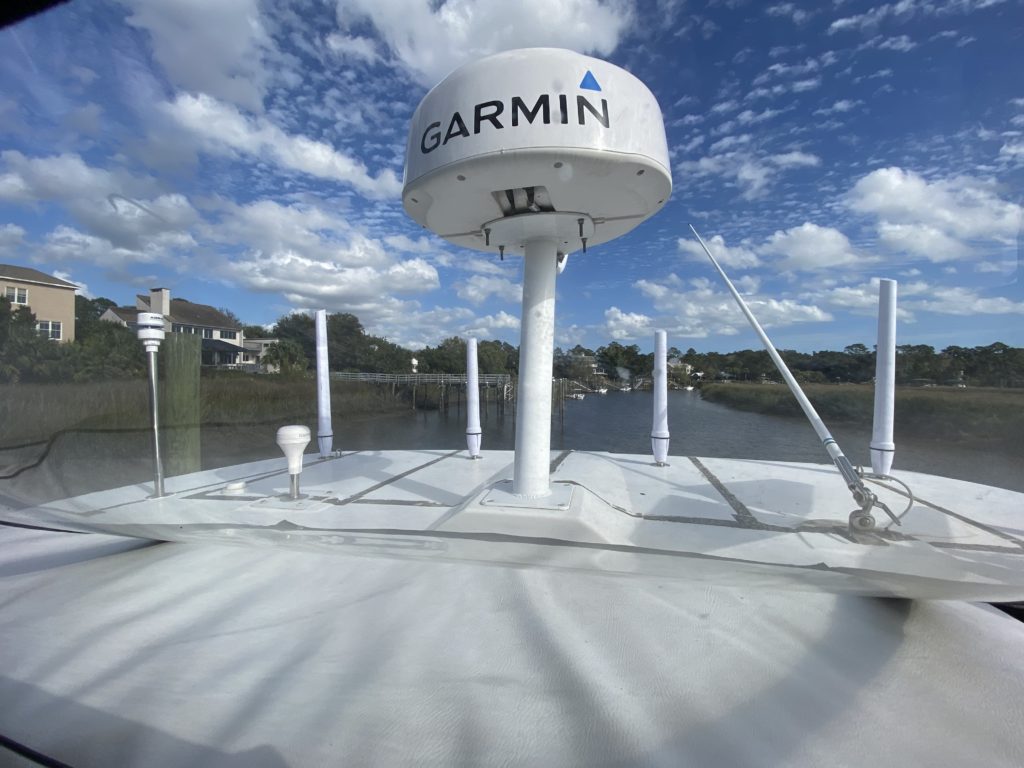
I picked up two Poynting OMNI-402 2×2 MIMO LTE/3G antennas, which were the SeaBits suggestions, to support two CAT12 cellular modems. They don’t have quite as much posted gain as some non-MIMO antennas, but they effectively pack two fairly-high-gain antennas per unit, in a nice weatherproof package, with integrated cabling, so it should work even better than the GigaMIMO under 95+% of circumstances.
Next, I grabbed two Poynting OMNI-496 2.4/5 dual-band WiFi antennas. Again, these were the SeaBits suggestions. The Poynting antennas have a great marine mount, have sturdy weatherproof packaging, and very good omnidirectional characteristics. So even though they aren’t the best peak gain of all available options out there, in real-world usage they seem to hold up better than anything else.
The interesting revelation that SeaBits had that kicked me over the edge was that he actually mounts the router very close to the antennas, letting you use very short cables (less signal loss/noise). Then you run a CAT6 cable and power cable into the boat to a simple switch (Trendnet 8 port industrial) and wifi access point (AP One Rugged) to actually distribute the internet to devices inside the boat. Separating the purposes like this means that you don’t need to fish a bunch of 30 foot cables from the antennas way down into the boat, with a bunch of noisy crosstalk with other signal cables the whole way. So even though I have way more wires total in play now, the actual arrangement throughout the conduits of the boat is way simpler.
Fishing the four antennas through the hardtop was awkward, since Meridian really didn’t build the thing intending for you to send wires through it, but once we got all the cables through to the center of the hardtop, it was gloriously simple to hook everything up. The router is a nice compact little rectangle with sturdy connectors and a nice removable power junction block. I put everything together, and magically it worked right out of the box. Both cell connections worked simultaneously, and I connected right up to the wifi of our friends’ house we were staying outside, and started setting up all kinds of routing rules.
Finally, a few days later, after validating that this setup was working well, I took our old MOFI4500 backup router, and hooked it into the WirEng GigaMIMO antenna that we hadn’t been using for the last week. After disabling wifi and a bunch of advanced settings, I stuffed a new TMobile unlimited SIM into it, plugged it into the WAN port of the Peplink, and immediately we were getting internet off all 5 sources (2 wifi, 3 cellular)! After testing this new setup, I hardmounted power to that as well, and now everything was nicely secured inside the hardtop.
Testing the final setup tonight from St. Augustine, I was able to pull 139 megabits down, with the laptop using wifi! And for days now, video calls have been rock solid, using the SpeedFusion Cloud redundancy setup, where it sends packets over multiple connections simultaneously and merges them in the cloud. For around 2300$ total, this setup is a huge step up from the old one, for less than half of the cost.
That’s a quite impressive system, and the gateway to being digital nomads. If you work in a field that requires always on connectivity and a failure is noticeable to your clients, the loss of even a little future work is more than the cost of this set-up.
Now, your clients needn’t even know you’re on a boat on the Atlantic seaboard unless you volunteer the information.
Also, Netflix!
(Queen’s Gambit was *excellent*…..)
Sweet! A nice interim solution until Starlink mobile hardware gets offered.
Yeah, based on the understanding that’s trickling out from the beta testers, I’m less confident that starlink hardware will be marine-ready in the next year, so it was worth dropping the money to get a reliable setup for the next year+.
Glad the new Poynting antennas are working well. I think you’ll really enjoy not having to mess with it as much as any of the previous systems you were using. I’ve been continually impressed with the performance of their antennas. I’m also super happy at their really good marine mounts and beefy hardware – it’s about time the marine industry got an affordable, marine-purpose-built antenna!
Definitely! I’m glad you write it all up so convincingly. I was nervous about switching from our 3400$ “18db” antenna to these, and yet, these are more consistent, and were able to reach way offshore when the big antenna had no idea. So, we’ve thrown nearly this exact setup on the new boat, just going with three of the 402s, a max transit duo, and a br1 mini for the third cell card.
Hi David, not related to this topic, but was wondering if you had gotten the capacitive moda sender to Cerbo GX conversion to work with the yacht devices nmea2000 tank interface. I am facing the same situation and am looking for a solution to use the installed MODA sensors to n2k.
thanks
Adrian
Hey Adrian. I did not get it working with the Cerbo GX directly. I believe I even posted somewhere asking if it were possible, but it only can do resistance-based right now. I just used the yacht devices tank interface directly to n2k and calibrated them with N2k commands (didn’t bother with the sd card thing). It’s working great!
Thanks David, so you used the capacitive sensors directly to the YD interface ? Could you send me a diagram (if you have it) on how you hooked it up ? I know someone wrote an extension to the Venus OS for the Cerbo to act as a n2k tankrepeater, which could use the n2k data generated by the YD to display on the cerbo
If you plug your VE-Bus from the Cerbo GX into n2k, then you can get all the n2k tank info from the network onto your display. So we see the holding tank levels if we scroll through to the tanks screen, as well as all info from the victron network gets shared to the N2k and I can see charge states from my helm on the Garmin plotters.
Yeah, I just connected the MODA sensor directly to the YD. I don’t have a diagram, but the one awkward thing I had when hooking it up was that the reference positive voltage on the YD is actually an INPUT for them to calibrate against voltage levels, not an output. So I ended up having to run power to the MODA sensor separately, and then just using the high/low sensor lines to the YD. After that, because the MODA ramped based on input voltage, I ended up buying the cheap regulators from tankedge to put on the power connection, to keep it at a solid 9V or whatever weird number it is that it wants.