Note: This post has been superceded by an extensive newer post going into the details as the system has evolved over time.

Around the time we decided to buy the Endeavour, I had come around to the idea that, if we instead committed to sticking with our old boat, I was going to have to redo batteries to non-lead-based technology of some sort. I was tired of always running out of power, managing/timing generator runs, carefully running as absolutely little as possible, timing showers to after we made a travel hop, etc. and wanted a change for our next year+ of east coast cruising.
When we looked over this Endeavour, in the electronics cabinet I found mostly original equipment with a few awkward slightly newer pieces thrown in. I quickly came to the conclusion that, if we bought it, it was a good excuse to do a complete writeoff of what it came with, and go nuts with something I’d be really happy with for years.
A couple weeks before we looked at the Endeavour, Kevin @ Airship posted a fantastic blog post talking about their power system. They’d been working on it over the last year, and were finally pretty happy with it. They had decided to do what most boaters consider pretty crazy — run 100% of their AC power through inverters. I’d been contemplating a system like that for a while but it seemed like absolutely no one did it, so it had been simmering on my back burner throughout 2020. However, when this article came out, it validated all of my beliefs about a modern power system for uses like ours:
- Lithium really does live up to the hype in liveaboard boating usage
- Heavily load your generator if you’re going to bother starting it — running a 9-12kW generator and pulling 1kW slowly charging batteries is inefficient and bad for your generator
- Run everything through inverters and use power boost as needed if shore power isn’t enough
- Get to a place where you barely have to think about power on the boat anymore
Throughout 2020, every day we weren’t plugged in at a marina, power was a foremost concern and dictated much of our scheduling. When are we going to generate so we can time our showers around the limited duration hot water? Are there people around us? Crap it’s 8pm we should probably not generate at this point, but our batteries are getting lowish so we have to either go to bed early or just read books or whatever to avoid using too much power overnight and drawing the batteries down too low.
Early in the trip, the mental load of managing all this was a little fun, even though we were already used to it from before we came out east. To semi-quote JFK, we don’t do these things because they’re easy, we do them because they are hard. But at some point it’s basically just an algorithm and it gets old to manage. So I decided I was done with it.
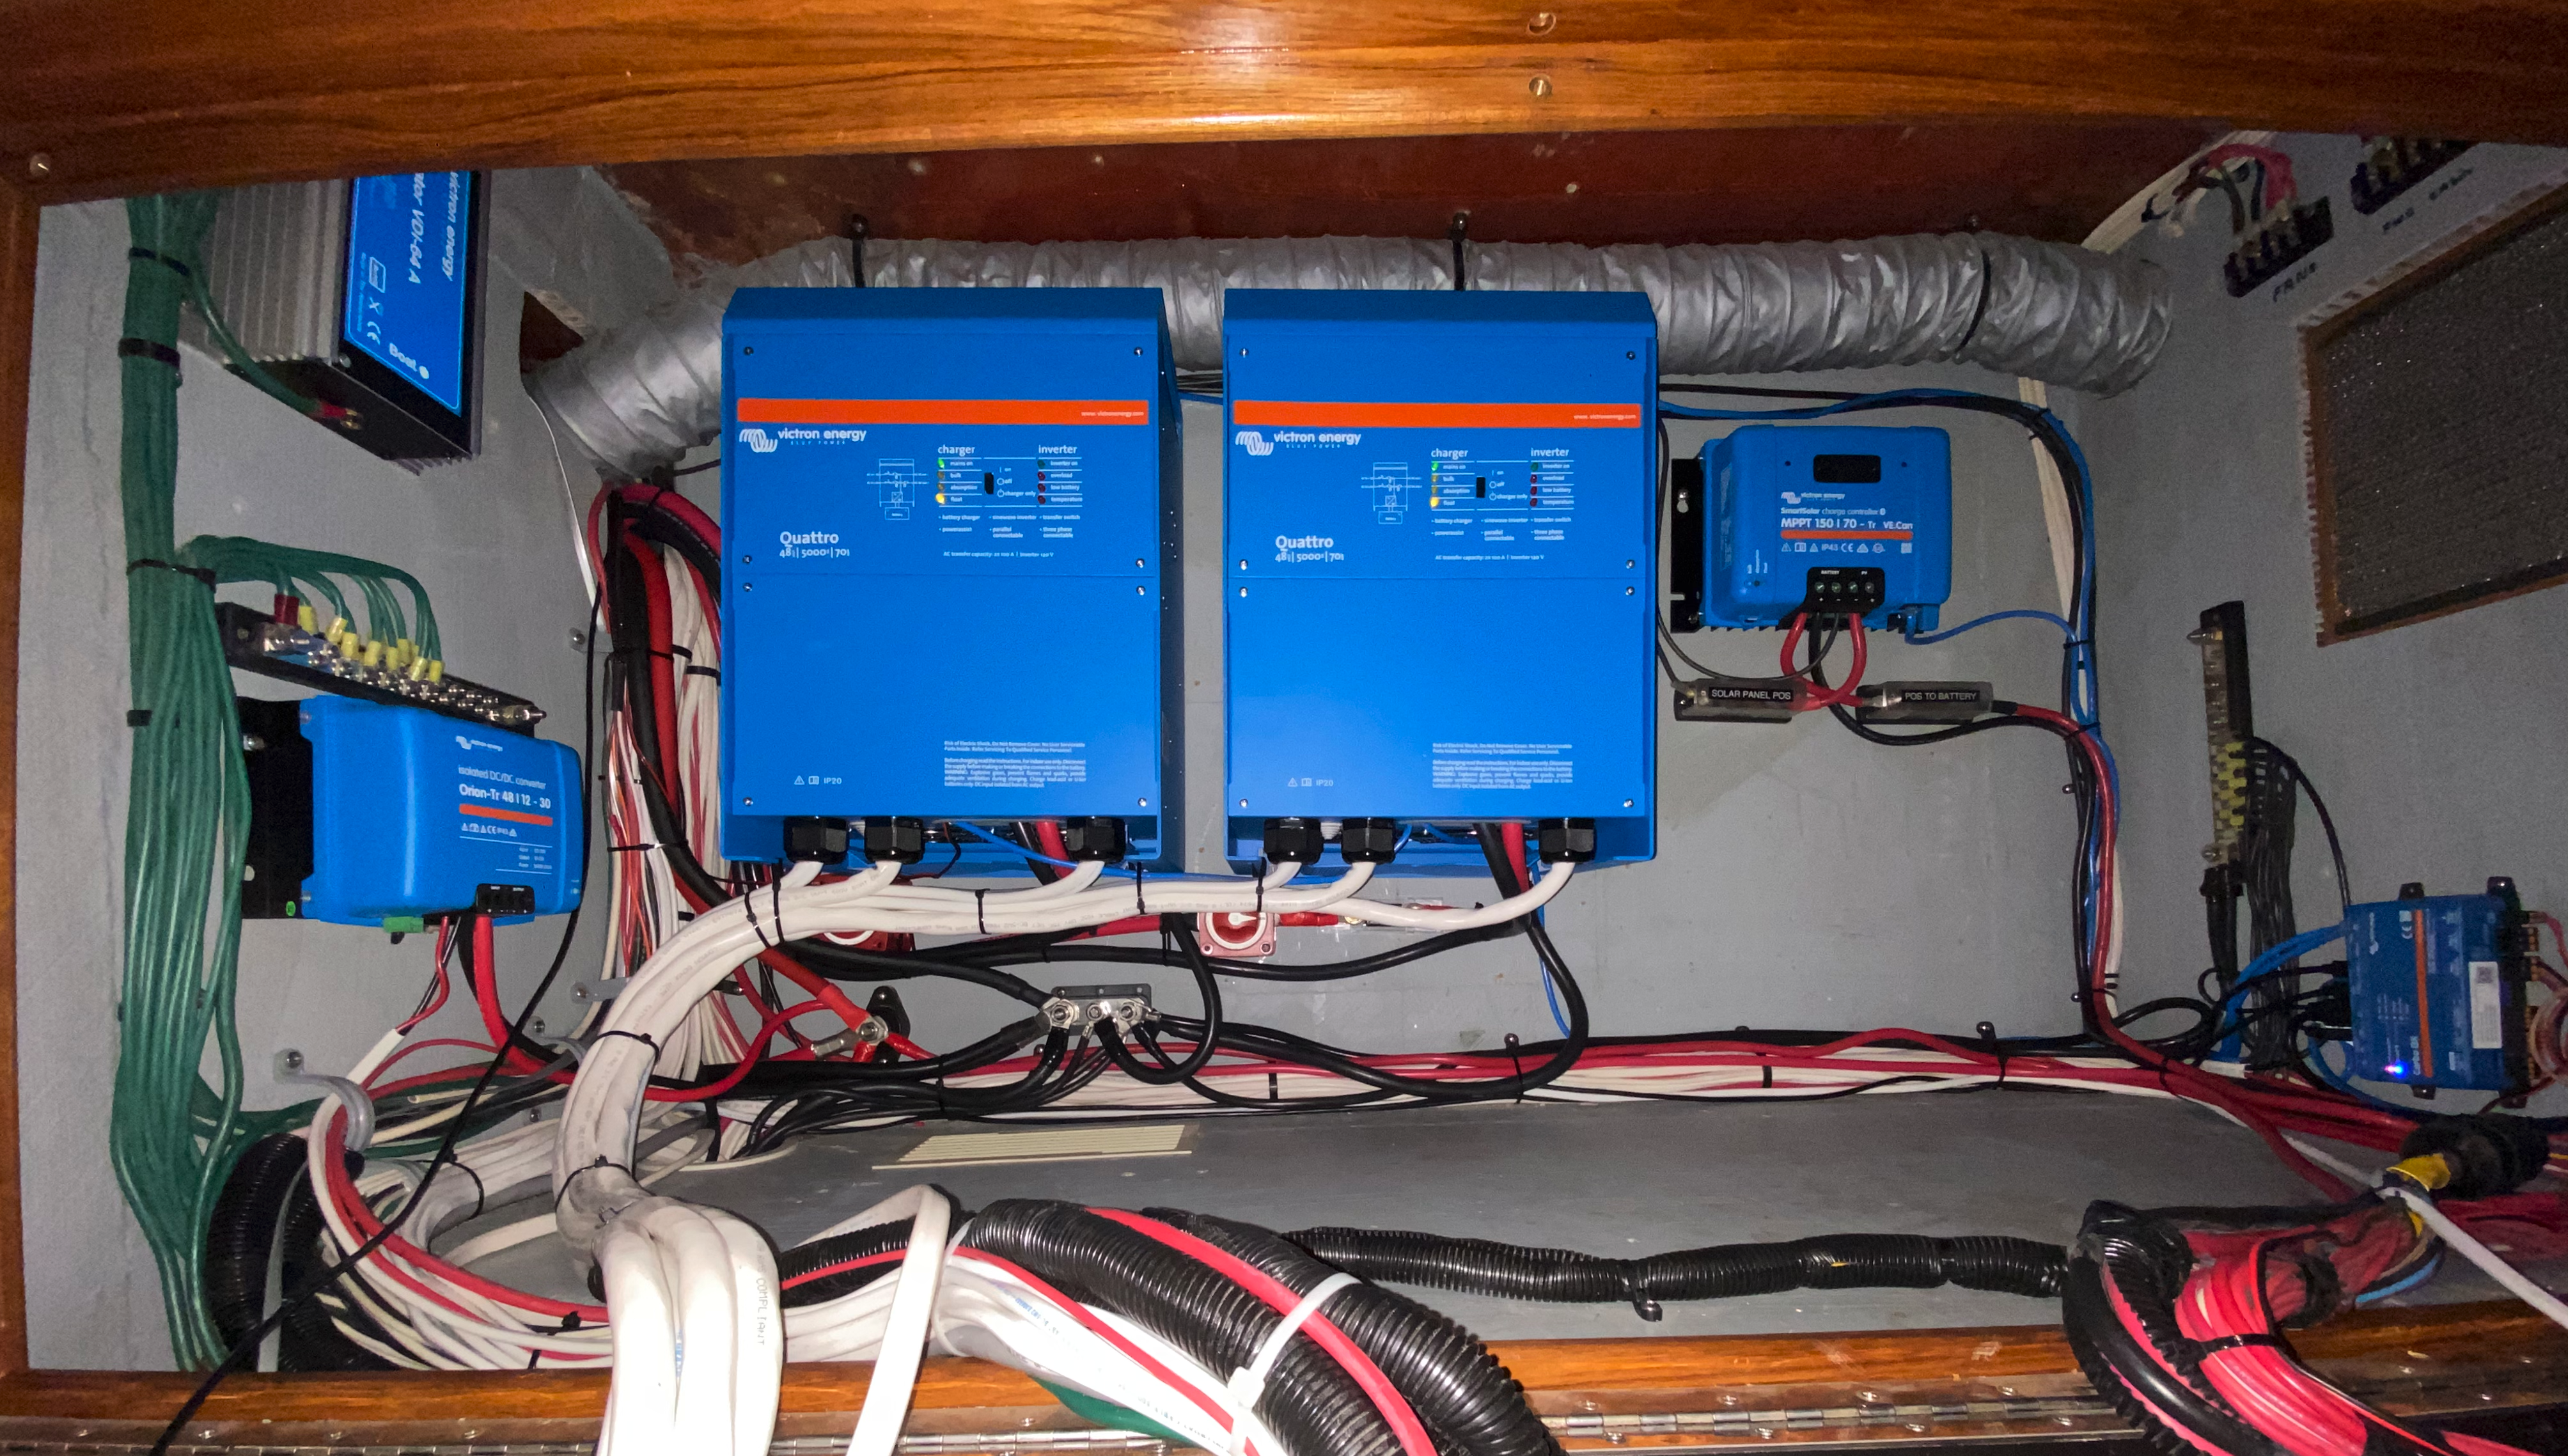
Victron Quattros
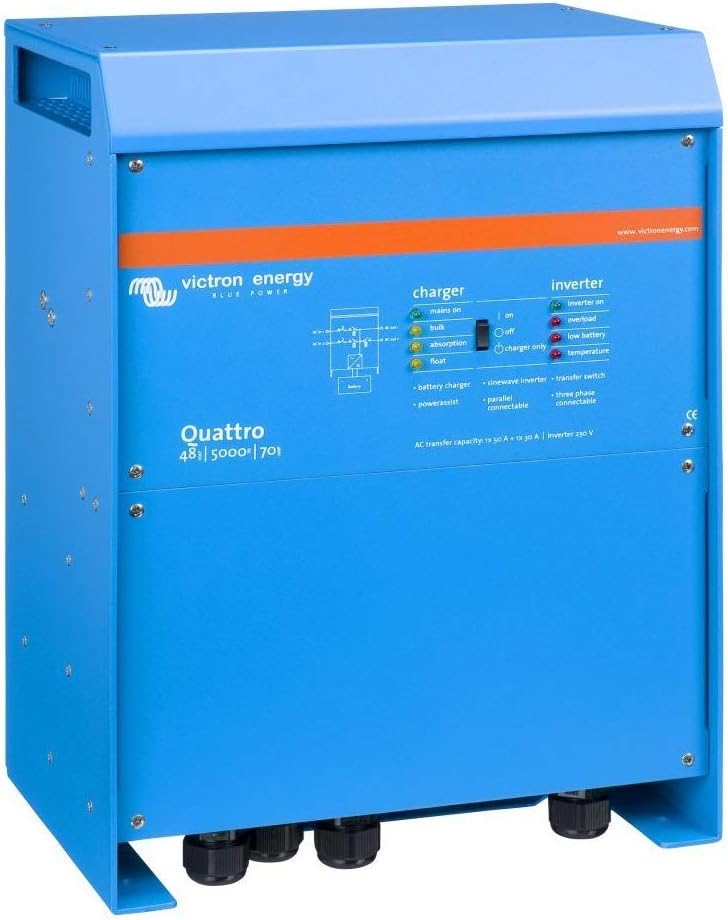
The Slowboat article led me to a newer suite of products from Victron called the Quattros that are a bit of a godsend for this sort of marine off-grid system. These actually go above and beyond the standard age-old inverter/charger combo unit. There’s two AC inputs, so you can put your generator in one, fix the current limit (50A for us), and then plug the second one to shore power, and, from a monitoring panel, easily update the current limit depending on whether you plug into 50, 30, or even 20A at a marina. Then it would use whatever power source was available as input.
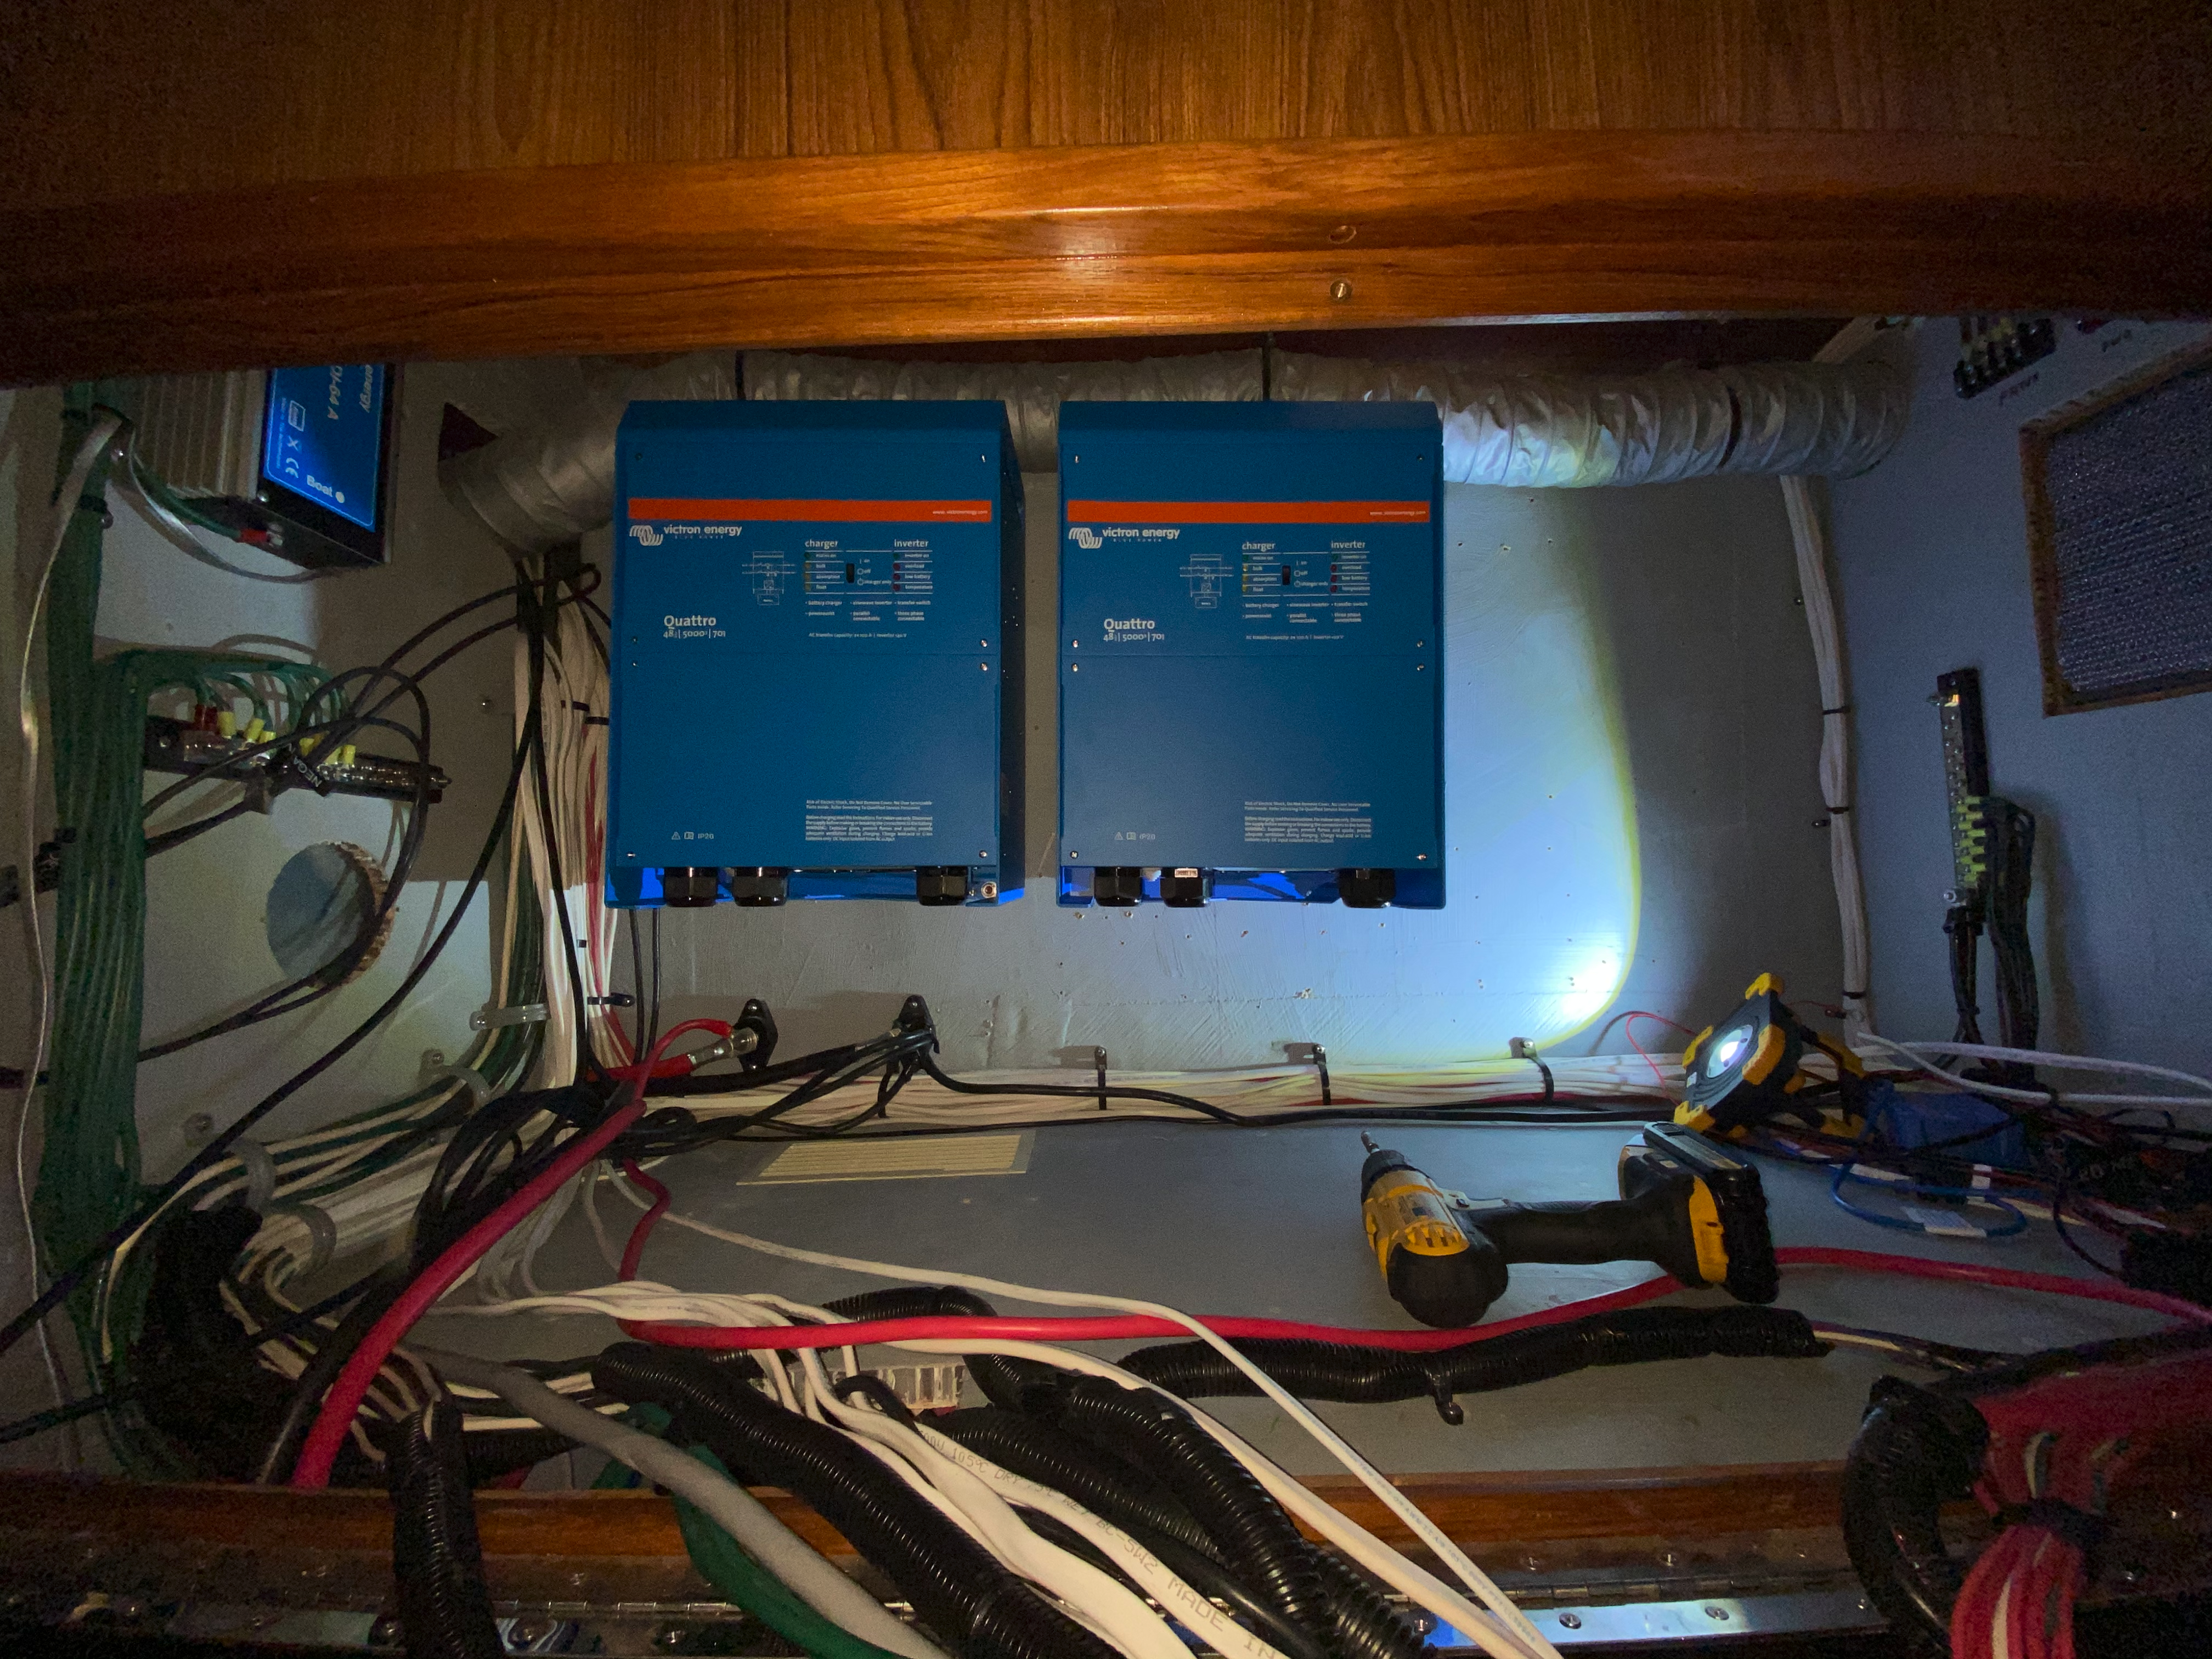
Our boat has one 230VAC device currently: the older watermaker that came with it. While I may replace it someday, I wanted to make sure that we could support it, so I needed to keep the full split-phase system that the boat came with. I also figured I’d probably upgrade the heating/cooling to a chiller system that would much rather be on 230VAC than 120VAC. While there’s a few options for accomplishing this, I decided to go with using two slightly smaller Quattros (5KVA) in a split-phase configuration, so that if one of them broke, I’d be able to quickly rewire/reconfigure the system to still function off the one remaining unit until we could get a replacement.
The Quattro has a bunch of neat features, not least of which is the PowerAssist functionality, which is part of what really sold me on the system. If you’re plugged into shore power of a certain amperage, and your panel needs to draw more power than the shore power can provide, the Quattro will fill in current from the batteries. So if you’re in a smaller marina with single-phase 30 amp, you can run the microwave for a while or the air conditioning, and it will fill in any extra power requirements over the limit. Then, whenever you drop below 30 amps again, it’ll go back to charging the batteries up with whatever spare current is left. This is really useful for marine air conditioning units, which traditionally require huge loads at startup (30-40 amps) for a few seconds, which tends to blow breakers, but this system totally avoids that problem.
So pretty early on, I decided to pick up a couple Quattros, and was able to move on to figuring out what to do for batteries. The first step down the carefree-power path I’m heading down is getting a silly amount of battery capacity, so this was going to likely be the most expensive part of the new setup, and hence required a ton of research.
Why Lead Batteries Are Terrible
Lead batteries have a bunch of nasty characteristics for long-term usage. When you start at 100% charge, you can only really bring them down to around 50% before you risk dangerously shortening their life span. So you start charging there. Then, once they get back up to ~80% charge state, they start increasing internal resistance and accepting charge slower and slower. Traditional logic is that to get from 85% to 100% takes ~3-4 hours for lead acid batteries. So you just don’t do it if you’re at anchor. You cycle between ~50% and ~85%. We had our auto-generator-management on the Meridian to cycle from 55-85%. So if you have, say, 1000 Ah of capacity, you get to use ~300 Ah of it from your main cycle. Not a great return.
But wait, it gets worse. The chemistry of the anodes in lead batteries is such that, when you run them down, on the exposed areas (where the electrolyte goes down), they get a little lead sulfate coating that you need higher voltage to get through. And you only uncover that surface up to the % that you charge back up to. So when you cycle up to 85% and then back down again, 15% of the anode starts building an ever-thicker coating on it and starts to crystallize. The next time you charge back up, to get back to 85%, it takes even more time than last time. By the time you cycle 50-85% ~4-5 times, you’ve lost 10% or more of your battery capacity, and you’re actually cycling between 50 and 75% — now you get 200-250 Ah of your 1000Ah bank to avoid damaging your batteries.

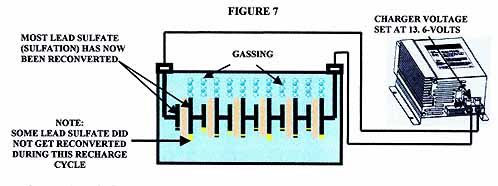
The only way to restore that capacity is to get back to 100% with a really long generator run as soon as possible, and every few weeks you need to run an “equalize” cycle that runs very high voltage through the batteries to “break through” that crusty shell on the anode and get your lost capacity back. It’s a pretty terrible system, all in all. And so not only are you constantly just managing these tiny-range % cycles on your batteries, you’re also managing plating that you need to work these really-long generator cycles in to break through, and every few weeks get a full ~8-10 hour generator run (or be in a marina) in place to do an equalize cycle.
Even being “nice” to your batteries and following things by the book, even “good” AGM lead batteries only get around 500 cycles down to 50% before they’re at a fraction of their initial capacity. So, doing 1-2 cycles a day, we basically had a year or so before we were working with a pittance of capacity. After a year of this game, and changing out the batteries once already, I was pretty tired of it and ready for a change.
I spent some time looking into Firefly (carbon foam-based) batteries and a couple other intermediate chemistries, but very quickly settled on a much better option.
Lithium Batteries
Lithium, specifically LiFePO4 chemistry, is in a category of its own in the battery world. These batteries can be around 1/4 the weight of traditional lead-acid batteries (either FLA or AGM) for the same capacity, and around half of even a carbon foam-based setup. So on things like boats, where weight is the devil, if you want a ton of capacity, you go Lithium, or you end up putting a thousand pounds of lead somewhere on the boat. The weight consideration is a nice boost in and of itself, but the biggest wins with Lithium are actually in usable power.
Remember my rant above about the fun 55-85% cycles on AGM and how you can’t get back to 100% without a ton of time, and the memory effects you need to counter? Yeah, those are gone with Lithium. You can safely draw them down to 20% and charge right back up to 100% and get 2000-3000 of these 80%-capacity cycles out of them. If you only draw down to 50%, you get 5000 or more. Better yet, that 20-to-100% cycle is at full speed the whole way. The batteries accept an essentially full rate of current from the bottom of the barrel right up to the last topoff. So you can really just use them as a reservoir like a fresh water tank — top off when it’s easy, let it live low if you want to and understand the risks, and add a little bit if you want here and there.
To do a little math here, the Endeavour came with 800Ah of AGM. With a 55-85% standard cycle, that gives us 240Ah of capacity to burn through in between running the generator. Getting the same weight of Lithium batteries gives us 2400Ah, and with a 20-100% standard cycle, that’s 1920Ah. That’s an eight-fold improvement in usable capacity for the same weight. Plus you’ll get many years out of the packs with the 2000+ cycle lifetime. The primary complaint about Lithium batteries is up-front price, and rightfully so. They’re expensive. But especially if you’re going to spend any significant time on your boat, do all parts of the math — cycle time and cycle count. You might find that lithium batteries actually save you significant money over several years.
So, I’ve convinced you to buy a pile of Lithium batteries, right? Great. I’ve been watching Lithium (LiFePO4, not Li-ion) batteries for years, and they primarily break down into two main camps: US-assembled-and-warrantied packs for around 1000$-per-kwh; and Chinese-assembled-and-basically-un-warrantied packs for around 300$-per-kwh. Forum posts for years have talked about the Russian Roulette of trying the latter — sometimes you get some gold, often you get half-capacity packs, and one dies a few months later and the company has completely disappeared. So, if you go that route, way over-buy for your intended capacity and still pray. For what’s actually our home, I didn’t like either of these approaches. I wanted at least 20 kWh and preferably closer to 30, which was putting the cost of option 1 well into stupid territory, and option 2 still at expensive enough to be a real investment, without any guarantee of success.
The other problem is form factor. Many makers have been making drop-in battery replacements instead of taking advantage of the big improvement that Lithium gets you on power density (capacity per space). So you get, for example, a Group 31-shaped battery for 700-1000$, and it’s still the size of a full Group 31 battery, is only 100 Ah, and is packed full of foam to fill out the space. So, for most of the better units, if you want to get up to 20 kWh or beyond, you end up with a huge amount of space.

Many people go the DIY route, where you buy bulk Lithium cells from China, throw your own battery management system on it, and solder it all together. But especially for a liveaboard marine environment, I wanted something slightly less hand-crafted than that with at least a vague weatherproofing certification claim. I had confidence I could make the DIY approach work, but at what cost, when every time I screw up a little bit we could be in a pretty bad situation?

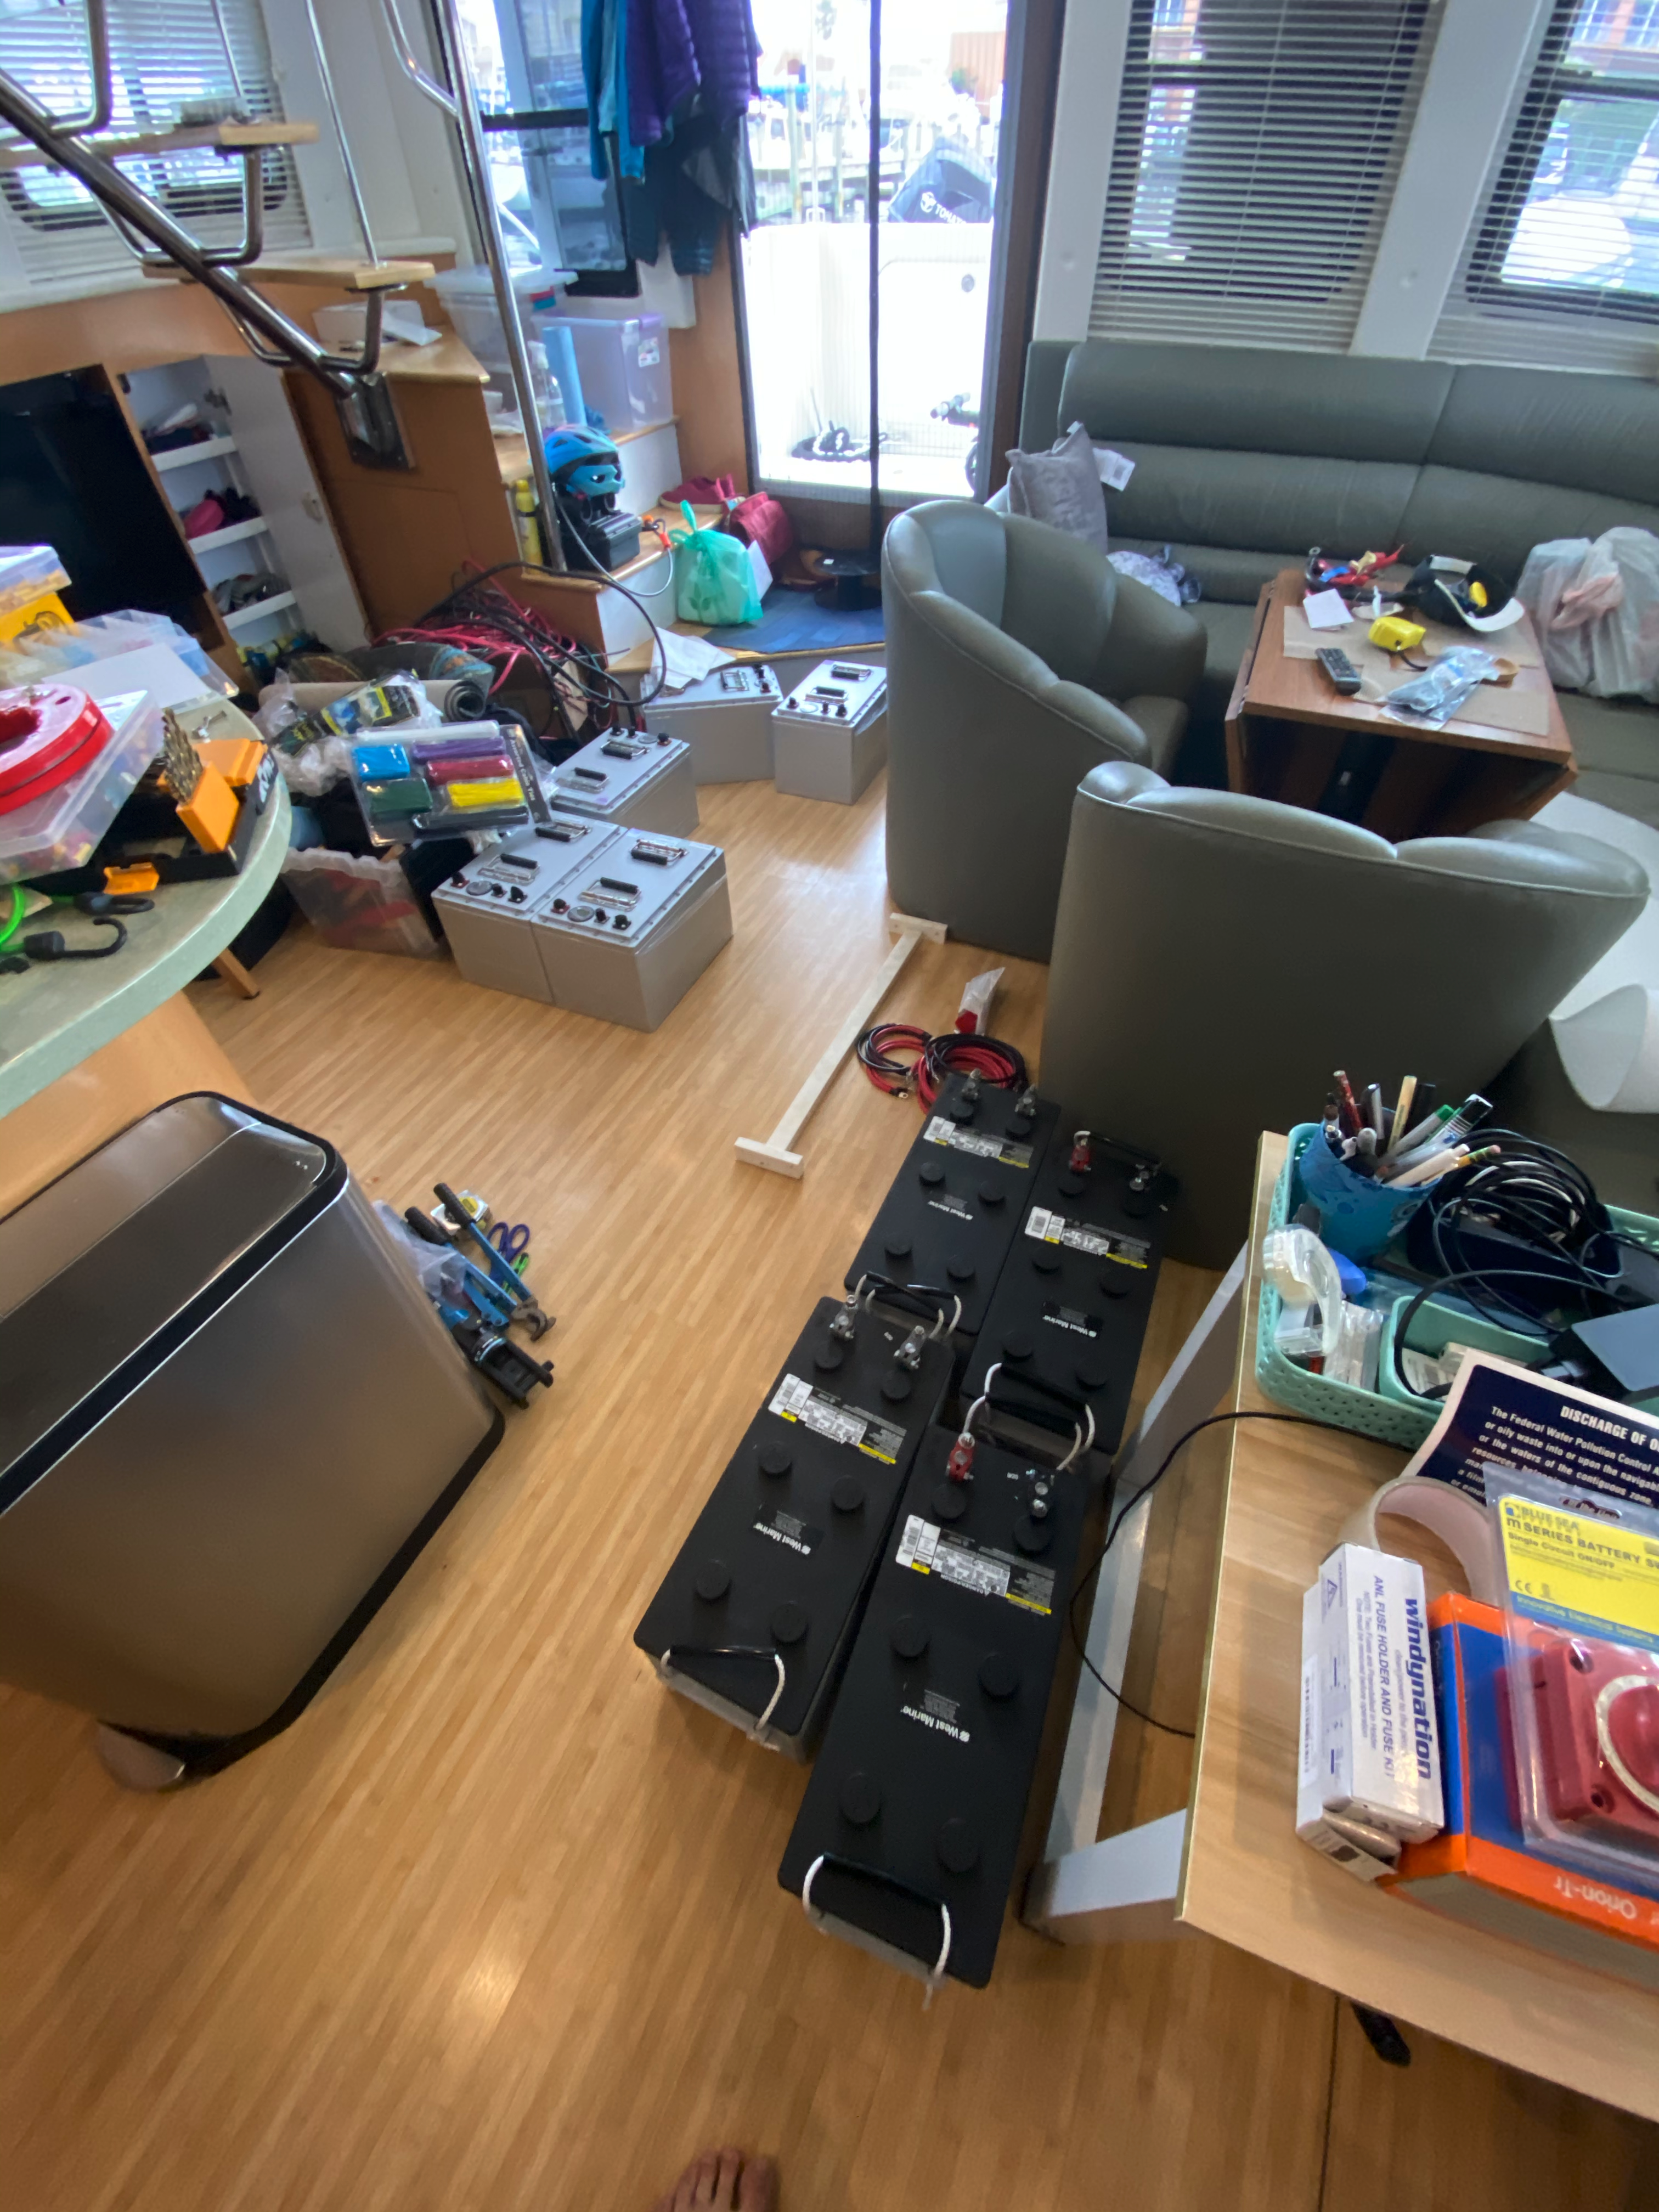
In the last few months, however, Electric Car Parts Company, a company that’s been around in the US for quite a while, and imports and sometimes warranty-backs various overseas options, came up with a new option: the BestGo “Preferred” packs — 12V, 400Ah, a hair under 2000$ each, with integrated battery management (a whole different topic, but suffice it to say you want this). That’s 5kWh for under 2000$ — slightly more expensive than the cheap-chinese-pack option, but a huge discount on all of the US-backed packs. It comes with a reasonable warranty, backed by the US company, and the form factor is awesome.
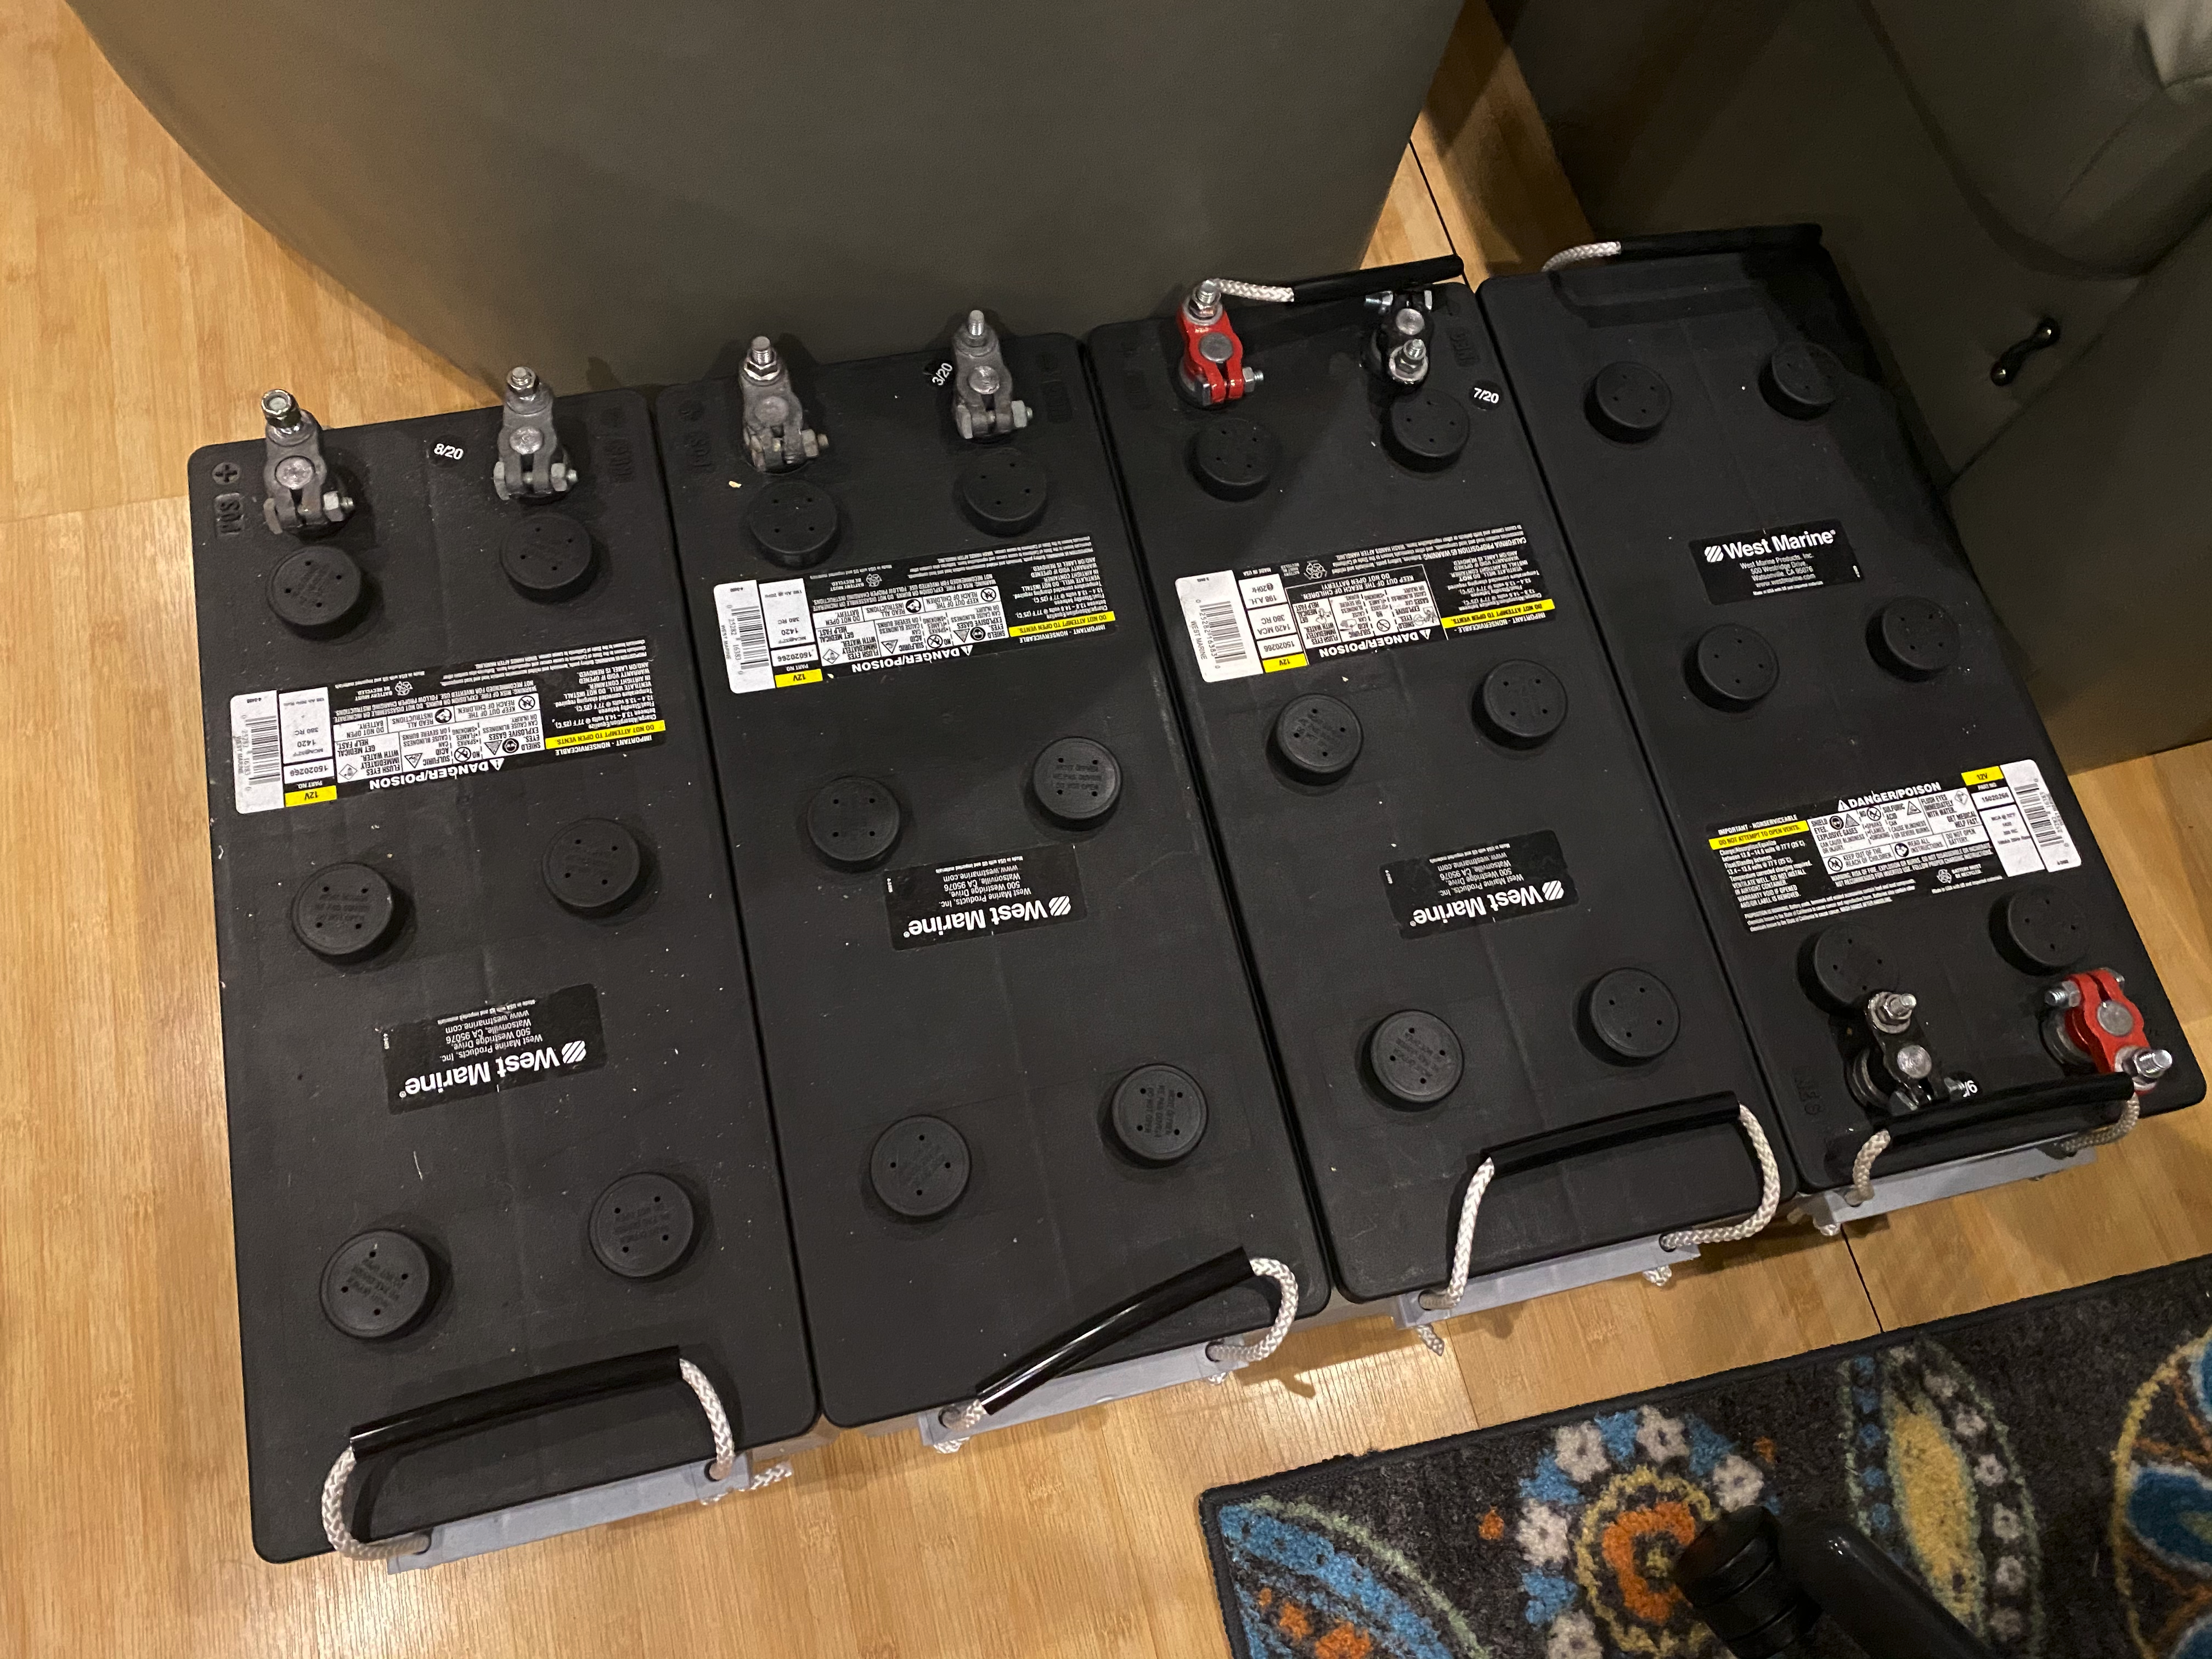
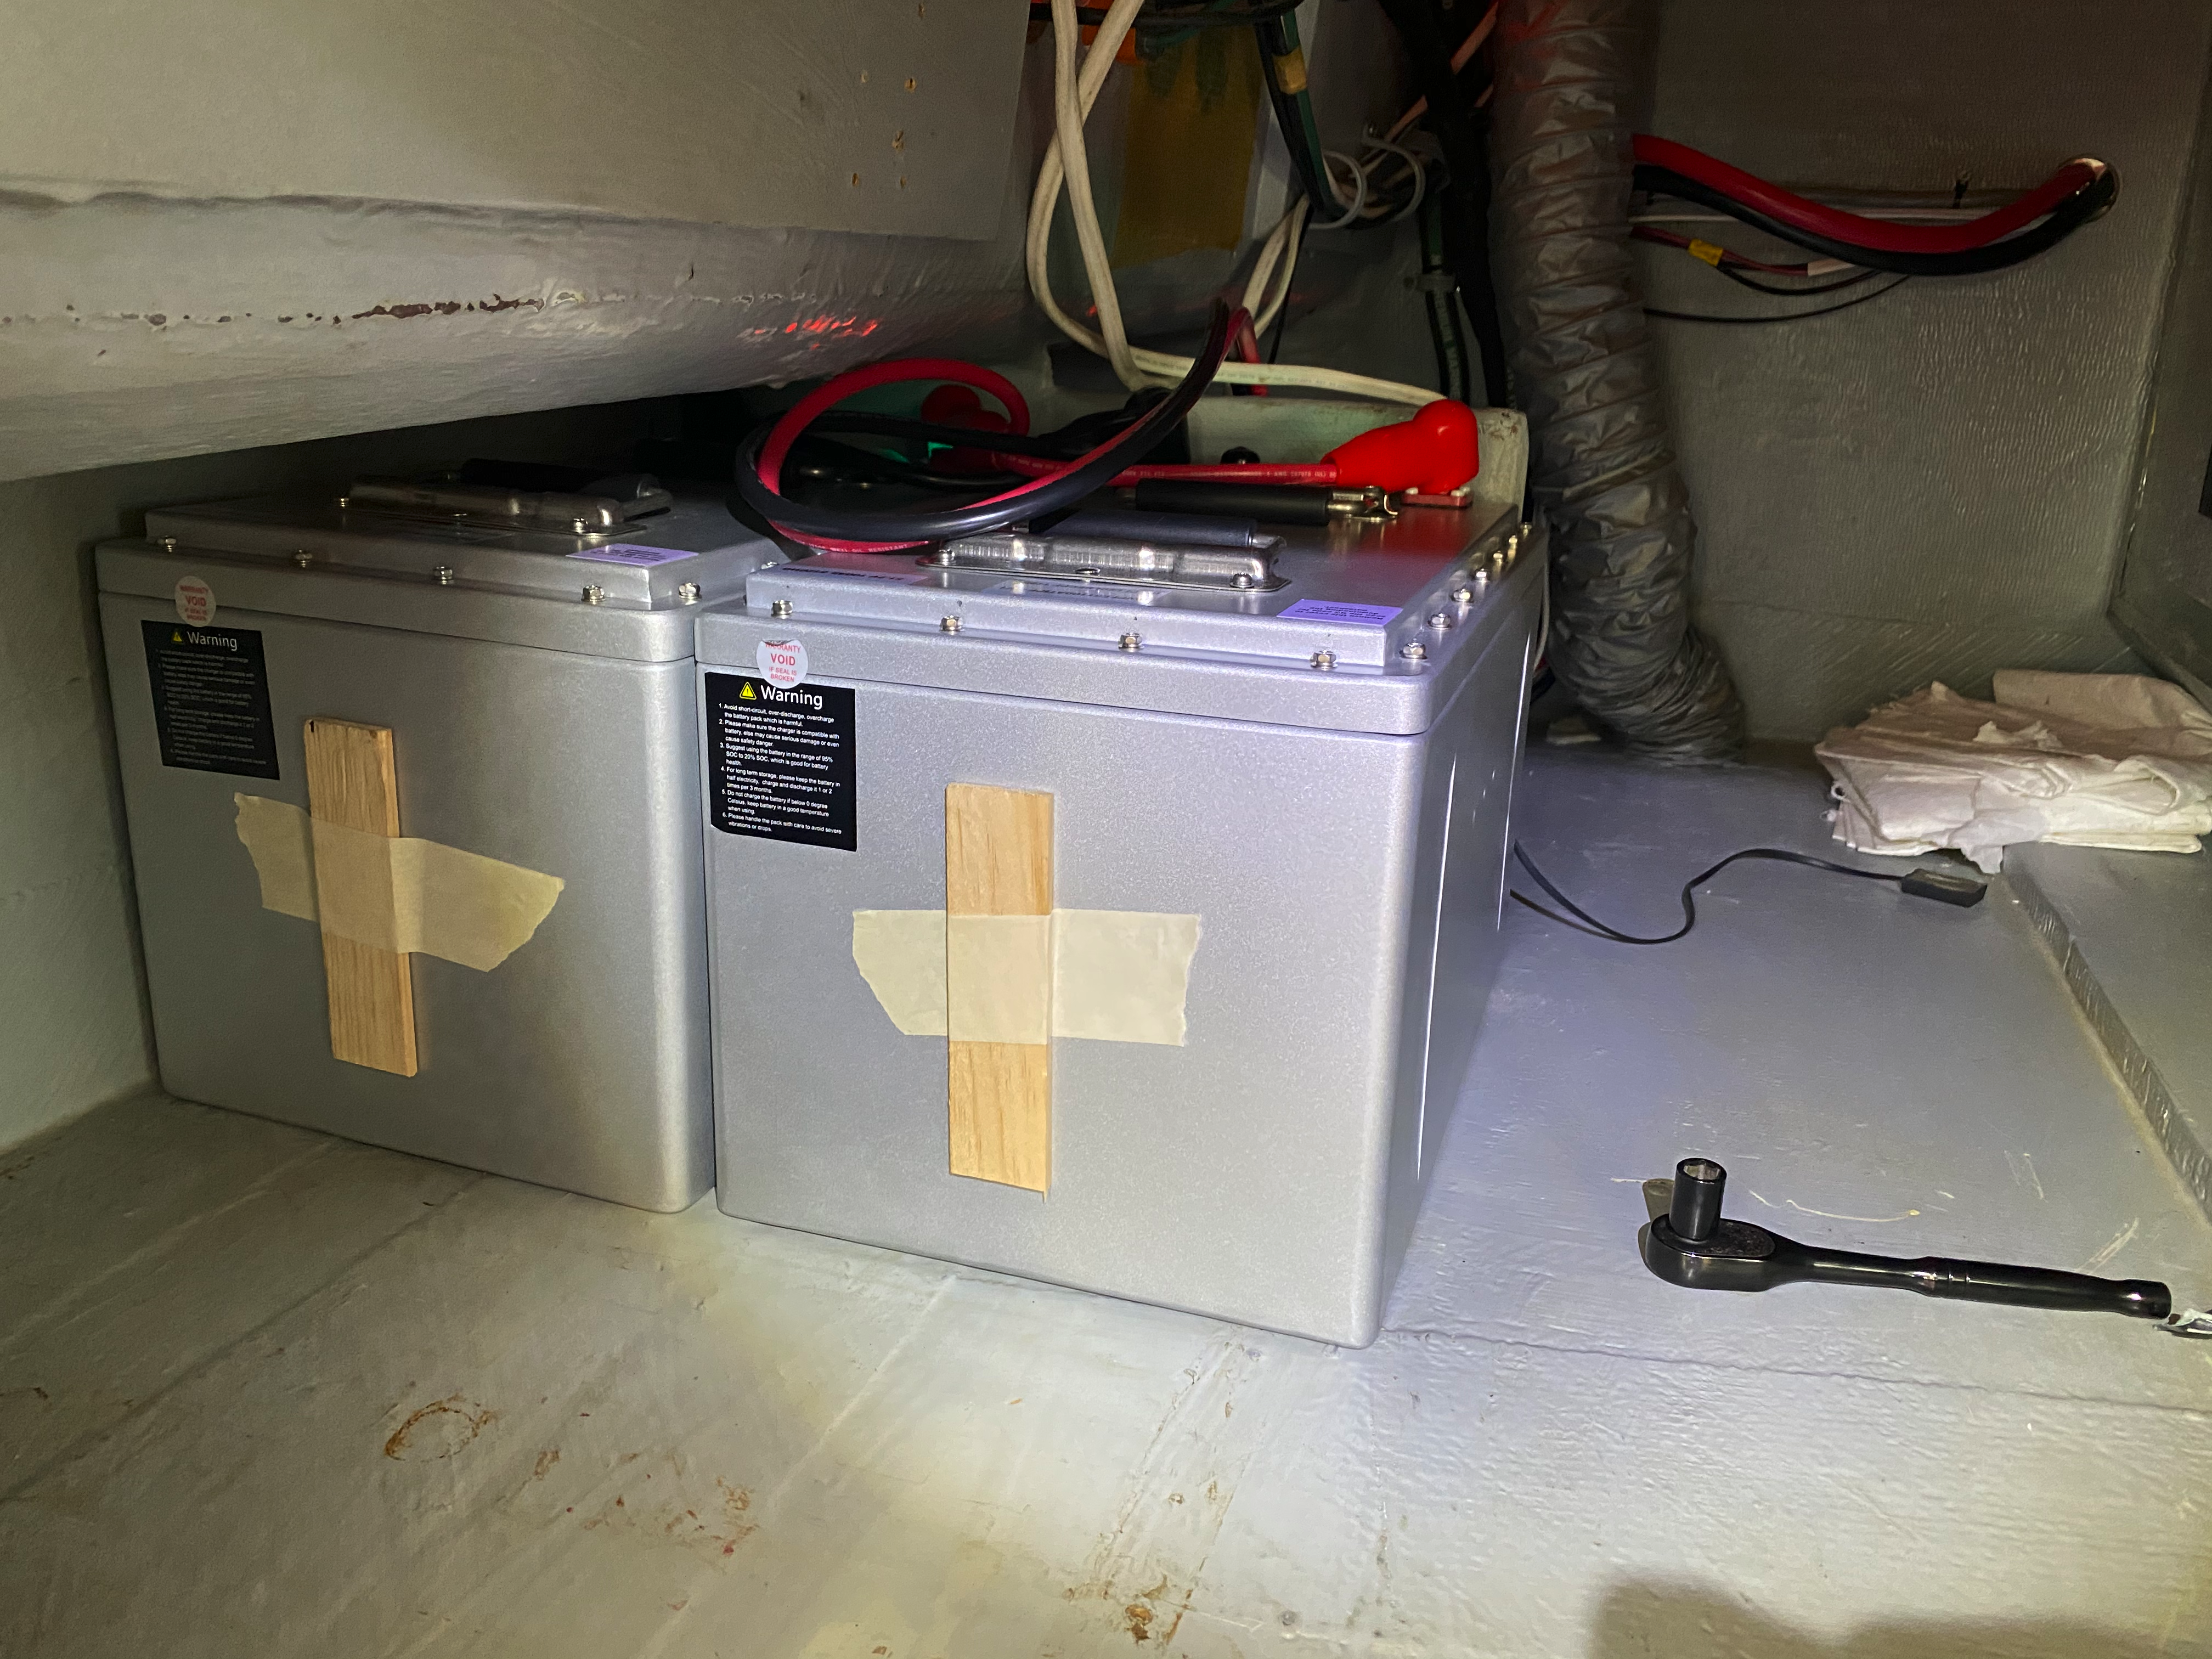
When I did the math, I’d be able to swap the four 4D batteries that came with the boat with four of these packs in a virtually identical rectangle (1″ wider, exactly the same length, and about an inch taller). I’d go from 9 kWh of AGM up to 20 kWh in the same space, at 2/3s the weight. And there was a nice little space next to the current battery area to put 2 more if I wanted, to get up to 30 kWh and have weight parity, with 4x the capacity. A plan started coming together. Shipping was going to be a little complicated, since they get “dropshipped” directly from China with a ~6 week lead time. So, we knew that as soon as possible after closing on the boat, we’d have to place the order and sit somewhere for a while.
12V? Bleh. Maybe 24V?
Up until recently, the only thing that made sense on your boat was sticking with whatever its native house bank was. Most boats are 12V, some larger boats are 24V, and none are 48V. You don’t want to change your house voltage. Everything on your boat is designed around it — lights, relays, toilets, macerators, electronics, your engine computers — virtually everything electric that you interact with on a daily basis.
For the longest time, I’d been assuming I’d get a huge stack of 12V battery power, run enormous cables to some huge inverters, just like Slowboat did, and that’s just life on a boat. But there’s a big downside to this approach. 12V is a terrible voltage. Humanity has been using it on mobile vehicles for decades and decades, and it’s so ubiquitous that it’s hard to change at this point. But especially for larger power demands and physically larger installations, it’s terrible. You lose so much voltage over such a short distance that everything is heat management and giant cables. Running, for example, 8 kW of power through 12V to power your inverter means pushing around 1000 amps continuous. That safely requires four 4/0 cables per lead (4 for positive, 4 for negative), and is still converting a bunch of electricity directly to heat. It didn’t excite me, either from a cable management perspective nor from a safety one. Doable, but really not ideal.

This runs into our next problem. With lithium batteries, due to some nuances of the battery chemistry, you really need to run a battery management system on top of the raw battery cells. However, most of the BMS systems don’t really support continuous draws over 100 amps. Even with 6 batteries, that’s only a 600 amp continuous draw. At 12V, that actually isn’t enough to fully feed the inverter behemoth I was looking at doing — I need around 1000 amps. However, BMSs tend to work at the same amp rates independent of voltage. So while the BestGo 12V 400Ah pack supports 100 amp draw rates, the 24V 200Ah pack also supports a 100 amp draw rate, but that’s getting twice the energy out of the pack.
I started investigating running a 24V subsystem — a main large house bank at 24V, with a tiny setup at 12V, and running converters to run power both ways. When the alternators were running, it’d charge up to the 24V house bank, otherwise the 24V house bank would live-convert down to 12V to handle constant loads. Victron makes a bunch of Orion units to deal with exactly this sort of problem, and it’s pretty manageable. However, at the end of the day, I was struggling to convince myself it was worth it. 24V halves the current requirements, but it still adds all the complexity of a new voltage level, and chargers are still fairly low-current. Even going ballistic on chargers, it was going to be ~8 hours on generator to refill a 25kWh drop. There had to be a better way.
48 Volts
Most home off-grid solutions use 48V. It’s still “low voltage” so it’s safe to work with, you get much easier and safer wire runs, and it’s a lot closer to 120V than 12V, so inverting it back to AC is a more efficient process. For off-grid home solutions, no one has 12V to deal with — you’re just storing energy to convert back to AC all day for your house. However, the more I thought about it, the more it seemed like this off-grid usage was actually pretty analogous to our higher-demand usage on the boat. We ALSO have a 12V system that has low-but-constant demands, but, over the course of a day, we lose way more power to an inverter than we do to the 12V loads. Computers, cooking in the convection oven, running the air conditioning, hair dryer, water heater, etc. It all adds up to an order of magnitude more usage than the DC stuff. So what happens if we optimize around that AC load instead of the DC load?
Well, as it turns out, the Victron Quattro comes in a few different sizes at 48V, one of which actually looks great for our needs. Significantly higher power conversion efficiency than the 12 or 24 volt models, actually smaller size and lower weight, and, best of all, a 70A battery charger in each unit (remember 70A at 48V is a lot of power). This started looking pretty compelling. For this to work, though, I needed some way to get, at a minimum, power from 48V to 12V to power the hungry fridges and electronics of the boat.

The Victron Orion line has a cheap and simple 48->12V 30 amp DC-DC converter, which would easily run our house loads 98+% of the time, at very low conversion loss. There’s also a whole pile of 12->48V battery chargers around the world to be able to charge the 48V bank from the motors. I fairly quickly pieced out a set of devices that would entirely solve this problem for me. You keep a small 12V starter “house” battery as a power sink in case you, say, run the toilet and water pump at the same time, the 30A DC-DC converter runs load the rest of the time and quickly recharges any actual over-30A-usage from the small battery.
This seemed like a slam dunk. It was a silly project, but I liked it, and it also seemed like it could be genuinely awesome. Fast charging from the generator, run anything on the boat off the inverters with pretty small size cable runs. Let’s do it. I went with six of the BestGo 48V/100Ah batteries from ECPC and got them ordered up, and got an order together from a Victron supplier for a stack of stuff.
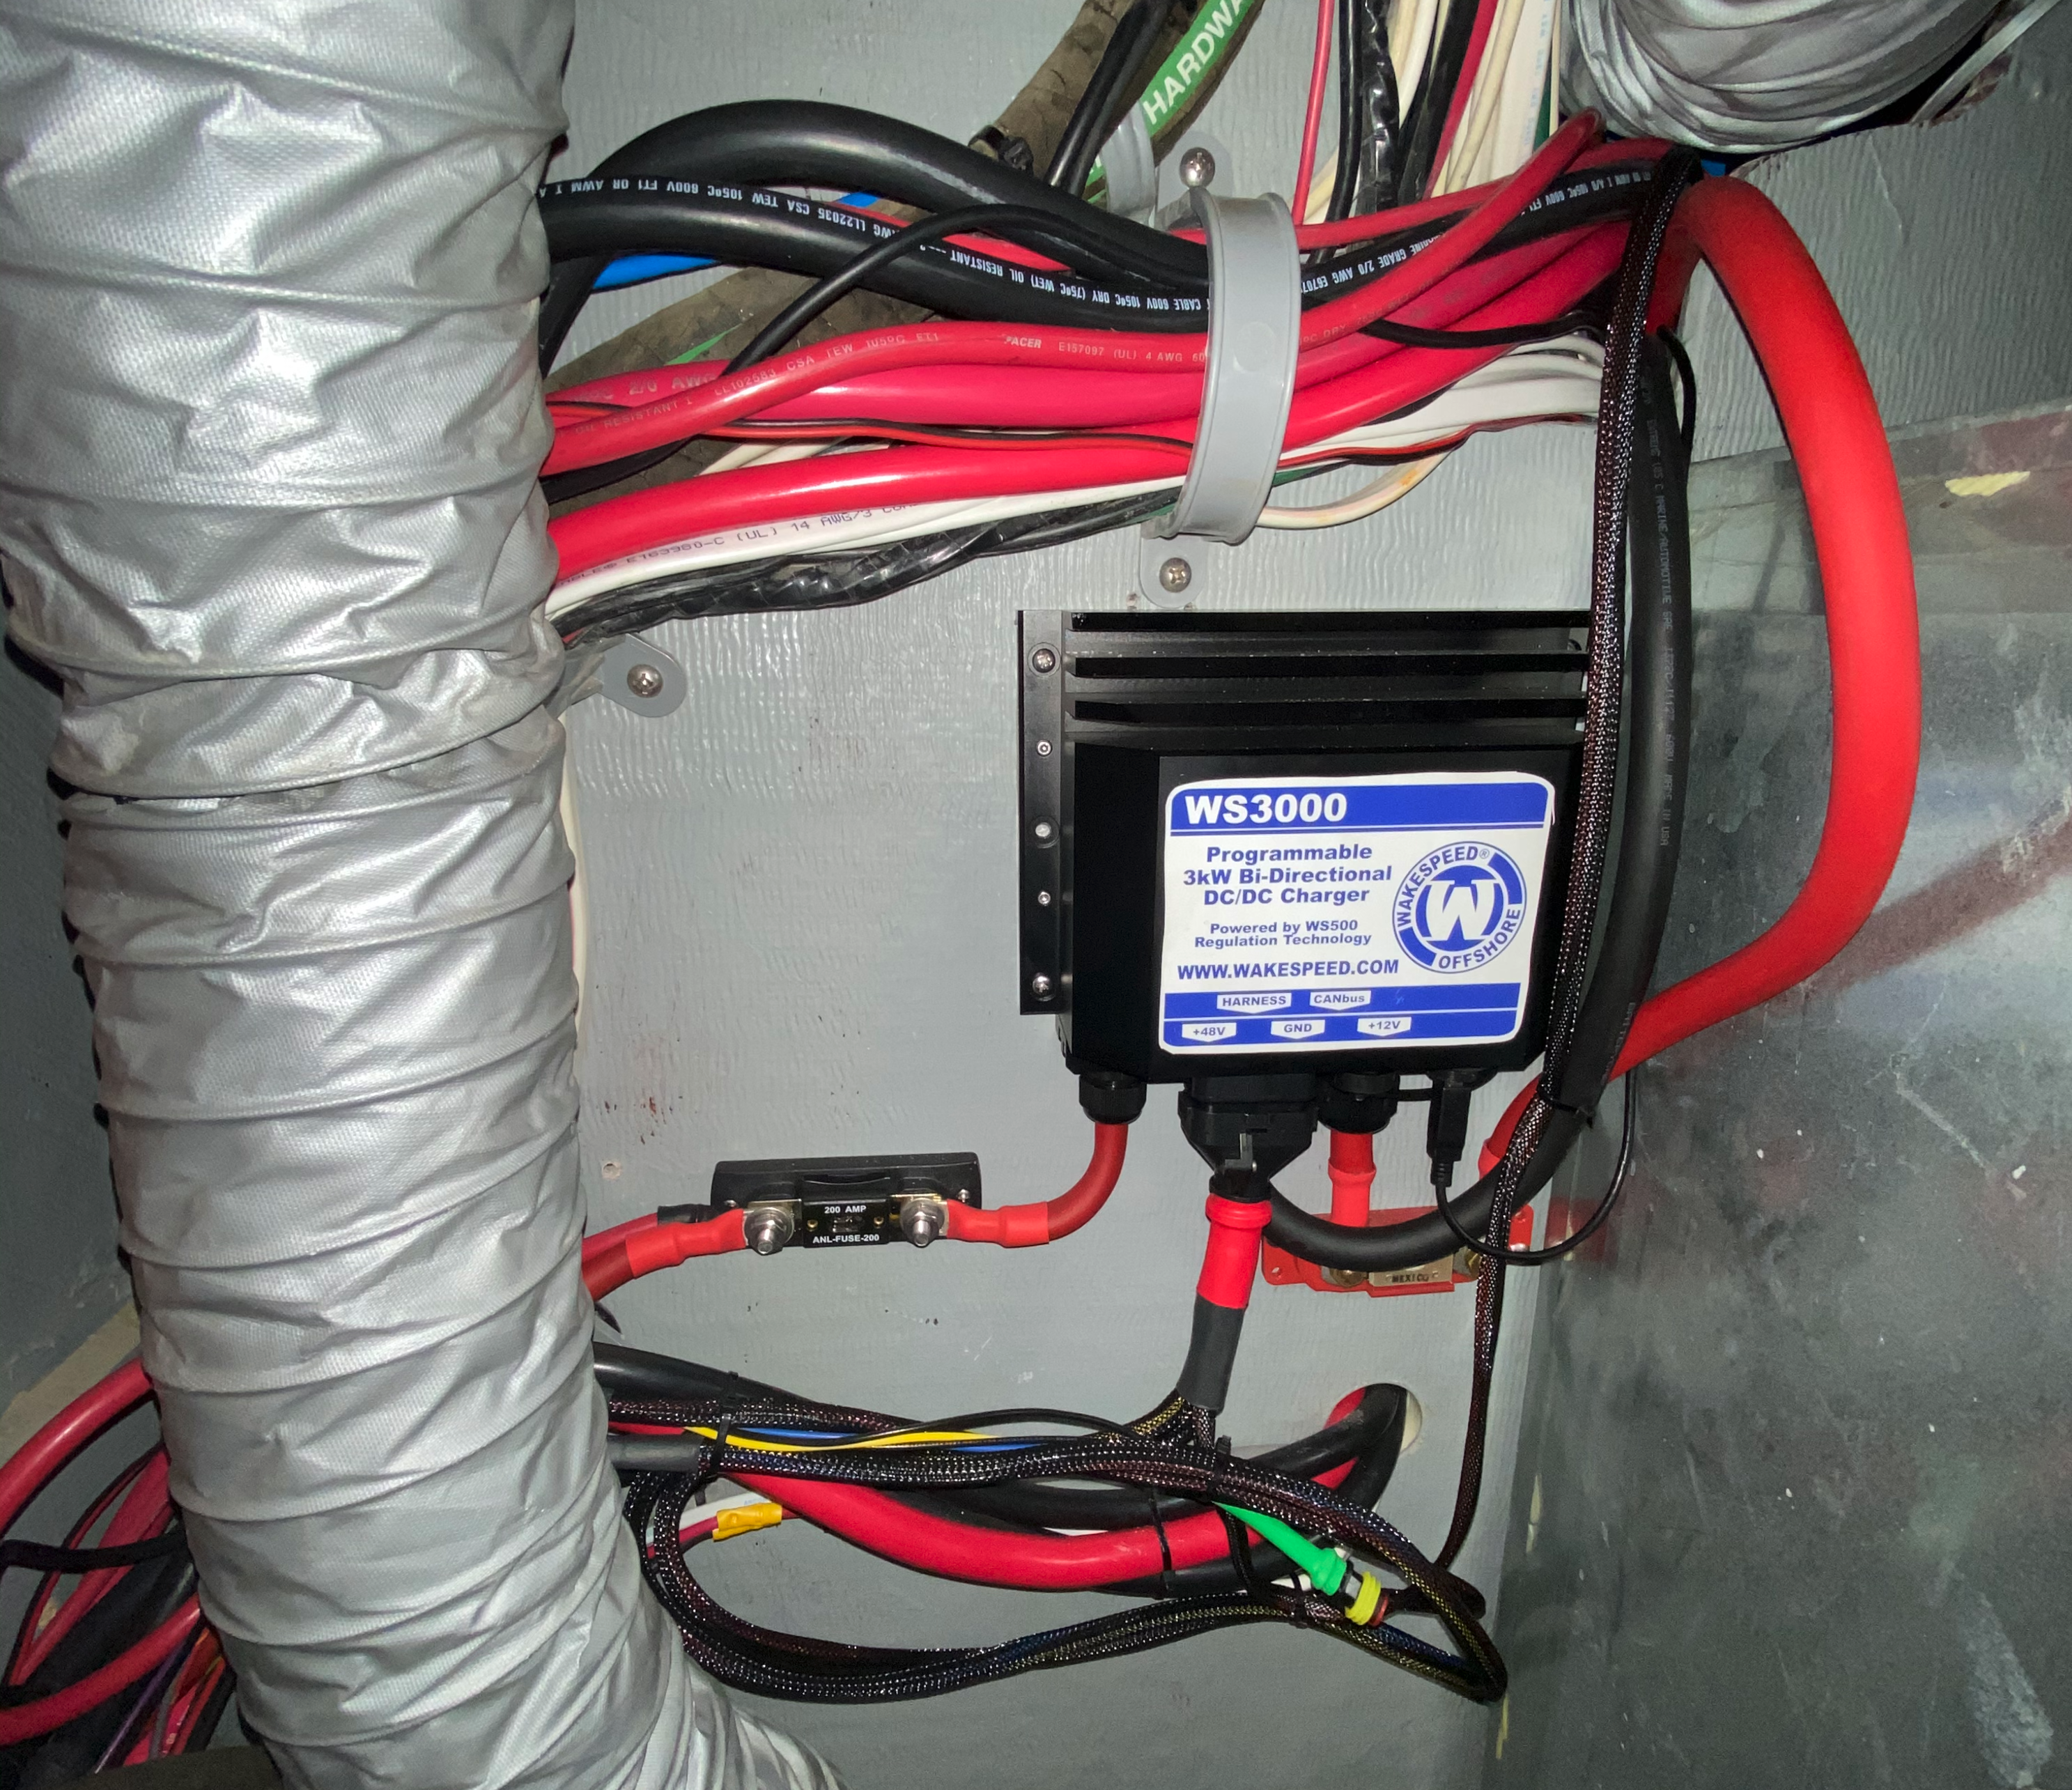
Wakespeed WS3000
As I was about a day from pulling the trigger on a whole slew of stuff, I just kept searching for an even more efficient way to do the 12<–>48 conversions. I had an answer that I found satisfactory, but it still just felt like there had to be a better way. Something interesting popped up on one of my google searches — a PDF of a brochure that didn’t seem to be linked to anywhere. It was from Wakespeed, a company mostly known for their line of alternator external regulators. It mentioned a new product coming soon, a “WS3000”, with this picture, and no other details:

It had to be too good to be true, right?.. I immediately sent Wakespeed an email describing what I was trying to put together, and that it seemed like this WS3000 was the magic bullet to tie my whole system together, but I wanted to confirm that this was what they were going after. Amazingly, that night, I get an email back from the co-owners of the company, “The WS3000 sounds like an excellent solution for your application!”, and offered a phone call the next day to discuss a potential collaboration.
Well, turns out, what I wanted was exactly what they’re trying to build. No one has a good way to bridge legacy 12V systems and high-energy lithium 24 or 48V power banks, so they saw a market opening, and jammed a 3000 watt crowbar into it. Their timeline was getting super-early alpha hardware assembled in a month or so, which was around when my batteries were going to show up, so our needs aligned very well, if I was willing to tolerate early development software and hardware and help them tweak it all. We started planning how things would go by email while we waited for our respective ducks to get in a row.
One interesting insight Al had was to just use my port start battery as the “12V house” battery. With only a 30A converter, I needed some sort of middle buffer, especially since the windlass pulls off the house setup by default on this boat. However, with a 3000 watt converter always at the ready, that changes the game. The idea seemed interesting enough to at least try for a while, so I went ahead with that plan — merge the port start battery with the “house” positive bus, and then feed the house off the WS3000, with the port battery as just a backup/energy sink a 15 foot wire run away. As a safety measure, add an ACR setup to keep the starboard engine+battery isolated from the port/house battery, so that if something went to hell and the port side fully drained, we’d still be just fine to fire up either the starboard side or the generator and restart the rest of the boat from there to get back on our feet.
With the rough circuitry figured out, I started ordering things.
The Build
I had 6 weeks to wait for the batteries to show up, but also a ton of other projects to do on the boat in the meantime. And also, converting over to the “no-12V-house” setup was going to involve a bunch of rewiring. Finally, even when the batteries arrived, there was too much to change to possibly do in one big full day, or even a full weekend, to ensure that we’d be ready for working again Monday morning. So I had to figure out how to stage things out to give myself the best chance for success.
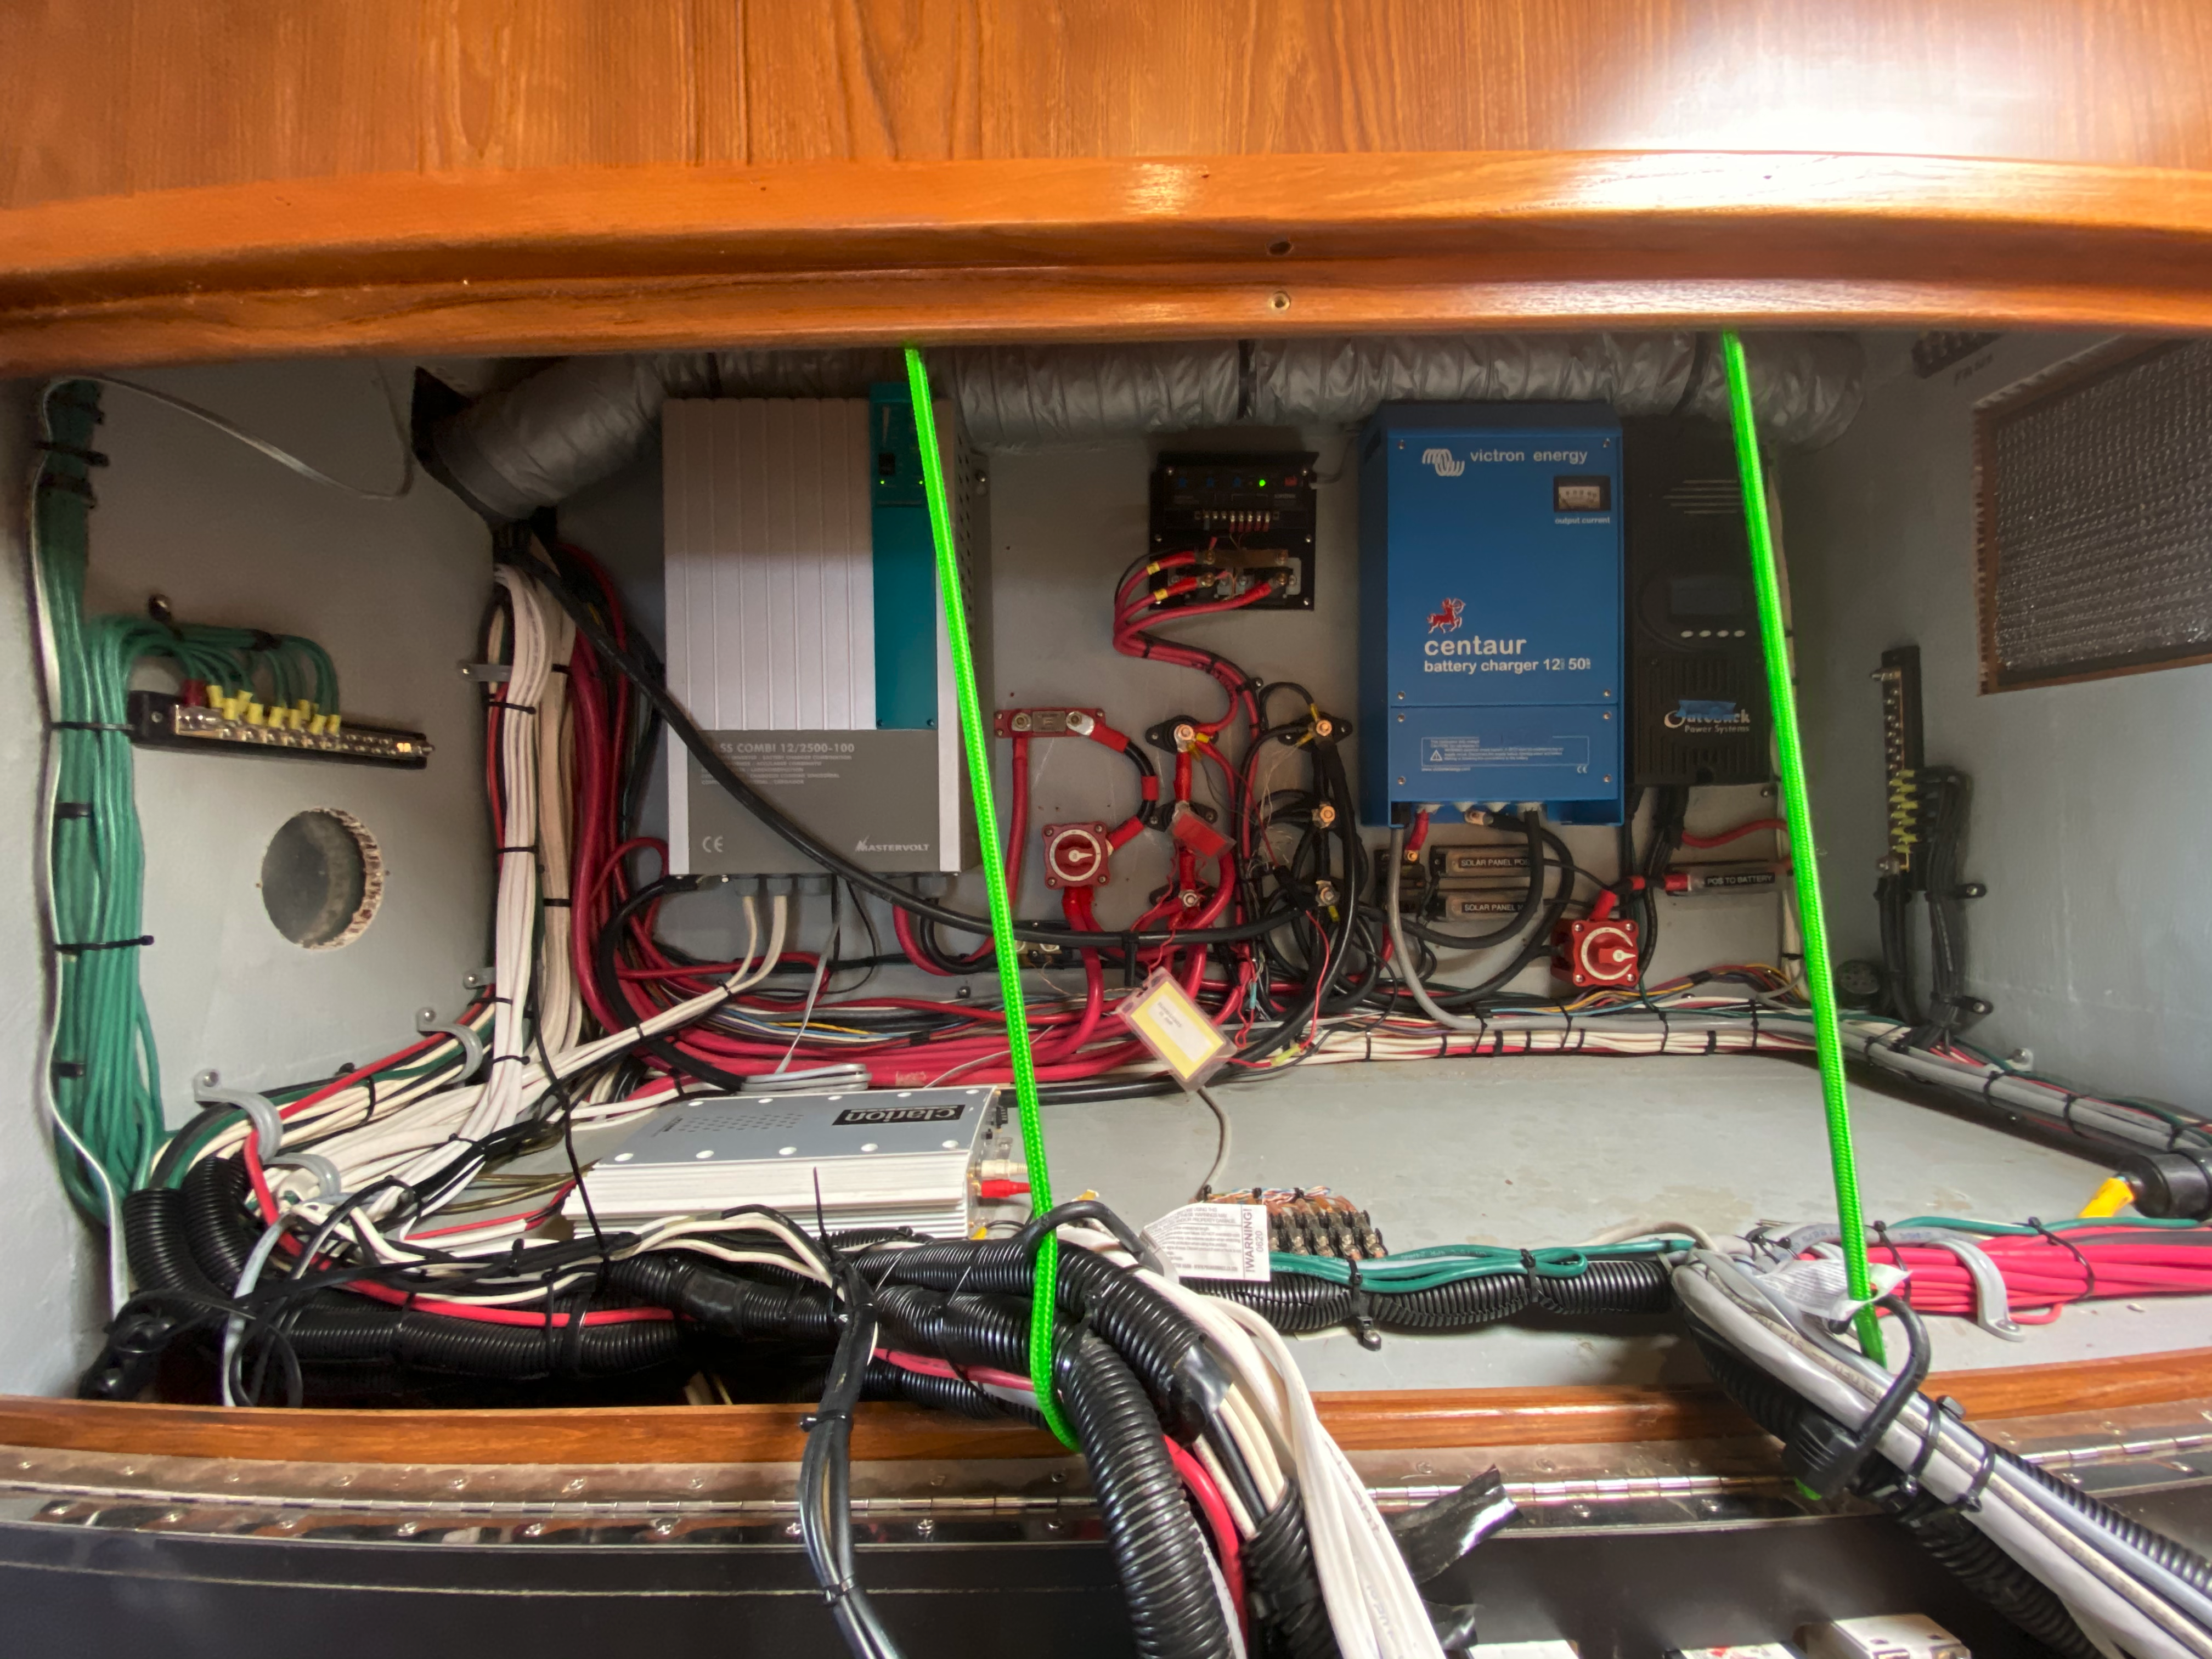
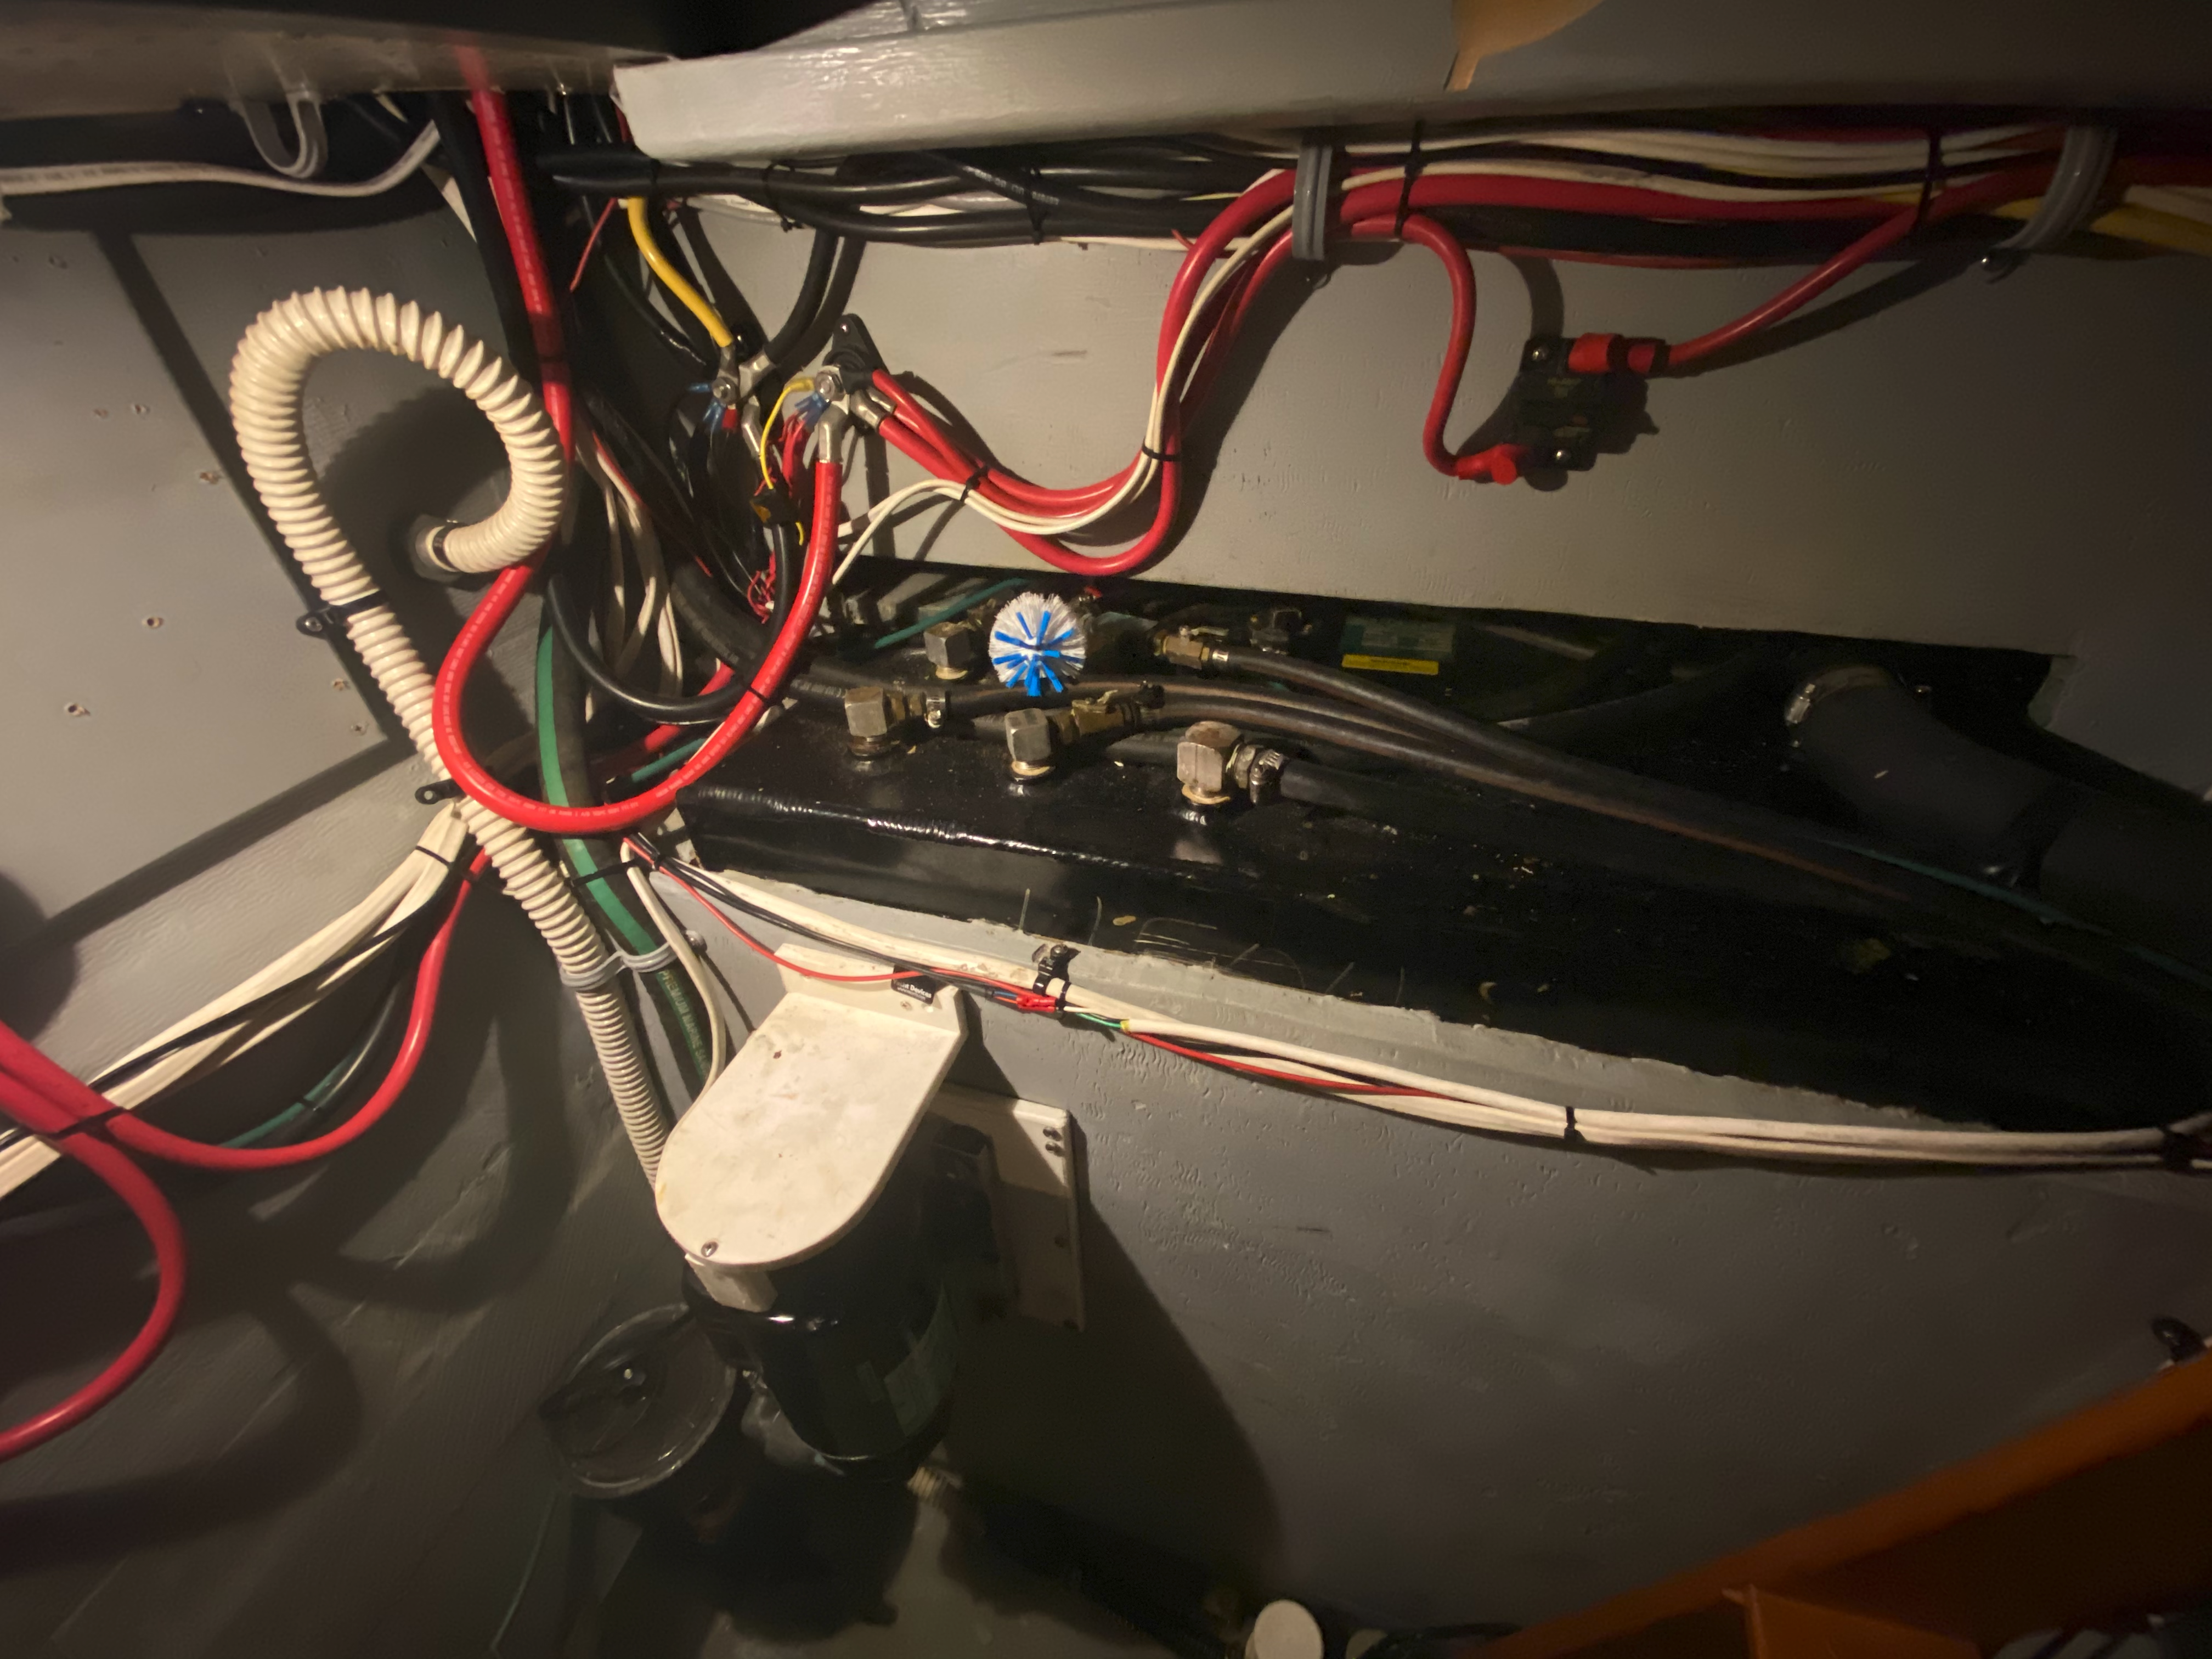
I spent several days going through the two engine bays and simplifying things. The factory and modded wiring in here was incredibly inefficient. Really long large-diameter wire runs to junction points that then had really long large-diameter wire runs back to near where the run started in the first place. Very questionable choices. At the end, I was able to pull out ~80 lbs of cable and end up with a more resilient setup, and get actual wire runs that were topologically similar to my ideal-state block diagram from above. I got to a place where I had both engine bays happily wired up with an ACR between them and the port loads all run to a set of terminal posts on the firewall that I could later run 4/0 cables up to the main electrical panel area when I was ready.
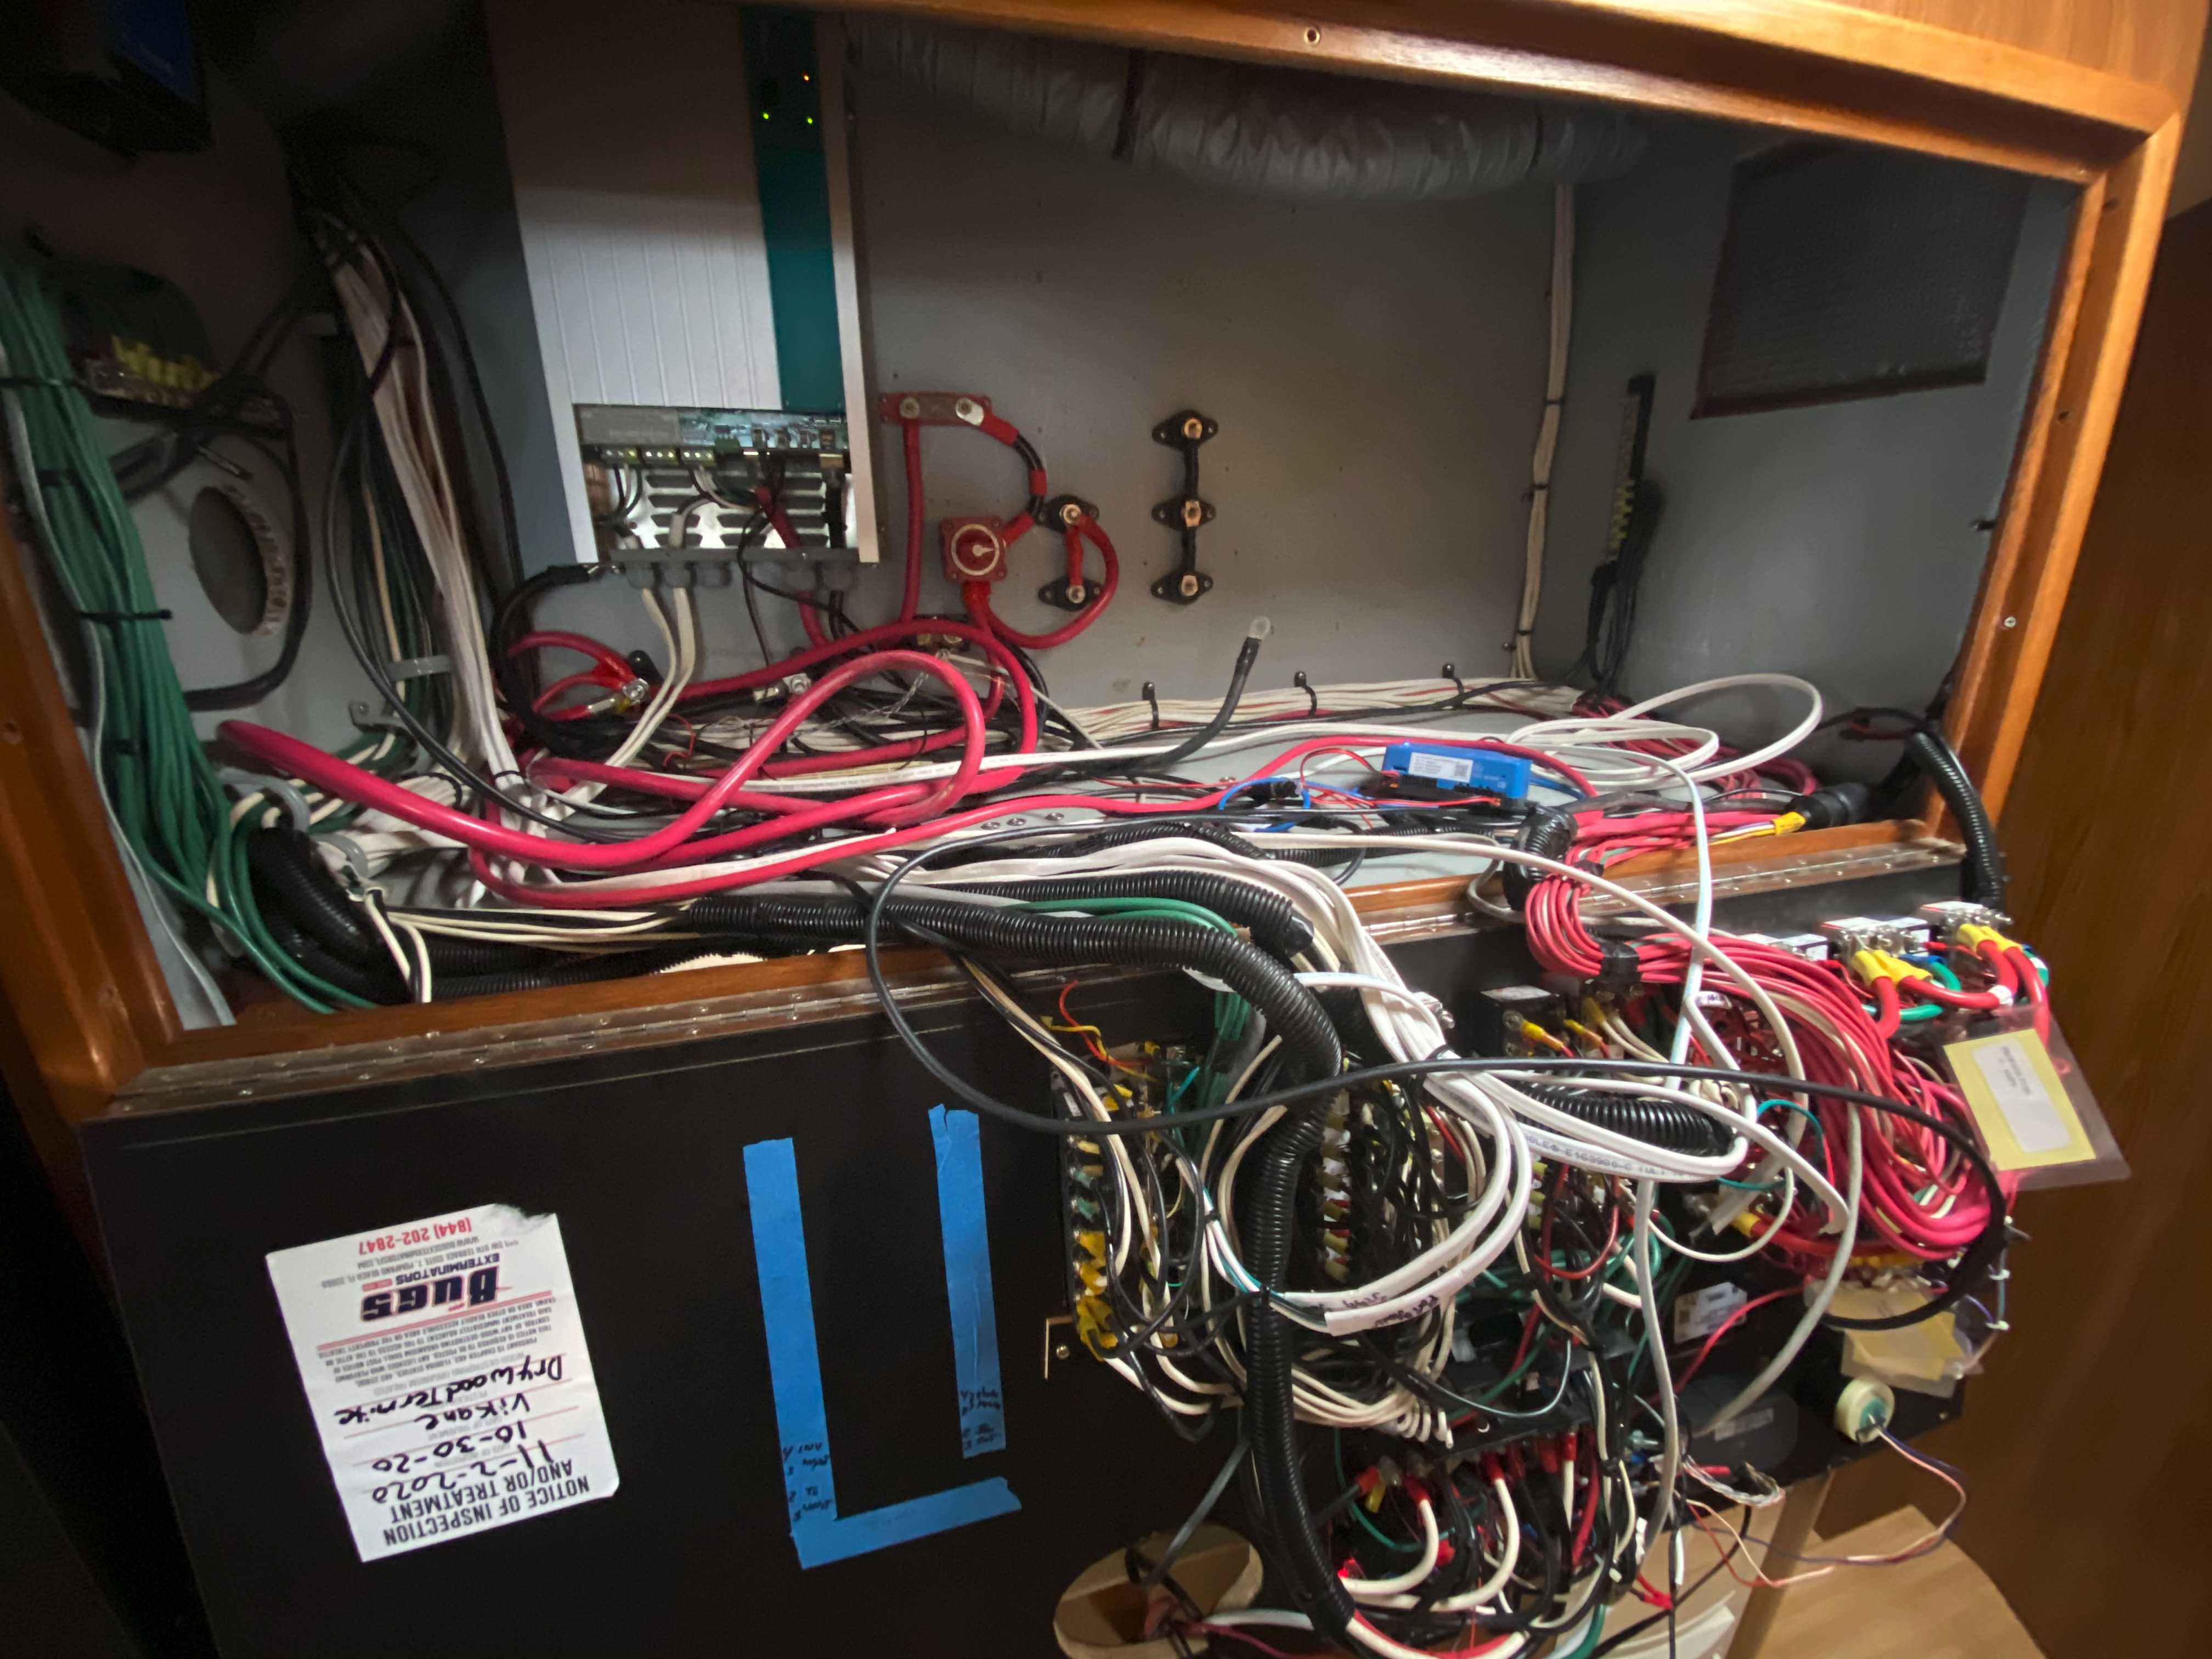
Once the engine bays were ready, which took way longer than I expected, I started dismantling everything possible from inside the electrical panel area to get down to the bare minimum needed to run the boat every day — basically, just the existing mastervolt 12V inverter/charger.
Eventually, over the course of a few days, two freight shipments showed up with the batteries and a stack of Victron stuff, and I was ready to go. I made a pretty serious tactical error here, and despite my plans to first merge the port battery in as the “house” battery, get that working, and then move onto installing the 48V setup, I got cocky. I can just dismantle the panel, throw the batteries in, mount up the Quattros, and be off to the races later in the day to do cleanup, right? How hard can it be. Well, turns out, quite hard, when you forget some important nuances.
To get through the day, when it came time to pull the plug on the charger setup, I wired the house setup to the Port battery, but didn’t really think about how small capacity the port battery was, nor did I have a good idea of what our steady state DC power usage was, since the factory gauges were really inaccurate and I hadn’t measured with a good ammeter or anything. So, barely a few hours into the rewire job, I realized I’d heavily drained the port battery, and quickly threw the manual switch on the ACR to join to the starboard battery to buy me some time. But this kicked off a frantic battle to get something, anything, in place that could keep the 12V system charged while I worked. I’d thought I had several more hours before I needed to be in this state, but now quickly needed a solution, or to revert to throwing the old house batteries back in to buy myself some time.
I decided to just go straight to throwing a couple of the 48V batteries in place, adding the Orion (48-12V DC-DC converter), quickly wiring it in, and using that to get the system into a recovered state so I could breathe and more thoroughly finish other aspects of the install. For those paying attention, why do I have an Orion when the WS3000 is coming? Backup. Given how utterly dependent we are on 12V power, I want at least 2 ways to keep 12V power going, especially given that one of them is in an alpha-level development phase.
Eventually, late into the night, I got one of the inverter/chargers up and running enough to start charging the 48V batteries from shore power, as well as power outlets on the boat, so we were in a breathable steady-state. I’d misjudged the length of 8 gauge triplex I needed to make nice-looking wire runs between the Quattros and the panel, as well as that I needed a stack of 8 gauge ring terminals, so I had to hack stuff together for a few days while I waited for more parts to arrive in the mail. But several lessons were learned, and a few days later, everything was finally in a full-power-usable state, though not cleaned up very well.

With the last final-gauge wiring hooked up, I was able to disconnect shore power and run about 4000 watts through the inverters for an hour before we got bored of how uneventful it was, and also the boat was really cold since we were running all the air conditioners at full blast on a not particularly warm day, so Hannah wasn’t thrilled. Then I flicked the shore power switch back on, it started charging back up at 120 amps into the 48V bank, and we were back to full in under an hour. It was a pretty magical experience to see it all come together in the end.


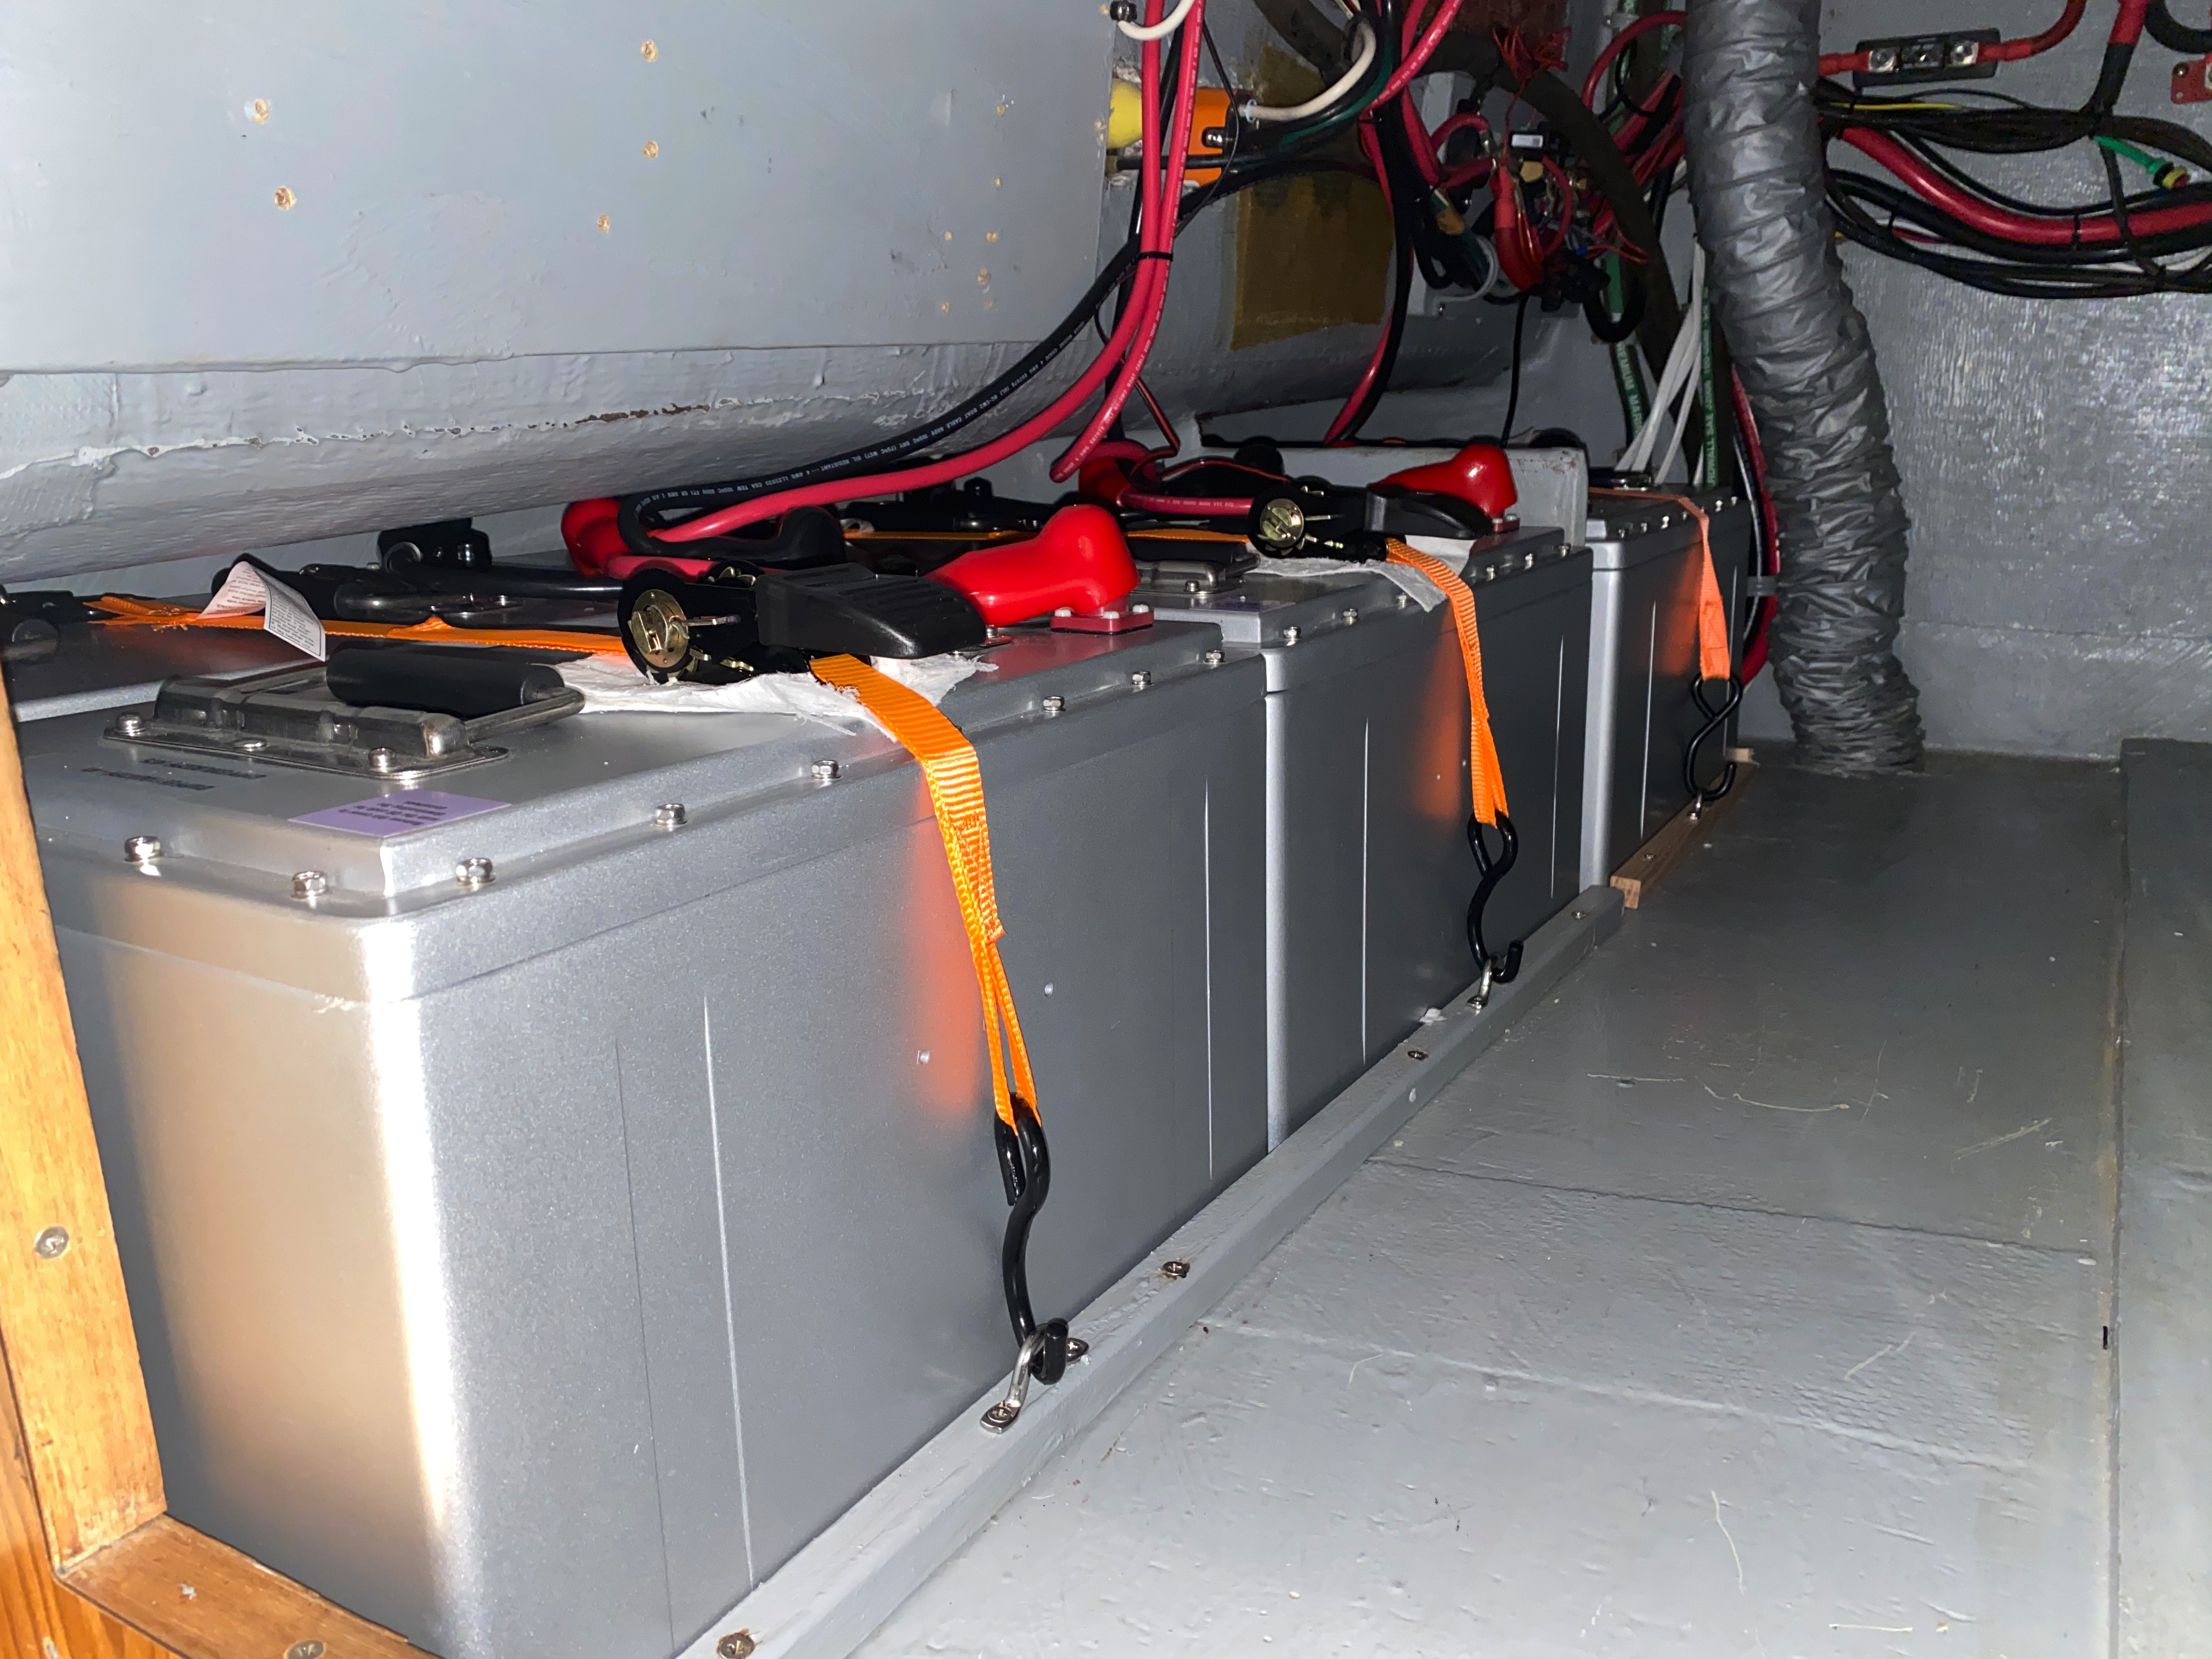
I spent the next many days getting the batteries properly hooked up together and secured for rough seas and cleaning up a bunch of wiring in anticipation of someday soon actually leaving a marina.
Panel Considerations
One thing I didn’t think about until much later than I should have was the electrical panel. Boats are usually designed with a front-door circuit breaker breaker + selector panel. You can select shore power (1 or multiple inputs around the boat) or generator, so that, just like with a home installation, you don’t back-feed into the grid. Then, you have a small AC panel that the inverter covers — usually outlets on the boat and the microwave. Then larger AC panels with the bigger loads on the boat that the inverter can’t cover — air conditioning, stove, water heater, etc.
This new strategy blows both of those systems out of the water. As mentioned above, the Quattro takes the generator input straight into itself, so you don’t need to “select” the generator anymore — it can just always be enabled, and can never back-feed into the grid. Also, we’re running the entire load through the inverter, so your runs go from shore power/generator through a front-door breaker, and then straight into the Quattros. Then the output from the Quattros go back and drive the entire AC panel. No more thinking about what works on the inverter or having to fire up the generator. Everything is battery-backed, usable no matter where you are.
This is neat and all, but since no one does a setup like this, there are no off the shelf panel building blocks to do anything like this. So, for now, I’ve kinda hacked my panels to do what I want — joined the “inverter” panel to the rest of one leg of the AC panel, removed the physical block between the generator and shore power connectors and now just use them as breakers, and ran the source wires back to the Quattro output for the panels. It required running a bunch of pretty large-gauge triplex wire (8 AWG for safe continuous 50 amp AC over these distances) back and forth ~6 feet between the panel and the back wall, but it worked out in the end.
Finally, I repurposed one of the 120VAC panels for 48VDC for now, mostly just to coordinate my two DC-DC converters for now, but hopefully over time I can get more 48V-native devices (like a windlass!), since it’s such a better power transport voltage.
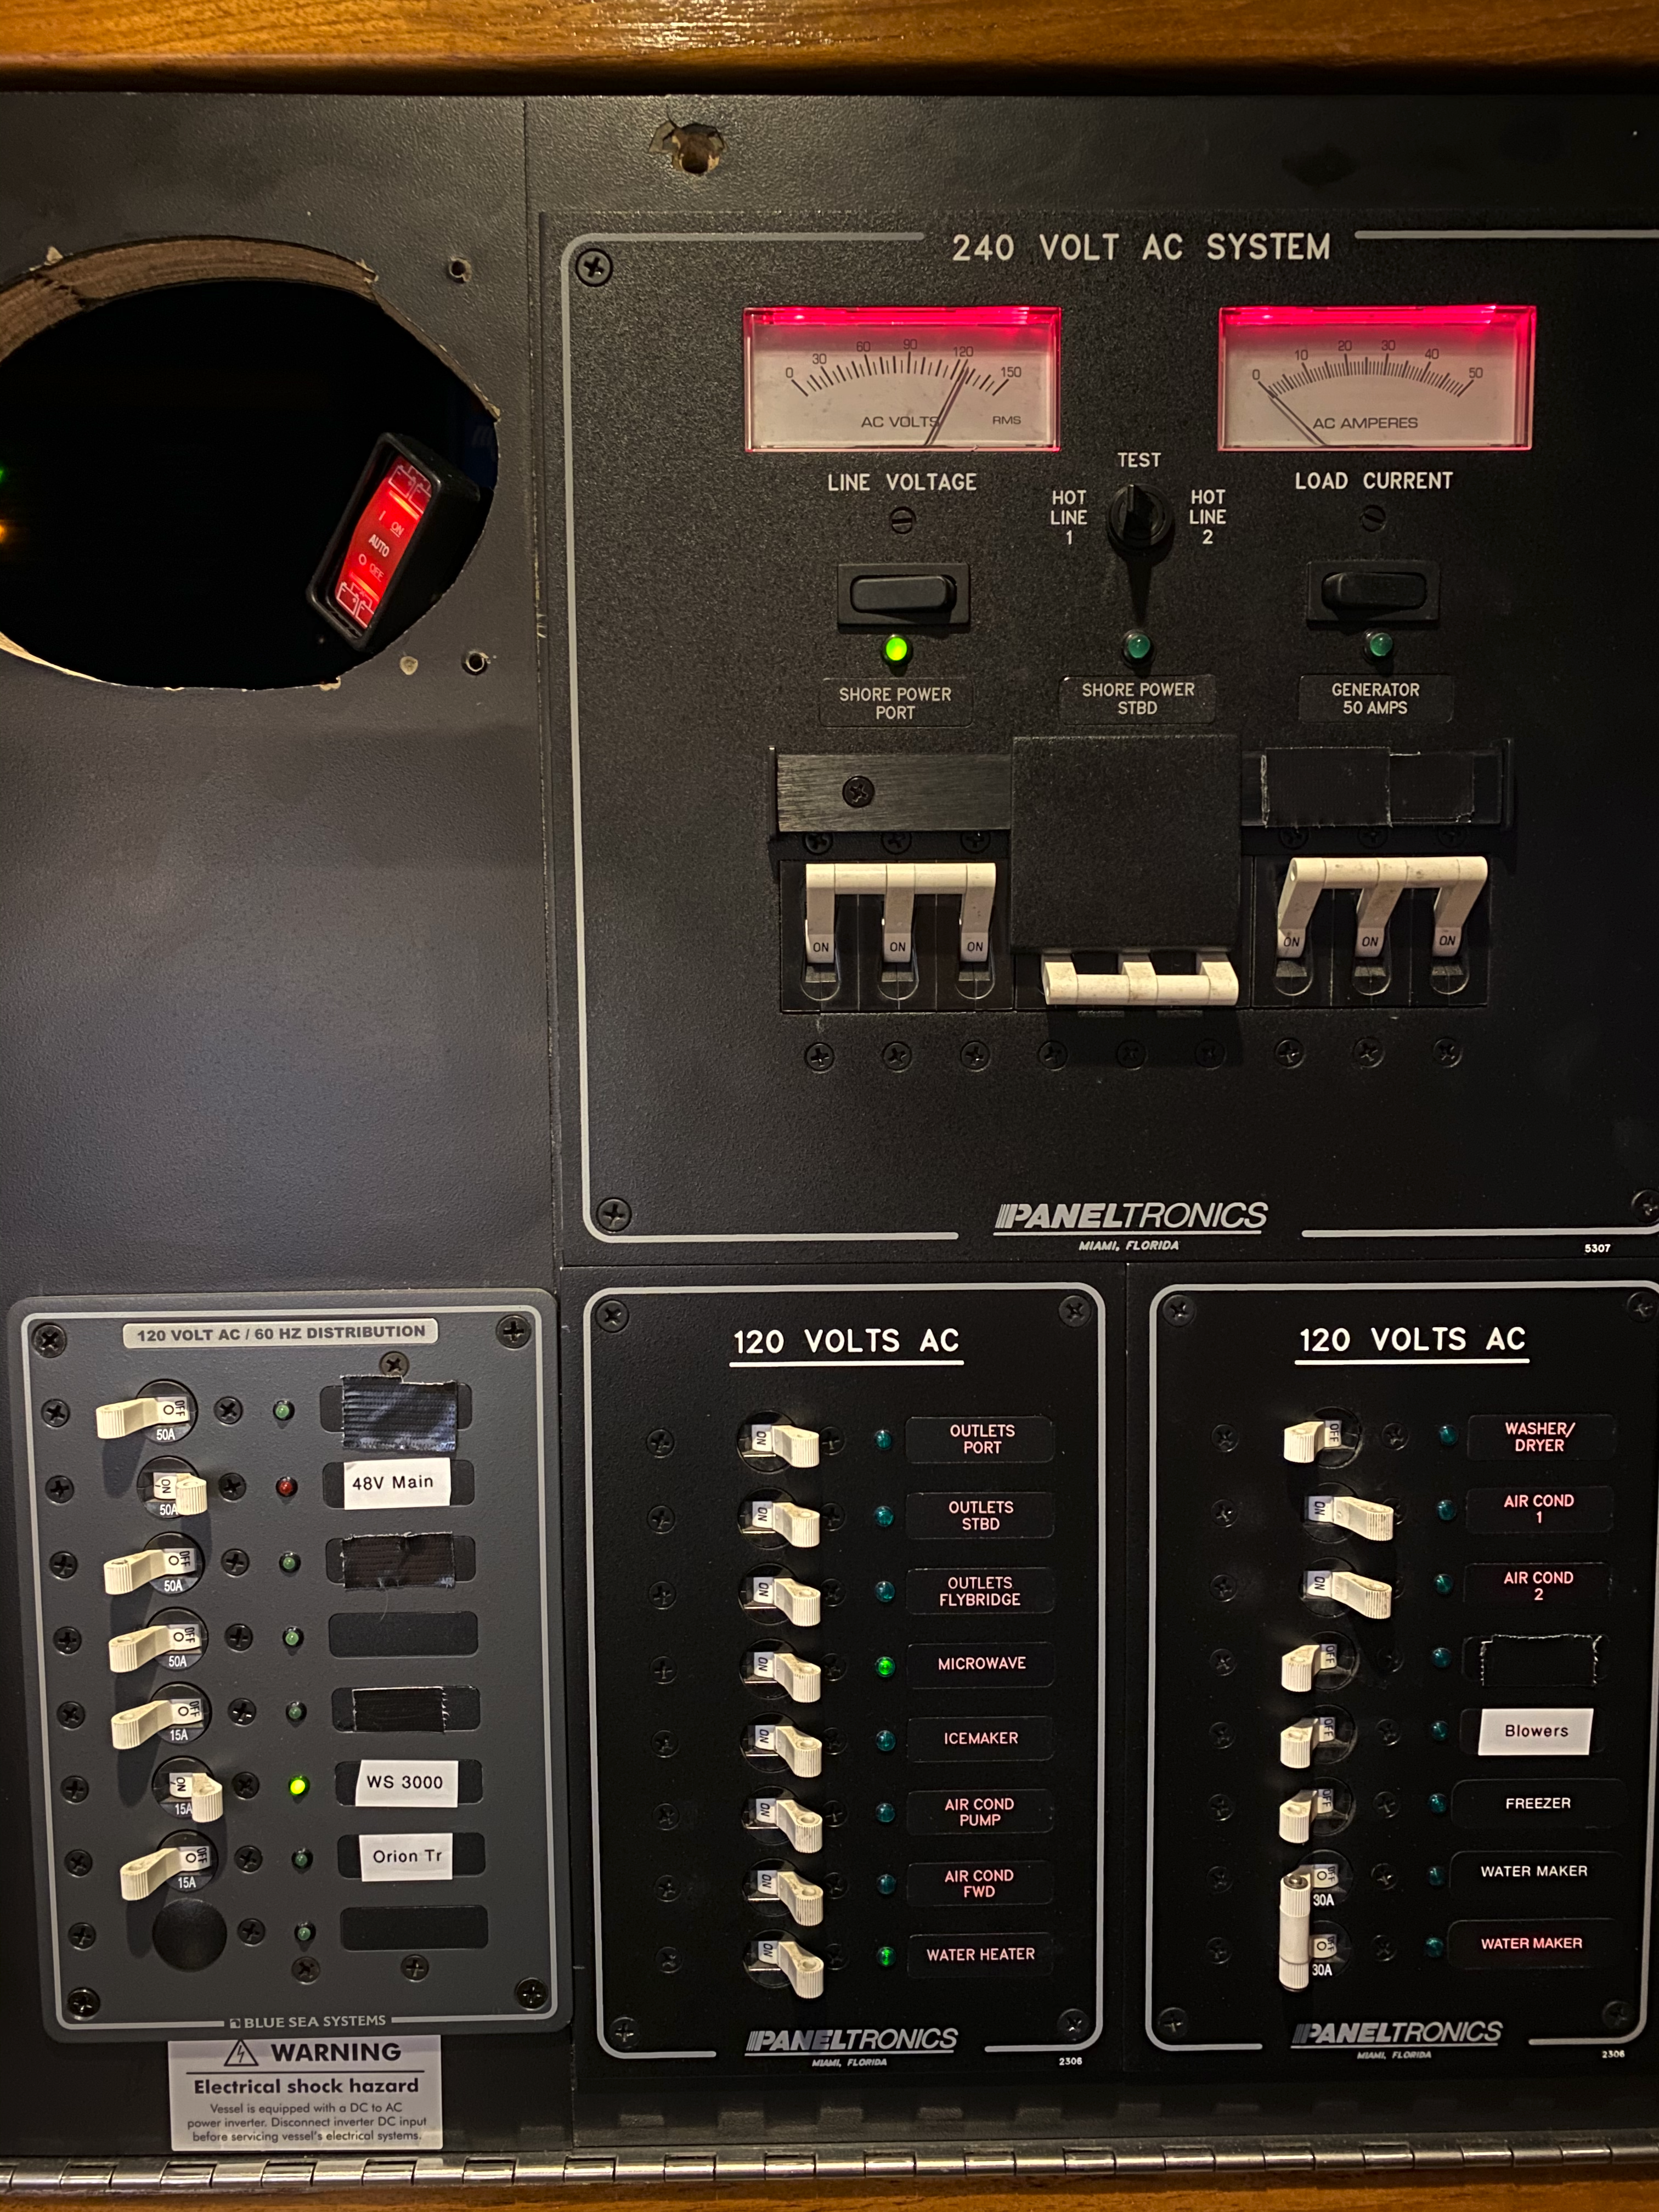
Once I get everything more final in the coming months, I’ll probably end up contracting with Paneltronics’ custom panel wing to build a new custom AC management panel for the new reality, but this all works quite well for now, in the end.
Monitoring/Observability
As a total dork, one of the parts of this system I was most excited about was the monitoring/observability aspect. On the old boat, there was pretty much just a voltage display, current in/out display, and state of charge number to the nearest whole % point. This new system is a little different.
The Cerbo GX is a cheap addon for your Victron network that lets you connect all of the individual pieces of your power setup and upload all the data to the internet for observing, as well as convert it to NMEA 2000 messages so the rest of your boat network, like chartplotters and Maretron displays, can display all the power information as well. It has a little touchscreen addon, the Touch 50, you can get for it as well that nicely mounts into your power panel and gives you quick access to all of the info on your power system as well as deep configurability through a touchscreen. It’s a pretty great little setup.
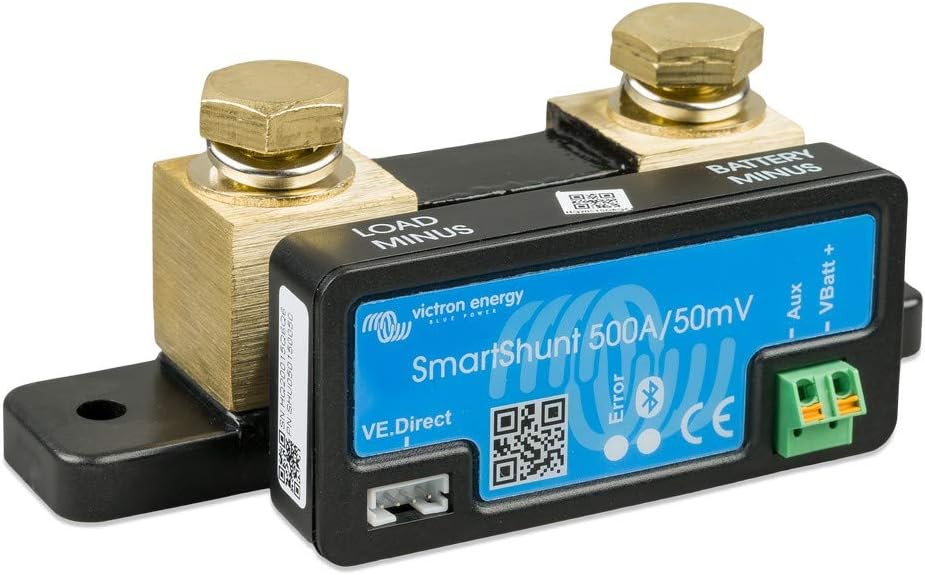
One of the key parts of the observability is the Victron SmartShunt, which is a nice little all-in-one current shunt plus electronics to measure it and integrate it into your Victron network. So I can monitor voltage and current in and out of the low side and high side battery banks and alarm on a whole slew of different characteristics, which was really helpful in the early WS3000 debugging days. It also allows monitoring an auxiliary battery, so I can monitor the otherwise-isolated starboard battery bank from next to the port one.

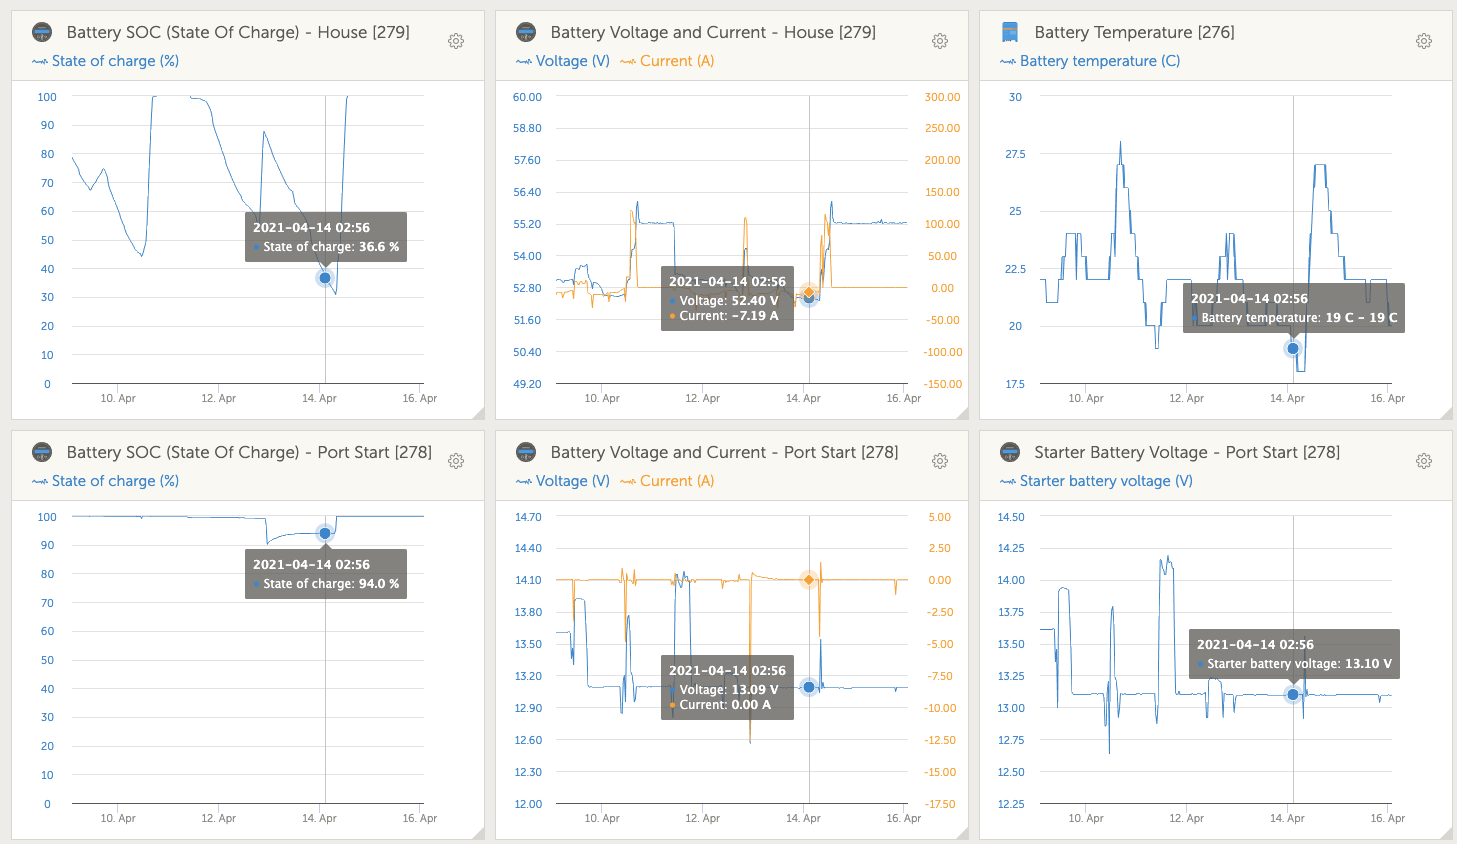
It’s a nice little interface that even does a calculation of how much power is “disappearing” outside of what it knows about for generation/consumption, and calls that “DC Power”, which happens to nicely correspond to how much power is going from the 48V bank to the 12V house loads. So, at a glance, I can see how much AC power and DC power we’re using, as well as the solar generation and house battery bank levels. Then I show the 12V port/house battery voltage and SOC levels on the little Maretron display at left there, along with our two holding tank levels.
The level of insight this system provides is amazing, both live and using the VRM portal to go back in time and see what everything was doing throughout the day, even showing holding tank level history.
Generator Management
One of the primary tenets of the new system was around effectively utilizing the generator when we do run it, and another was getting to the point of just not really thinking about power usage. So, I wanted to make the generator control fully automatic.
The generator is a 12kW Northern Lights unit, and has a pretty manual panel — you have to hold the preheat button for a few seconds, then hold the start button until it catches, then keep holding the preheat button for a few more seconds until it’s running nicely, then you can let it run until you press the stop button. Being a fully-manual two-handed operation, automatic generator start/stop wasn’t going to be as easy as it was on the Onan generator from our last boat, so I had to go digging.

I found an affordable unit by Dynagen, the TG-410, which you can see mounted in the picture above in the monitoring/observability section, that allowed custom generator control basically through plugging the oil pressure/water temp sensors in as inputs and then running the start/stop/preheat outputs through relays. Setting it up was fairly trivial, once I reverse-engineered the current generator wiring harness and made a new plug-and-play harness to the Dynagen that would let me fall back to the stock controller in a few seconds of swapping a big 8-pin connector. Getting the preheater timing, start-detection conditions, and sensor curves right took a little while (and I still don’t have the temperature one quite dialed in yet), but now it starts and runs without a hint of complaint, and stops when you ask it to. The next step was external control based on battery conditions.
The Dynagen supports taking an input where 12V = generator should be running, ground = generator should be stopped; and its job is to make those conditions happen. The Cerbo GX actually supports a complicated automatic generator management system via conditional setup that, in the end, powers a relay on or off. By putting 12V on the NO and ground on the NC lines, I ran the common output to the TG-410 and it worked right out of the gate. The Cerbo GX supports standard conditions like SOC-based low/high levels for start/stop, but also quiet hours, emergency low/high levels for during quiet hours, and even time-based runs (i.e. it’s been too long, please run).
After a few days on anchor to tweak the settings, I’ve settled on 40-90% runs during the day, and 20-30% runs for emergency night settings. With these settings, ideally I essentially never have to touch the generator myself, though I’m sure I’ll keep fine-tuning this for a bit.
WS3000 Tuning
A couple weeks after I got the main power setup working, the WS3000 alpha hardware showed up in the mail and I added it to the system.
It’s been a really interesting device to tweak. I’m still working through a bunch of learnings with Wakespeed, and we’re learning as we go. The bidirectionality is a nontrivial problem to handle. You need to detect when voltage falls below a threshold and immediately switch to pulling current from the high side to feed the low side up to a setpoint, but when the voltage rises above the setpoint on the low side, you get to pick when to try pulling current off it to charge the high side. But how quickly do you pull current off? Too quickly and you drop it below the setpoint and then you need to fill back in, and get in a really awkward cycle. Too slowly and you’re letting the alternator “charge” a full battery and wasting potential charging. So there’s a bunch to tweak.
After working through a couple major early kinks, we quickly got off to the races of a working system for the basics, and getting to the finer-grained tweaking. So far we’ve largely been playing with the hysteresis between charge points, and what to put the setpoint at to maximize charging from the low side but also keeping the voltage high enough to actually put current back into the low side battery in case you overrun the 3000 watt converter and pull some capacity out of the low side battery.
A really interesting problem we discovered early on was that the preheaters on the Yanmar diesels in this boat are hungry. Each engine pulls ~200 amps from its start battery for ~5-8 minutes after a cold start. The alternators are only 80 amps each under the best of circumstances, and I mostly measure around 45 amp output at idle, leaving a huge current shortfall for the batteries to fill. The WS3000, of course, tries to fill in for the shortfall, but it can’t quite keep up, so it does draw some current down from the start battery every startup. So we’ve been tweaking the voltage setpoint to make it so that it will charge back up after the preheaters turn off. 13.2V was not enough to get anything appreciable back into the start battery, but 13.6V has been a good compromise so far.
Similarly, when raising anchor, we have double the problem, since we have 200 amps of preheater on the port battery plus the windlass pulling 300+ amps as well, vastly exceeding the WS3000’s capacity. This is causing voltage dips in the whole house setup, causing some devices on the NMEA 2000 setup to freak out whenever the windlass is powered, so I’ll need to address that pretty soon with a buck-boost converter expressly for the NMEA 2000 setup.
Next, at 13.6V, you’re pretty close to the alternator output voltage, so it’s way harder for the WS3000 to figure out how much current it can pull off to send to the 48V batteries. So we’ve found that, at 13.2V, it can pull twice as much current than at 13.6V, so we have some competing interests here in the settings.
Finally, the solar setup on the boat was originally plumbed into the 12V side, but with the WS3000 in there now too, it was getting confused with multiple different devices vastly changing voltage levels and sending current in and out, so I ended up moving the solar up to the 48V side pretty quickly to simplify things for the WS3000.
I’m sure we’ll be tweaking settings for quite a while to really dial in the last effective charging nuances, but the system is already working really well, and I’m sure this will be a great addition to other boats trying to follow in my (and the other few alpha testers’) footsteps. Hopefully this writeup gives other people the confidence to come play in these waters!
Summary/The Future
It’s been a long road, but in a Marie Kondo world, this setup brings me joy. We have the battery capacity to run the A/C all night on anchor, wake up, take a shower with hot water because we just leave the hot water heater on, then turn on a crockpot for dinner that night, run a load of laundry, throw some lunch in the microwave, and spend the day playing video games on a power hungry desktop computer. On an extreme usage day like that, we only need to run the generator for a few hours to top off again in the evening. Working full time in more normal fashion, each of us separately taking taking daily showers, spending all day on our computers on video calls, cooking meals, and watching TV all night, we can easily go two full days on anchor before running the generator to catch up. If we were really being frugal, we could go a week or more in between topoffs. And this is before I even add real solar.
Over the coming months, I expect to keep tweaking things pretty steadily. I still have a lot of optimizing to do to get our power loads down while we’re on anchor — right now, I’m running a ton of electronics all night until I dial in a good anchor alarm setup that gives me confidence. And we tend to leave things plugged in all night because we can just be lazy now and not really think about it. This is really the real measure of success here — Hannah doesn’t even slightly think about power usage, and I only barely think about it, thinking less with each passing day. Living aboard and working full time while boating brings enough challenges, we don’t want to also be dealing with power management all the time.

I was originally planning on diving right into an enormous solar setup — my measurements say I can easily get around 3000 watts of solar onto the roof and still have walking access for maintenance. I’ve wired in a new (Victron, obviously) charge controller sized for it, all plumbed in and configured. But once I saw just how long we can go on the setup without generating, I pumped the brakes and haven’t gotten around to even picking which panel to buy yet, much less getting 8 of them delivered somewhere. The ~800 watts on the roof help quite a bit on good days, so I know that quadrupling the generation should make us essentially never need to generate. So I’ll get around to it. Just not as immediately as I thought I would.
I hope this inspires others to build setups like this on their boats, and I’ll keep updating the blog as I make improvements throughout the year. Feel free to reach out blow with comments/questions, I’d love to hear everyone’s thoughts.
Great write up, David.
Way over my head, but a really well done write up. Now to get a builder to do that right in the factory.
Yeah, I hope as components like the WS3000 mature and make a system like this much more plug-and-play that factories can start picking up designs like this in the coming years and just install it from the start. Nearly everything in this boat is positioned and routed poorly for a system like this, so I’ve been fighting a lot of uphill battles and did probably 20 hours of rewiring in the engine bays alone just to make this setup more viable. Starting from scratch knowing exactly what you would be doing, and ideally having an even bigger DC-DC converter available to power things like the windlass, would let you make a really slick setup.
Thanks for writing an amazing summary of the process. The 48 volt concept is a really interesting way to solve the problem. I enjoy reading your blog.
Absolutely fantastic writeup! We are planning on almost exactly the same thing except without generator and putting large efficient alternators on the two engines (5kW each) combined with big solar (3-5kW). The Safiery Scotty is exactly the same as the WS3000 – they developed it together – and being Australian we’ll use that one. Looking forward to hearing how you are going with it in the future, and maybe getting your input into our journey if possible.
Aha, Al mentioned working with testers in Australia. Didn’t realize it was being codeveloped!
I’d love to use 48V alternators on here for the same reason, but no one makes a 2nd alternator kit for my semi-rare Yanmar 6LY3 engines, so I’m going to have to get someone to fabricate something up at some point. I’m just nervous because of how much torque the thing is absorbing at 5kW, so I want to really get the brackets made correctly. But in the meantime, generator it is!
But feel free to reach out with questions, let’s compare notes!
Do you have any 6-months-later thoughts on the WS3000? I’m considering a similar 48V system for my boat, and wondering how well it worked out.
It’s still a work in progress. The high side to low side charge cycle is solid at this point — it augments low side as needed during cranking, preheaters, windlass, etc. and I never need to think about it. The low side to high side still needs a lot of work. You basically have to pick a set number of amps that it will pull from low to high side, and so you have to choose between a low amp rating that works across all RPMs but doesn’t utilize all of the ability of your alternator, or a high amp rating that only works when you’re at higher RPMs.
In short, I’m glad I have it, but it still needs work before I would suggest anyone less technically inclined than I am gets it. Al knows this and is deciding on what the right path forward is.